Designer
-
Posts
1,758 -
Joined
-
Last visited
-
Days Won
182
Content Type
Profiles
Forums
Events
Everything posted by Designer
-
Hi Captain Tim, I am enjoying your build but two alarm bells rang in me. The first one was when you said "the position of the temporary frame is vague". The position is precise, I looked on the S11 standard plan sheets, lo and behold you were right, they are missing. The gremlins took them. I reinserted them so here is the measurement on the side from the third station forward of the transom along the sheer which you should have on one of your sides, is 2 3/16" or 56 3/16" forward of the transom with the tape pulled around the sheer line. This measurement is to the aft side of your temp frame. I won't give you the other measurements because they will be hard to measure with precision now that the boat is folded. When the temp frame is in position on the sheer marks, use a level and make it plumb. The boat will be level when it is sitting on the level cradle and the boat is in it's correct fore and aft location. I apologize for the missing dimensions. The other alarm bell was when you said that you will trim the forward bulkhead. You may remove 1/8" bevel on the forward side of the bulkhead but it is not necessary. You need to force the sheer out until the bulkhead will fit in place. If you trim the bulkhead to the newly folded hull you will reshape the forward part of the boat, the first obvious thing will be a weak looking bow and a hogged sheer line forward. The lines of the boat and dimensions are very accurate and if the parts are cut precisely every part will fit. None of us are that good and there is a lot of marking and cutting which means there will need to be some trimming but how do I know when to trim? First, if you are diligent you should not be off by more than 1/8" or so. If your part is under sized the epoxy will fill it but say there is a gap at the keel line under the temp frame. This is where hull massaging comes in. If the temp is in its correct position then you need to try forcing the keel up to meet the temp. Try a prop from the floor up to the keel line, this should fix the problem. Lets say the bottom and sides fit the temp pretty well but you notice that the temp forces the sides away from the bottom on each side. this means that the temp needs trimming. The same rule will apply to the transom. What we are looking for is a nice fair sweet hull. Make sure that the keel and chine seems are together and look fair and spend a fair amount of time just admiring the boat as you look over every part to see if there are any tweaks that you can do to make her even sweeter. You will just have to live with anything you missed forever. Keep up the good work.
-
It is definitely Dawn Patrol. I have heard that they were doing fine when suddenly they were hit by a rogue wave. They have rescued the boat and are in good spirits
-
New B&B design stats: Design name: Henry Wilder Stewart LOA : 21" 53.34cm Disp: 7lbs 5oz 3.32kg
-
Taylor and Alan just launched the heir to the Stewart clan. You all may have noticed that there were no Stewarts in this years EC, and that is why. I thought that he was going to be really cool and launch himself to coincide with the EC but no, he decided to emerge in his own time. Design name, LOA and displacement will be posted later.

-
Jay I guess I need to tackle this post. To the best of my knowledge, I am not aware of anyone deliberately altering the sheer except for Emvrin in Malta who changed it from a CC to a cuddy, although I am sure that some may have gotten it wrong. Shay did indeed build a 20 but I recall that after it was built he confided that stretched the boat. I am not aware that he otherwise altered the sheer. He might chime in. The trouble with pictures is that they play tricks depending on camera angle, boat trim, focal length, magnification and lighting. Not to mention the finishing touches of the builder, like tapering of trim pieces paint lines, striping, rounding of corners and blending of faces can turn a rather agricultural look into a fine vessel or vice versa. I checked the numbers and the break of the sheer is 85 1/2" forward of the outboard edge of the transom which is only slightly more than your 1/3 rule. It has never been altered. When designing a boat we still have to follow the FFF rule, form follows function. Don't get me wrong, aesthetics play an important part. When designing the sheer break, we start by putting it where we think it should be, then the fighting begins. Is there enough length between the aft deck and the sheer break to land a large fish with the fisherman and crew with a gaff? In this case there is 62". Will the tumblehome interfere with landing that fish? Getting the cockpit height right so that it does not back flood when backing down, but no more so that the cockpit has enough height to be safe but no higher than necessary for landing that fish. Where is the CB/CG in light and loaded trim, the console and helmsman seat, framing and having enough structure to take reasonable abuse without being overbuilt, positioning the tanks to meet the CG? Can it be built by first time builders with good guidance etc. etc.. Having said all that, it still gives me great pleasure to see non boat builders like Len turn out such nice boats.
-
Spindrift 12 #1275 - out haul line anchor to boom
Designer replied to J. Cote's topic in B & B Yachts Forum
I am glad that the confusion has been cleared up, maybe I can muddy the waters a bit more by discussing how to use those controls. I have recently wondered if we are doing anyone any favors by having the adjustable outhaul when most of the time most people either do not know how to use it or are using it wrong. The most egregious act is to leave off the red line which acts as a cheap version of an outhaul car by keeping the the clew close to the boom and leaving the outhaul to just haul the clew out or in. When the red line is not used, the outhaul can only raise or lower the boom. There is never any need to lower the aft end of the boom as it just brings the boom closer to your head and makes it harder to duck the boom during a tack. It also tightens the leech and drafts the foot too much making the sail set inefficiently. We only have 4 sail controls. Mainsheet, boom vang, outhaul and downhaul/ halyard. The downhaul is on non reefing sails and the halyard is for reefing sails. To save duplication I will just use downhaul for both rigs. The mainsheet obviously brings the sail in or out but it also controls leech tension and mast bend which effects upper sail draft when close hauled. The outhaul effects the draft of lower region of the sail. the downhaul effects the draft in the forward part of the sail or luff. The boom vang controls sail twist when the mainsheet is eased. When sailing to windward in light air I have no downhaul on and I want the outhaul to give me a modest camber in the foot area of the sail and a slightly eased mainsheet and eased vang. As the wind increases the sail draft starts to move aft so downhaul will be tightened and the mainsheet will be brought in and the outhaul maybe tightened. When I bear away and I don't need to point, I start to power up, as I ease the mainsheet I let out a lot of outhaul, the downhaul will be eased unless the wind is strong. I start to bring on the vang if the is much wind, being careful not to over tighten the leech. When I get to a broad reach, the sail stalled and is no longer an airfoil, I switch to the maximum projected area by tightening the outhaul and downhaul as much as I can. When racing I will pull on the control lines many times and it really helps improve your performance when you get it right but if you are out sailing alone all of this could be as meaningful as shouting while alone in the forest. -
Spindrift 12 #1275 - out haul line anchor to boom
Designer replied to J. Cote's topic in B & B Yachts Forum
Hi Jan, A Harken eyestrap goes on the port side of the boom for the outhaul. There is a drawing from the top view showing how the cheek block and eyestrap share the same fasteners. -
Tim, A S11 should look good on a Beale 38. Those dimensions for the nesting version should work pretty well on the standard S11. It also depends on the davit spacing. I just based the length on the for end of the aft tank with room for fasteners at the forward end of the keel from midships. You could add another pair of H1558's on the forward end of the side tanks so that you could have any davit spacing that would work for your Beale. Aphers, The same goes for you in terms of davit spacing. You could do as you suggested and add some reinforcing at the chine forward on the inside and bolt on a pair of H1558's I don't know if either of you are going to sail your Spindrifts. I consider an Anderson bailer to be indispensable on them which works out perfectly for draining as you can trim the boat out level on the davits and the bailer will be at the low point except for the nestor, it will need 2. I like davits when they will work. While crossing the Mediterranean we enjoyed the company of crew on a 45' steel boat off and on. I once said " do you ever worry about the dinghy in the davits on an ocean crossing?" He said " everyone asks me that, ever since we left Australia, but her we are." We left Gibraltar on the same Levanter (east wind). We fetched up with them later in the Canaries. The dinghy was gone and the davits looked like pretzels. They got caught in the same Winter north Atlantic storm as we did.
-
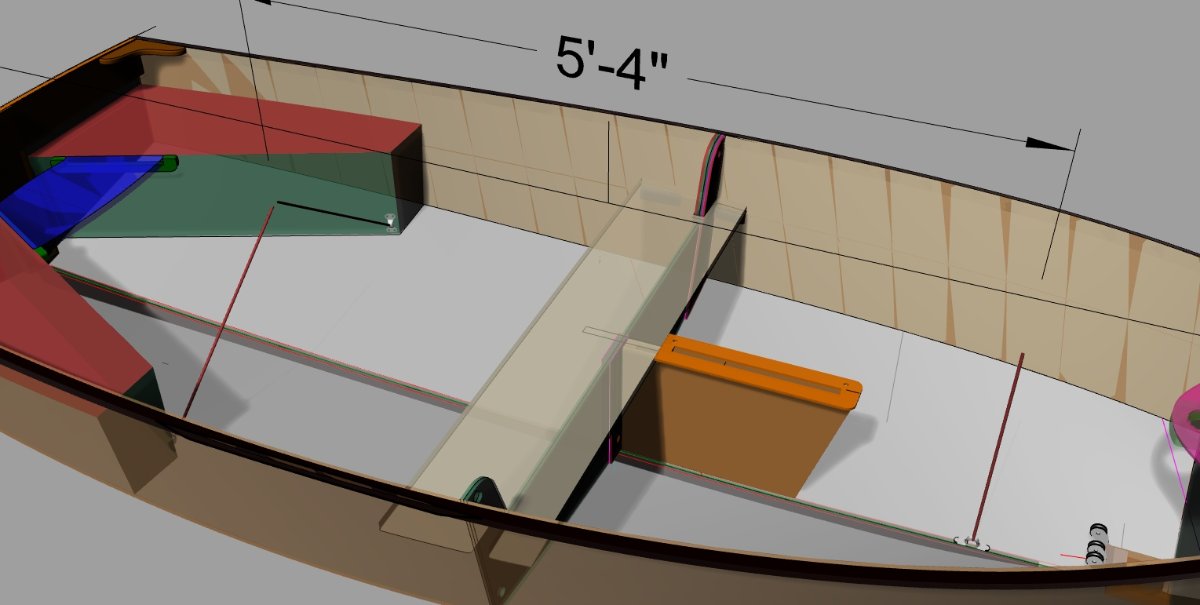
There are as many ways to mount hoisting hardware as there are different davits. A S11 needs a good size sail boat to be able to use davits. I like to use a 3 point attachment so that the boat will not tip over. The CG is well above the bottom. I am showing a 5' 4" attachment length in the renders, this lets you mount a pair Harken 1558 eyes trap on the forward end of the aft flotation tanks P & S. You can add a couple of 6mm ply backing pads on the inside, fillet and glass them well inside and out. The forward end shows a H 137 eye strap bolting through the keel. These eye straps take 1/4" fasteners. It is certainly a lot easier to build if you make these decisions before you put lids on the tanks. You better have open drains if the boat is going to hang in davits. One good shower could tear up the deck or break the davits.


-
Request for Advice, Coastal Camp Cruising
Designer replied to Don Silsbe's topic in B & B Yachts Forum
Don I like the tent. I am less than enthusiastic about your current sheeting system. In the light air you tried the new sheet arrangement anything will work. You should attach the sheet to the sprit instead the sail. The sprit is the strong point and can take any load that you are likely to give it without misshaping that part of the sail. I just drill a say 5/16" hole vertically thru the aft end of the sprit, just forward of the pin. You can pass a 3/16" line thru the hole with a stopper knot at the top and an eye at the bottom where you can clip your snap hook. I like to make that pennant 12" to 18"long, so that it will be just short of being two blocked when I have the sheet on as hard as it can. This gives me that much more sheet length and lowers the windage and cg for practically no cost. I prefer the sheet blocks back where you had them but with some quick disconnect for sleeping. The problem with your new system is that in a breeze you will end up with too much mast load and sail flattening when you need to point. This will not show up in light air. -
Tim, You just need 6mm okume ply for the S11n. Tom came up with the 1# per mm per sq. ft. rule. It is handy when we are roughing out a new design for estimating the weight. We have weighed a lot of ply over the years and it will vary from batch to batch, not to mention different species. I have never seen 7 mm okume ply. We used to be able to buy 5/16" back in the day. You would not be able to fold a 7mm Spindrift into shape and 4mm would not be stiff enough for the bottom, as you had surmised. We had an issue folding Spindrifts into shape when I was teaching boatbuilding at the local community college. The bow would sometimes crack, even days after it was folded, whereas it never happened at our shop. We realized that the CC shop was air conditioned and heated and was a low humidity climate. This dried out the ply making it very stiff. We started wetting the forward bottom panels before folding and eliminated the problem. If you are lucky enough to be building in a climate controlled environment or you live in the desert I strongly recommend wetting the bow areas before folding. We live in a high humidity environment. Occasionally it will be so damp, it feels like you can drink the air. We have had an offcut of okume ply which was so limp that we have tied it into a knot. The same piece a week later would have broken. Good luck with the build.
-
Lenny, Congratulations. She looks great, now for some fish. Brunswick Heads is a special place for me. My mother was born there, my uncle fished commercially all of his life from Brunswick and I had my first boating experience on the river.
-
Hi Carter, I am enjoying your build, you are doing a great job. I retrofitted the 35 gallon tank under the cockpit on my OB20 hull #1 that chick built. I did not see any baffles in it, nor was I looking for baffles because I was under the impression that they could not fit them in a roto molded tank. I have not notices any issues from the lack of baffles. Chick had installed a 15 gallon tank on the port side aft. I recently chopped the tank up to remove it from the boat to get rid of some superfluous weight and give more room for fenders etc.. I can assure you that there were no baffles in it. The 35 G tank is long and skinny and has all of the plumbing at one end including the fuel pickup and gauge float. It would seem that the obvious way to install the tank would be to put the plumbing aft to to keep the pickup in the fuel as it will be trimming by the stern while planing. Being a contrarian I installed it the other way. I don't like the idea of sealing the plumbing under the cockpit sole and I did not like the idea of a raised hatch in the cockpit sole. I cut a kidney shaped 6mm lexan hatch that was rabbeted into the sole which I seal with mastic that I can pry up when I need to work on the fuel gauge or plumbing. Being forward, it is under the pilot house. I can see the plumbing without having to open it up. My rationale was that if I am careless enough to run the fuel that low she will drop off the plane and force me to run her at sub planing speed which will give me the longest range to get to a gas pump. I ran her down to about 1/4 tank so far without issue. Another issue is that when planing, the fuel gauge shows less fuel than I have. If the tank was reversed, it would read high underway. I get a reasonable idea of the fuel level at rest.
-
Request for Advice, Coastal Camp Cruising
Designer replied to Don Silsbe's topic in B & B Yachts Forum
Hey Don, have you watched any of Roger Barn's YouTube videos on dinghy cruising? -
Request for Advice, Coastal Camp Cruising
Designer replied to Don Silsbe's topic in B & B Yachts Forum
Peter, if you think that my tent setup had too much windage, have a look at this. They had a pair of Hobie tri's and always cruised together. They each carried their own condo while sailing but set them both up on the one boat, port and starboard to keep it balanced. We did the Outer Banks 120 the summer before last. They said that the windage had not bothered them. We had thunder storms with squalls on two consecutive nights with the second putting us on a lee shore. I did see them walk the boat into deeper water when the storm woke me up but I think that it was more a poor choice of anchor setup.
-
Request for Advice, Coastal Camp Cruising
Designer replied to Don Silsbe's topic in B & B Yachts Forum
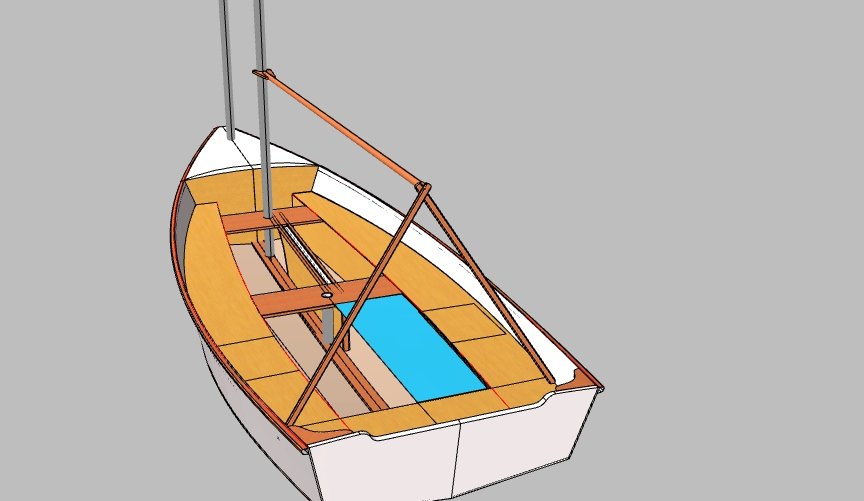
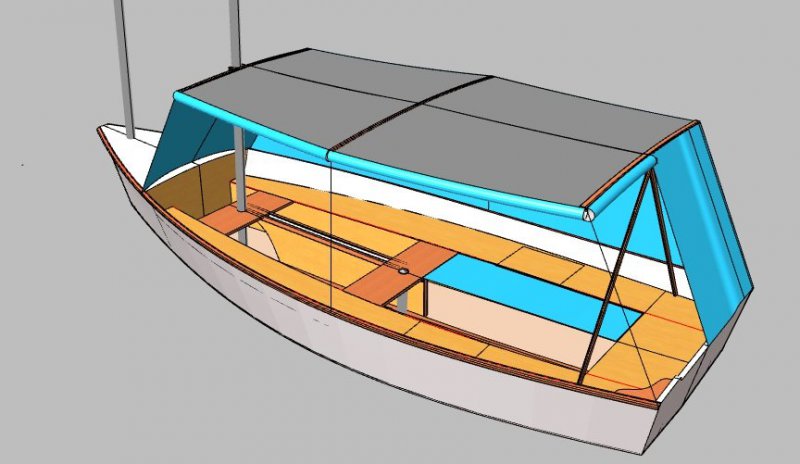
Don, you inspired me to post the boom tent cabin that I made for my BRS. It was a lot of work, Carla only got to spent a couple of nights on board in the Everglades. We enjoyed it a lot, we were with another couple with their BRS and day sailed after that. I spent a few night solo on board with it but I sold the boat to make room for my growing fleet. If I got to do it again, I would go with the same lift up floor boards to sleep on but buy a good small tent to save the work. Living in the south I prefer to sleep on board. I recall the walk we took at Bulls Bay seeing the alligators and snake not to mention those thieving racoons etc.. It started as a basic boom tent with dropdown sides. I moved the mizzen mast with the sail rolled up forward to the reefing mast position. I made a yoke out of 1/2" ply to fit around the rolled up sail with a pair of holes that was tied around the mast. the aft end was made with a fork that slipped around the front end of the main sprit. and was shaped to fit the fork on the sprit. It turned out very secure. The pin at the aft end of the sprit fitted into a hole on the scissor crutch when it was opened and tied with a piece of 1/8" cord and a hole drilled through the sprit. The top was made from grey Sunbrella with three battens. The roll was positioned over the sprit against the mast, lashed round the mast and the side strings of the forward batten were made fast on a pair of hooks under the gunwale using tiny tent guy toggles made out of 1/8" lexan for the 1/8" cord. I then rolled the top out to the middle batten and tensioned up the next pair of lines, rolled out the rest of the awning and tightened the last pair. I now had a good firm awning, which was a perfect shade. For a sleeping platform, I cut two pieces of 3/8" ply to fill up the cockpit giving me a 6'5" bunk, the width of the boat. To stow them while sailing, I turned them into floor boards. They rested on little cleats glued around the perimeter of the cockpit to let the ply sit flush with the seats. There was a fore and aft beam glued under the starboard floorboard centerline offset to form a rabbet to take the port floorboard. When alone I just used the starboard floorboard, shown in blue. This gave me good seating and mobility and a good place to turn the port side into a bench for the galley. With Carla on board we put the Porta Potti on one side of the trunk and the igloo on the other. The sides were made from some blue spinnaker cloth that we got cheap because it got screwed up in the dying process giving it a slightly striped appearance. All the vertical joins were connected with zippers and the centerlines were joined with velcro. The bottom edge was held with Dot snap fasteners under the gunwales. All told it performed very well. To work the anchor I just opened up the velcro center seam and stand in front of the mast. We would set it up similar to the render to shelter us from the late sun or privacy screen and still enjoy the view. If it was too windy for the stove, I rolled down the front half and moved the stove forward. I think that it was far more functional than a tent but you need to use it a lot more than I did to justify it. It obviously had a lot of windage but in reality it was not too bad. I never saw any wicked squalls but I thought I would drag the boat up the beach on rollers if I had to sleep on board in bad weather. Beside the tent roll which was 5' long and about 5" in diameter rolled up, the boom crutch was rolled with the tent and the ply yoke 5" wide and 9" long. The floor board were stowed under feet. Tom also made an excellent tent for his BRS. It was also blue and from the same cheap roll.

-
You are doing the right thing by making sure that you are not going astray. This is a critical stage and if you get it wrong it will be harder to get right. Having said that, I cannot see if you have a problem or not. The object is to be able to fair the sheer to the stringers and stem so that the planking will lay down flat to your bevels. The other hard part is to get it so that when you trim off the planking, there will be just the right landing for the gunwale to go on and look right in 3D. There some sectional views in the plans showing a cross section of these parts. Feel free to call Alan or I and maybe we can talk you through it.
-
Ken, Here is an article on sound deadening for engine rooms. practical-sailor.com/blog/reducing-boat-noise There might be something that you can glean from it.
-
I agree with Dave said. It does look like our typical treated southern yellow pine which I have used many times for gunwales. What I like about it is that it will be better seasoned and is less likely to turn into a snake after it is ripped. After I rip the laminations, I look over every one and select the end with the straightest grain and mark it forward. I will select three for port and the three for starboard so that I know which way to cut the bevel on the bottom edge. The forward end has to take the most bending stress.
-
Chick is correct, the mk3 is a different boat.
-
That BoM is wrong for the S11n. It is correct for the non nesting version. I recall that the actual length is 11' 4" and rounded up to 12'. You need 3 lengths of 1x2. In the US a 1x2 real size is 3/4 thick and 1 1/2 wide. To keep the fair shape of the boat after it is cut in two, we need to laminate the gunwales around the boat in three layers. Allowing for the saw kerf after ripping 3/4" stock you will end up with about 5/16" laminations and will give you close to 1" thick gunwales, this is close to perfect for that boat. We typically use 2 x 4's, real size 1 1/2 x 3 1/2 and rip off 6 - 5/16" slices. You will just have adjust to whatever is available over there.
-
I have not seen treated fir but I would choose it if given the choice. Fir is stiffer than pine which can be a negative when bending gunwales around the boat. In your cast you are laminating the gunwales in three thin strips, that is not an issue. I have found that treated wood epoxies well as long as it is dry. Around here it is almost dripping wet when it arrives at the lumber yards. I search for older stock, this has the advantage that I can see how it behaves when seasoned.
-
Douglass Fir is very good for gunwales, I have used it many times. My current preference for a tender that will be covered with fendering is to use treated pine to prevent rot. I have seen a lot of gunwales rotted out from many wood species because the fender keeps them wet. It is worse if you hold the fender on with fasteners.
-
I had been thinking, with the promise of mild weather for the next three days of going out to see if I could find a way through the maze of shifting sands to the new Drum Inlet that a hurricane had cut a few years ago. With the call for help to rescue the kayak, I shelved the idea. By the time we brought the kayak home I thought that maybe the weather would let me do both. I had been fiddling with the outboard/ transom height and found that out in open water that there was some cavitation. I needed to drop the motor back to the previous hole which was the reason for hauling the boat. I got away much later than I wanted and I still had to fuel up. I left a few critical things behind, the loss of the depth sounder was just a minor annoyance. When I made it to where the channel ended , the wind was stronger than forecast with a good chop and whitecaps. The sky was overcast with the light in my face, I just could not read the water and did not want to risk running aground and bounce the spinning prop and outboard leg on the bottom while pitching about 1 1/2 feet. I had been out to the old Drum inlet in my BRS and if I had been in it, I would have set the board to about 18" below the bottom and used it as my depth sounder and pushed on. Yes I have heard of a lead line and I own one, it was not with me. They are accurate and reliable. I still would have aborted because I find it hard to work a lead line single handed and get back to the helm every few feet with the bow blowing off when I stop. One of the compromises of a planing hull is that there is no lateral plane allowing the bow to quickly blow off. I try not to make decisions in haste so I elected to run over to Atlantic and get some shelter in the lee of the breakwater and have breakfast and plan a course of action without pressure. I looked at several options and decided to leave the inlet for another day and go up to Hog Island where I could try my luck in shelter. Luck was not with me so I had lunch and headed home taking the time to revisit Vandemere Creek. It is not a big deal that I did not make it to the inlet, I view the trip as a success. I had a wonderful time, travelled more than 100 nautical miles over three days with the boat performing flawlessly and the inlet will wait for me.
-
North Carolina Challenge 2020 is happening NOW
Designer replied to Alan Stewart's topic in B & B Yachts Forum
Joe, that is an old picture taken at Key Largo. If you click on towndock.net you will see him arriving at the finish in Oriental. He got in just before the weather deteriorated and will likely be the only finisher for a while.