J. Cote
-
Posts
66 -
Joined
-
Last visited
-
Days Won
1
J. Cote's Achievements
")


-
My gosh, he is so alert! Love the first picture of Taylor holding him. Congratulations to you.
-
Spindrift 12 #1275 - out haul line anchor to boom
J. Cote replied to J. Cote's topic in B & B Yachts Forum
Huh?......? Sorry Graham, I think I'll have to read this a dozen times while staring at the drawings before I have even the slightest clue what you're talking about. I'm sure I'll have to sail the boat for a while before I truly "get it". I'm going to save your quote for a "smarter Jan" in the near future. ? -
Spindrift 12 #1275 - out haul line anchor to boom
J. Cote replied to J. Cote's topic in B & B Yachts Forum
Thanks Alan. I'll get acquainted with your schematics & description above and get back to you via email. This is helpful. -
Spindrift 12 #1275 - out haul line anchor to boom
J. Cote replied to J. Cote's topic in B & B Yachts Forum
Nope, don't have one in my kit or in my invoice list, Let's see what Alan/Graham recommend. Thanks for the photo. -
Spindrift 12 #1275 - out haul line anchor to boom
J. Cote replied to J. Cote's topic in B & B Yachts Forum
Thanks Joe. Alan & Thrilsbe collaborated on my hardware at a time when I didn't know what any of this stuff was, let alone where it goes. I just recently opened the bags to figure them out. Alan/Graham, what do you think? -
Spindrift 12 #1275 - out haul line anchor to boom
J. Cote replied to J. Cote's topic in B & B Yachts Forum
-
Spindrift 12 #1275 - out haul line anchor to boom
J. Cote replied to J. Cote's topic in B & B Yachts Forum
Thanks Joe. I don't have that top view section or that page in my plans. Now that you showed me a cheek block, I know what that is & I don't have that either. I am not doing a reef line, so that may be why my hardware is different. I have eyelets, so I think I should bolt eyelets on the port & starboard sides, across from each other & share bolts. I'll tie the outhaul line to the port side eyelet & use the starboard eyelet as a cheek block. Do you think that will be OK? -
Spindrift 10, #1329 -- "Seabiscuit" . .
J. Cote replied to Pete McCrary's topic in B & B Yachts Forum
Very clever! I appreciate your photos. I'm finishing an S12 now & you've taught me a few things.... like how you attached the halyard & gooseneck so that your mast will still nest for storage. Your photo of the end of your boom answers another question I had about how to route the outhaul line. Thank you! -
Spindrift 12 #1275 - out haul line anchor to boom
J. Cote replied to J. Cote's topic in B & B Yachts Forum
Hi Graham, I looked through all my plan sheets carefully & couldn't find the top view you speak of. So there is an eyestrap on both sides of the boom? If that is the case, I can picture the 2 eyestraps sharing "bolted fasteners", but I can't picture the beckon block & eyestrap sharing fasteners because they are at right angles to each other..... -
Spindrift 12 #1275 - out haul line anchor to boom
J. Cote replied to J. Cote's topic in B & B Yachts Forum
Thanks, I have that same view on my plans, but it just shows the line going behind the boom. I suppose an eyelet could be back there to run & knot the end of the line through. -
How does this out haul line attach to the boom on the port side? Or does it?

-
Spindrift 10, #1329 -- "Seabiscuit" . .
J. Cote replied to Pete McCrary's topic in B & B Yachts Forum
Actually, I think I answered my own question. I'm going to remove the thick selvage edge from the top 3" wrap so the taper is more gentle. Thank you all for helping think this through.
-
Spindrift 10, #1329 -- "Seabiscuit" . .
J. Cote replied to Pete McCrary's topic in B & B Yachts Forum
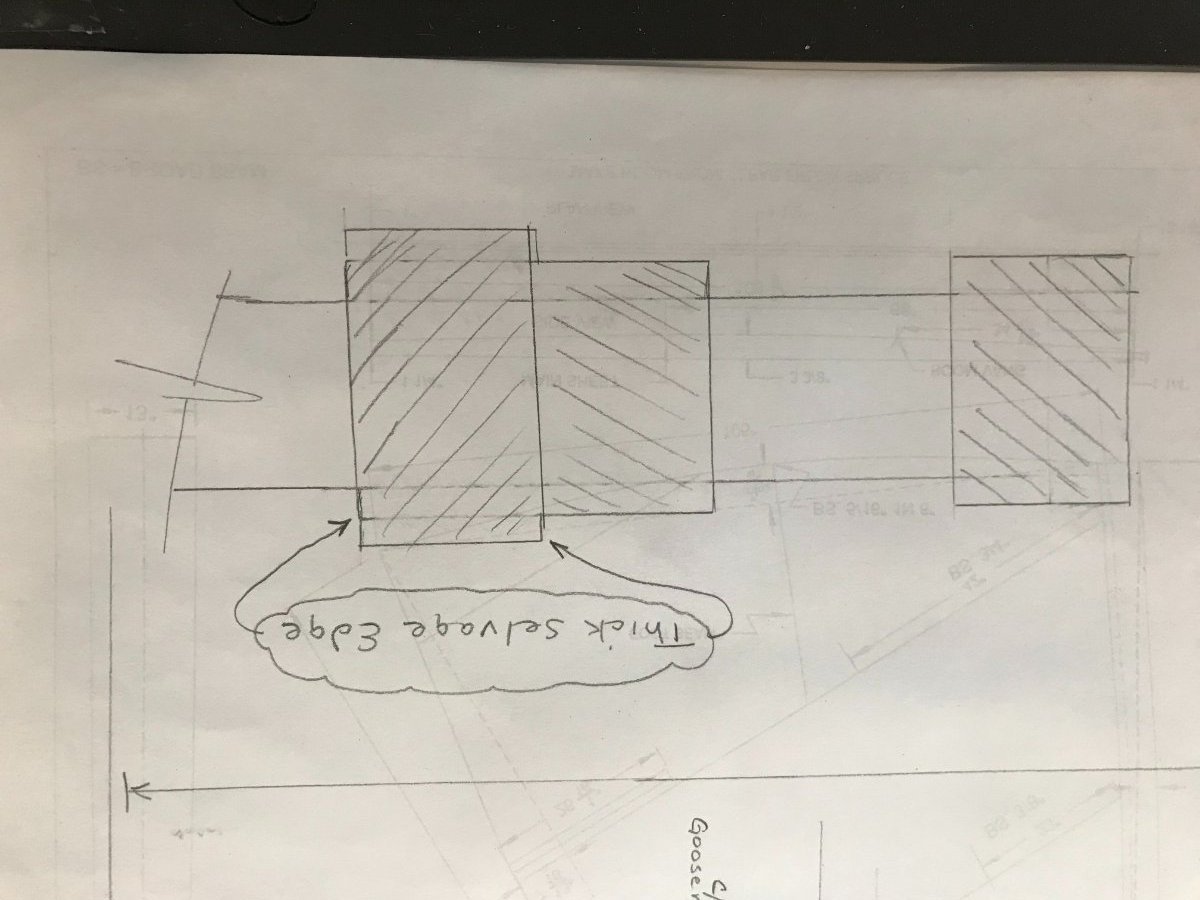
Thank you Pete & Hirilonde for your descriptions. Did you pay attention to the FG thicker selvage edge? My impulse is to position them as shown....
-
Spindrift 10, #1329 -- "Seabiscuit" . .
J. Cote replied to Pete McCrary's topic in B & B Yachts Forum
Hi Pete, I like your mast for transport. My question is: How do you make your bushings so the tubes can separate? Do you slightly overwrap them with FG/epoxy & let them cure separately? Then sand them to a snug fit? I assume that if I make the bushings & insert 'tube in tube' while wet (like Alan's CS video), it will cure permanently fused. This is my first mast so I'm not sure of myself. Thanks. -
I think you found the 3" explanation, Graham. My plans show a wood plug 6" long with 3" in the tube, 3" out. Alan shipped me the plastic plugs (top & bottom) so I can visually understand their impact on length now. My plans also show a wood upper section. I was pleasantly surprised to find an aluminum upper section in the kit. However, on the plans, the 230" total length appears to visually include the wood heel plug (of +3").