Designer
-
Posts
1,758 -
Joined
-
Last visited
-
Days Won
182
Content Type
Profiles
Forums
Events
Everything posted by Designer
-
Don, I am my worst enemy when I get pushed hard. I say it is only my boat and I can fix it when I return. Suddenly a year or two passes and it bites me in the butt. If I can help someone understand the ramifications of not doing a proper job, then it is worth it. Here is the 12" extended board in the up position and down. Now that it all fits I can close the trunk and glass the joints in the board and then glass the whole board. You can see some of the damaged keel after the worst of the strings were planed off in the above photograph. I think that I will be able to save it, thanks to epoxy.


-
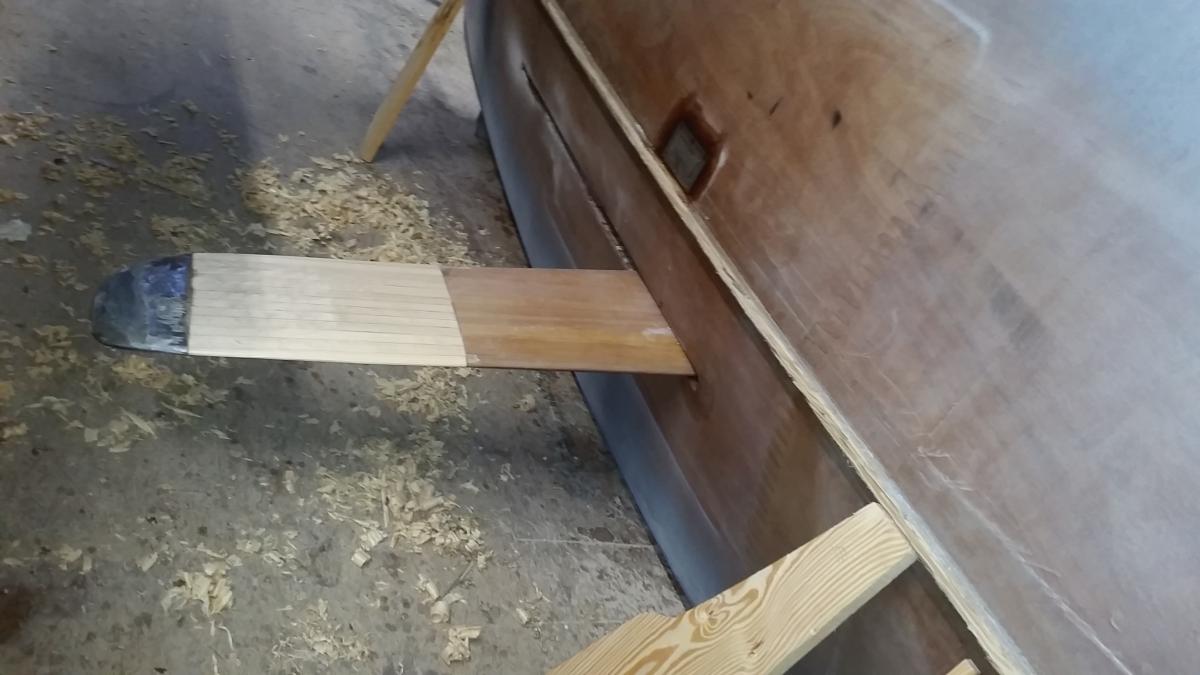
Progress has been steady . I have been getting some work done between Christmas celebrations, I will get back at it tomorrow. Carlita was lifted off of the trailer and set on her side on some blocking on the floor. I kept the cum-alongs in place and added a couple of props under the keel. This allowed easy removal of the centerboard and after adding the extension I was able to fine fit it to the trunk before gluing the ballast tip onto the extension. I was impressed with how hard it was to remove the lead tip. I have had builders getting concerned that there were no bolts connecting the lead tip to the board. You can see the stub where I was able to peel back the layer of glass tape and the layer of glass sheathing with the heat gun and a blade. I must not have gotten enough heat into the lead because I broke wood fibers as it I broke it off. There were couple of issues that came up, both caused by me. In my desperate rush to get her to the EC in time I did not seal the top end of the board. It looks like there was only one coat of epoxy and it looks quite porous. The first indication of an issue was that the board was a lot tighter in the trunk than it was. The end grain allowed moisture in and there was some swelling. The rest of the board except for a couple of dings from the trailer where I forgot to raise it before launching was as good as when built. I now have the time and will get it done right this time. The other issue was the keel did not even get a coat of epoxy and it is pretty nasty. It has started to be dressed up and will be well sealed and be capped with 3/4" hollow back Stainless steel. The other job that was not done was fairing the bottom, I will start on it soon. I am off to a Christmas dinner. Merry Christmas to everyone.


-
It is good that you are on top of this, but you do not need to sweat it. It is the best time while the boat is very malleable to get it true because as the boat gets stronger and stronger as the structure comes together, it will get ever harder the straighten out. You should be able to wrack the boat easily at this point. If the stern cradle is solid and level you can twist the forward cradle to bring the boat back to true. If you do not have a forward cradle you can use a piece of wood , say 1 x 2 or whatever as a prop down on the floor on the low side forward and a clamp to the side of the boat near the sheer. You can lift up on the boat and clamp, then check the twist, adjust until it is true. I have used gravity by hanging a C clamp on the high side forward to untwist. If a C clamp is not heavy enough I have hung several more off of the first one. I have twisted the boat the other way for a while hoping that when it springs back it will come back to true. Sometimes it is difficult to find the root cause of the twist. If your panels were true and it is neat and evenly tied together, just carry on but keep an eye on it until you are done. Once the decks are on you will own any twist that you have built into the boat. One of my favorite ways to check for twist is to have a vertical center line on the transom. Stand back about ten feet if you have the room and sight down the centerline on the transom lining up the center of the stem. Keeping that alignment, I lower my eye until the transom crown kisses the top of the forward bulkhead. If the centers are aligned and the edges of the forward bulkhead are hitting the transom top at the same time, the boat is twist free. If one side of the bulkhead is higher, you have a twist. It may sound convoluted but once you master it you can check your boat in seconds without having to use tools. Of course it depends on whether the forward bulkhead is in its proper place. If I am checking a new boat and observe a twist. I check if the forward bulkhead is in its place by measuring back from the center of the bow to each side to make sure that the bulkhead is in square to the boat, if the bulkhead is set below the sheer, I measure down from the sheer on each side to make sure that they are the same. When overseeing large boat building groups I can wander around the classroom and monitor the entire group in minutes every day.
-
Thanks chick, for answering Beacher . Chick you had the Breeze going upwind very well at the lake and I never caught up to you at the messabout to see how you did it.
-
Chick, Anyone who knows me knows that I am against leeway. If I was the legislator in chief I would work both sides of the aisle pass a law against it. Until then I will do whatever I can to avoid it. Kidding aside, during my summer and fall sails I was starting to think that it was not as bad as I thought and I might not bother to change it but I got another race coming up which got me fired to make it as good as I can. It will now probably a downwind year.
-
I am lengthening the board because the boat makes a bit more leeway than I like. I usually err on the larger end of the spectrum accepting a wetted surface penalty versus leeway but weighing up the pros and cons I went a bit too far the other way. She was well balanced and steered for about 70 miles to windward with the helm tied during this years EC. As the board goes vertical when down the extension should not make much different with balance. It will make some difference with the board half way up but I will have another EC to get to know how it worked out.
-
It is good to be putting her back together. I got some parts made and glued in.

-
Steve, It was a cool night but the port kept the cabin from getting stuffy and there was no condensate under the deckhead in the morning. The Nicro solar vent does work, I have installed several. I won't be putting one on Carlita as it would have gone under water in our capsize test unless it was on centerline and I do not have much centerline real estate left. They can be a bit noisy when you are trying to sleep but they can be turned off. There is no reason why you cannot install both. Sometimes nothing short of a 2 ton Carrier will work. If it is not raining an open forehatch and open companionway will do good things plus you can amplify it a bit more with a wind scoop. The port was on the downside during our capsize test and it did not leak.
-
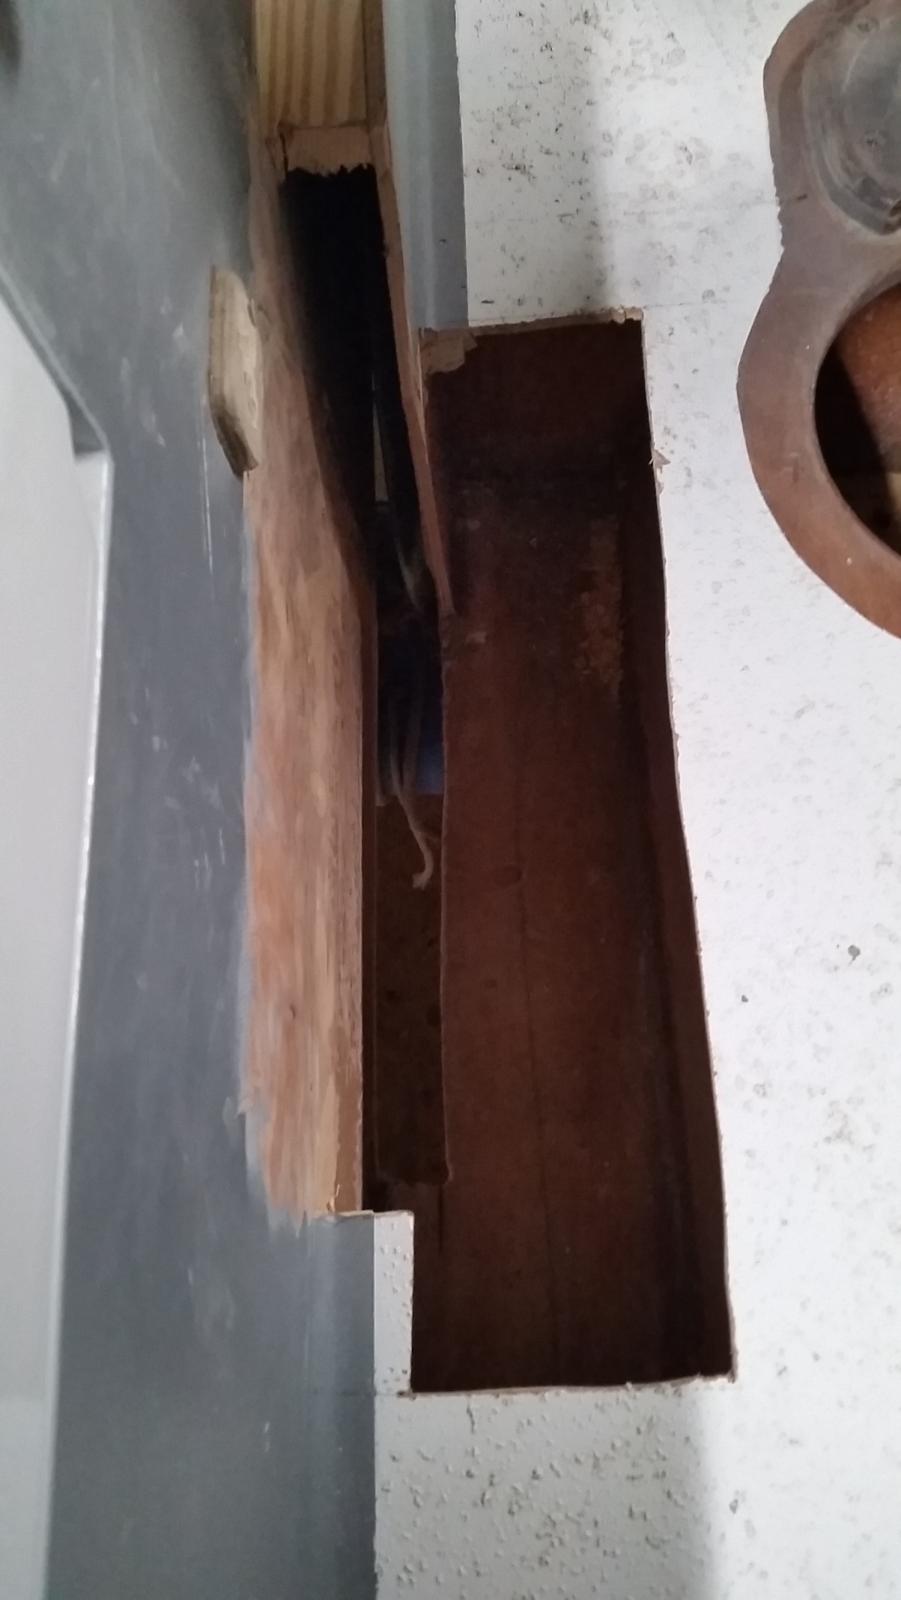
I have been considering all summer whether to increase the size of the centerboard or not. I have a window of opportunity and went with it. The pre-op went well and yesterday the surgery got going in earnest. The picture shows that the aft end of the trunk has been removed and part of the cockpit sole was taken out to allow for working on the inside of the trunk extension and the slot has been extended. The top edge of the picture shows the beginning of the scarf cut into the trunk cap. The mizzen mast step is in the upper right of the picture. It is a good day for epoxy so I am heading to the shop to start building the trunk back. Tomorrow I plan to lift the boat and remove the board so that the ballast tip can be removed and a 12" piece be added and the tip put back on. The cockpit sides and trunk were left in primer until I finish this job.

-
Steve, Alan is correct, I could not fit a hatch to port because of the bowsprit. There will be times when there will never enough ventilation. I am still planning to fit a dodger on the boat which will allow me to have the hatch open in the rain. Beth and I slept in the boat during MISCF, Friday night was raining and the boat was completely closed except for that port. It was quite pleasant on board. If we had opening ports in the hull, they would have been closed.
-
The high roach sails were put on to the mark 3 to take advantage of the extra stability gained from the water ballast. I could have just used longer masts with less roach but there would have been problems with long masts on the trailer. As designed you just hinge down the main mast into the inserted mast crutch in the mizzen mast step, lay the mizzen mast alongside in it's crutch and you are done. Tidy up the rest of the gear and you are off down the road. Alternately you could undo the main mast tabernacle bolt, disconnect the masthead light wires and move the mast forward and reverse it to go sailing. I think that I will stick to the former. My goal with the mk3 was to make her perform about equal to the mk1. In this years EC, John Bell sailing his Mk1 nearby with my mk3 in fast running conditions stayed together for mile after mile. At least in those conditions they were very equal. I use the shute on the bow sprit. It is something that you can add or not.
-
Don, The Spindrift reefing system will not work with a sprit. I think that with common sense, the rig that you have will work for coastal cruising. You just have to anticipate the weather before you set off or find a somewhere to stop to reef. The biggest open passage that I did in my BRS was from Oriental to Beaufort around Cedar Island and down Core Sound. Because I was racing, I did want to reef. She handled everything well until I got past the western end of Harkers Island. The wind was hard and on the nose and was against the tide with a wicked chop. About every fifth gust heeled me over to the point that I shipped a small amount of water. This started coming in faster than the bailer could handle. I realized that if I did not do something I would sail her under. I reluctantly hoved-to and bailed her out. After a while Carrot Island came closer and the fetch shortened and the nasty chop reduced and everything was good. Had I not been racing I would have pulled up to the lee side of Harkers Island and reefed and everything would have been fine. Even when pushed hard, her handling was predictable.
-
Core Sound 20 Mark 3 Build - Chesapeake, VA
Designer replied to AmosSwogger's topic in B & B Yachts Forum
Amos, Back in 93 I used Brightside directly over epoxy. I think that I was using SystemThree epoxy at the time. I believe that the paint reacted with the amines in the epoxy which prevented it from curing. It almost cured at the surface but it was clear that it was soft under the surface. Fortunately I stopped before removing the paint became a major problem. I took the boat to the Wooden Boat show at Newport where the Interlux people got an earful from me. I felt that they knew about it as they said that you should never put Brightside directly over epoxy. They later put it on the can and on paint guides. They want you to paint the epoxy with their epoxy barrier coat before you use Brightside. Anytime that you want to try a new one part paint over epoxy, you should always do a test sample before you create a big problem. I ended up using latex exterior gloss on the interior of that boat. It was never very glossy or very tough and it could stain but the best part was that before a boat show, I opened the can of paint and dabbed at any wear or stain marks and it dried in 10 minutes and it all looked fresh with no sign of a repair and I cleaned up with water. Jay painted the inside of his 20 mk3 with latex and I thought that it looked pretty good. I was talking to Tom about it at the messabout, he told me that he used Brightside on the inside of Liz and had issues with mildew. I plan to eventually paint some of the interior of Carlita with Latex but I definitely will not be painting inside my lockers. -
Steve, I have running backstays that I employ when there is any wind. The masts can take a fair amount of abuse, you will notice during the capsize test that sometimes one mast was doing most of the work.
-
The weather was nice after work today but the wind was too light for real sailing. I wanted to try the spinnaker so we motored out to the wind line. I was well satisfied with the way it set. We could carry it quite deep without the interference of the other sails and could carry it a little forward of the beam. We could probably carry it a fair bit higher with the other sails up and some more wind. I think that it will do a good job. Got to try out Alan's oars from Southbound, they worked well. I will compare them with mine over the next couple of days. Mine are heavier and a bit longer and the oar stops are in the wrong place. I tried rotating the first picture but it keeps showing it on it's side.


-
At the dock capsize test. We got to capsize Carlita yesterday and Alan just uploaded the video to our website. I am always happy to see that the tests confirmed the calculations. Of course real life conditions are not always like it is at the dock. If you watch the video you will see what happens when I forgot to dog down the fore hatch. It was no problem in calm water. The other positive result I noticed was that when the stability ran out with the main mast about a foot under the water, the buoyancy of the sealed masts stopped the boat from wanting to invert. All the calculations are worthless if hatches leak or fail or the mast fills up with water or gear stowed below can move.
-
This ply came from us. We only use the finest European made okume ply made by the Allin company in France. http://www.mcilvain.com/new/wp-content/uploads/2012/09/BrunzeelFlyer_ipad.pdf. I agree that the cross grain failed. There is a lot of stress at the end of bitter end of a solid gunwale on a Spindrift. When the first fibers failed, the load went to the next fiber which failed and it accelerated until the load started to diminish. We devote a page to the knees in the plans. It says YOU MUST USE SCREWS OR THE JOINT WILL FAIL. The good news is that the glue is sound. This means that the gunwale can just be glued back and it will still be a good job. It will be more difficult now that he does not have the leverage that he had when he had the whole gunwale as he will be putting it on backwards. I would start by trying to bend it back in place with clamps between the gunwale and the side until I got to the breast hook. Fortunately the breasthook is just under 90 degrees so he should be able to get a large clamp near the forward end of the gunwale to the back edge of the other leg of the knee and put in the screws.
-
Don, I agree that your needs are different. We needed light weight and stowability. Honda owned the small motor market but being air cooled it is substantially noisier than the Suzuki. I also like the fact that the Suzuki has a clutch allowing you have the motor running without it driving the boat. Yamaha is more expensive and heavier. My motor was delivered for $745 Once you go up in hp the parameters change.
-
Don, I have only run mine once, yesterday so I cannot comment on reliability. All 4 strokes have an oil filled crankcase. It is critical that you do not allow the oil to to run to the head and leak through one of the valves and fill the cylinder rendering the motor inoperable until it is removed. Suzuki tells you that you must lay the motor down on the port side or tiller side down and that the leg must never be higher than the head. When the motor is put in the aft hatch, the leg is aft with the head forward, because of the rocker in the bottom it is possible to have the head lower than the leg unless you have some sort of cradle to raise the head. When the motor is on the transom and raised. the head is pointing up with the crankcase down. This seems to me like the best way to stow the motor. It appears that the reason why they do not recommend stowing the motor this way is that they have not built any support into the cover for resting on the floor. The carrying handle as designed is up and when you lower the motor through the hatch by the handle, the motor is in the best attitude to prevent the oil issue. I plan to stow mine this way with some sort of cradle to give the cover good support and make sure that the leg is below the head. When the motor is raised on the transom, if you study the motor you will see that they have angled the motor 10 - 15 degrees to port to keep the exhaust port within the cover. This puts the head lower than the crank case when laid down on the port side as they recommend. THE BIG PROBLEM is that boats do not sail level so we need to cover extreme angles of heel. Even on the road with the motor stowed out of site, the boat will not always be level. I think that my reasoning is the most sound for our purpose. When Jay was here he had to change out the spark plug to get the motor to run. The spark plug was made by NGK who are about as good as it gets. I do not think that we can blame Suzuki for the spark lug. As an optimist I will carry a spare spark plug Try to keep clean fresh fuel and try not to put the head below the leg and hope that I have good reliability. The manual says to break in the motor for 10 hours and for the first 1 hour not to go over 1/2 rpm and 3/4 rpm for the rest. I cannot tell 1/2 rpm but yesterday running easy, Carlita was doing 4.2 knots. I could not resist a short burst to maybe 3/4 rpm and saw 5 knots. If I can cruise in the high 4's to 5 knots I will be pretty happy with it.
-
Carlita gets a new Suzuki. It just fits, there is at least a couple of mm clearance in the critical places. It is all mounted but have not had a chance to try it yet. I was quite pleased with the quality and finish. I ran a magnet over the lower end and all of the bolts are Stainless steel except for the tilt pin and a couple of screws in the throttle. I would have been happy to give them another $10 to swap out the few plated steel components.


-
Lenm, I have used all of the plywood mentioned above. We use Hydrotek where we need strength and low cost and not worried about weight. It splinters more than the others and does have occasional voids. You will often see splits on the face veneer that they fill with a cheap filler. I had no idea that hoop pine was that expensive over there. I was talking to John Welsford a while ago about hoop pine ply. He told me that he had been to the factory and was very impressed. He said that they sell seconds at a good price and they cannot find any fault with it. When I designed the Ocracoke I intended her to built from Okume because performance is primarily power to weight. If I was building one over there I would probably use Hydrotek on the bottom for strength and okume for the rest. I do not think that delamination is an issue with the above mentioned plys as they all use the same glue and are reasonably void free. Hydrotek is probably the likely to rot as meranti is more durable than the rest. That said I would not touch any Chinese made ply. Regardless of the ply used you still need to keep the water out of the wood and the only way to do that is with using good building practices and sealing every piece of wood with epoxy. When creating a vapor barrier thicker is always better and using glass with epoxy is the best way of creating a thick barrier. Where it is not practical to glass, use at least three coats of epoxy.
-
William, About the only disadvantage with a rotating mast would be wear inside the mast heel. Carlita's mizzen mast rotates. I made a glass tube to aid in installing the mast and to take the wear. I also laid several layers of glass under the mast heel for wear and to absorb the shock of the mast being dropped into the step. That may be overkill on a Spindrift. You cannot put the mast into the step if there is any hardware for a vang. It would be easier to attach the vang to the base plate. It will tighten slightly when on a run but the mast bend would absorb it. It would not bother me as I always adjusted the vang when off the wind as well as the outhaul and downhaul for the sail shape in the current conditions. The reef point is below the bottom batten. There was mention of the halyard earlier in this string. You only need a halyard if you want to reef. Here is a video of reefing a Spindrift on the shore. I believe that we were the first to reef a laser style sleeve luff sail.
-
William, Whether the mast is fixed or rotates depends on the gooseneck. All goosenecks need a vertical axis. The horizontal axis can be the mast as Laser does or can be in the gooseneck like most of the commercially available goosenecks have. If the gooseneck has a horizontal axis and the mast rotates you will tear up the gooseneck. The boom vang puts a forward load on the gooseneck which causes the mast to over rotate, say to port. When you tack over to starboard with the over rotated mast, the boom vang component is still holding the mast to port and the boom has to go to starboard which will be beyond the limit of the gooseneck. If there is plenty of wind, there are only two possibilities, you break the boom or the gooseneck. With the mid boom sheeting which I prefer on the S10, it is best for the helmsman to slide round on front of the mainsheet and switch hands with the tiller extension and main sheet. After a little practice you will like it. We played around with end boom sheeting which had two negatives, the sheet running forward under the boom often drooped down on the skipper and caught on your head or life jacket plus when running in light air the long mainsheet would droop in the water dragging the boom back toward the boat. The former problem could be solved with loops to support the mainsheet. If you move the mid boom sheet forward, you lose leverage and put more bending load on the boom and giving up some sail control.
-
Alex, You need 4 oz. US cloth for a Spindrift sail.
-
Here are three pics from 2016