Designer
-
Posts
1,758 -
Joined
-
Last visited
-
Days Won
182
Content Type
Profiles
Forums
Events
Everything posted by Designer
-
Chick, I have to measure my oars, I think that they are 9'6" or a bit longer. Don't forget, I cut a slice out of my coamings to get the oarlocks lower. This allows for shorter oars. Don, I was well pleased with a cell phone and the Navionics nav program. I did just use it as a backup for my Garmin. The Garmin did go black one time and I was happy to have a backup. I used it at night time for planning the next days sail. I found that each map covered areas differently and it was handy to have a second opinion in areas where I wanted more detail. It worked for me every time and I am glad that I had it. I tried to download Peter's recommended program but could not find a cell phone app for it. In fact I could not get it loaded onto my computer for a test drive. I guess I need a millennial to help me.
-
Steve, In Carlita's first EC I did some temporary stuff because of time and everything had to come back off for finishing. I had a couple of small leaks plus I found a tiny leak under my forward king post. It was a real pain to have to sponge out every time I stopped and cost me a lot of time searching for the problem. Not to mention water damage to gear. I spent enough time in this years EC to go through one of the wettest part of the course and I was delighted to report that not one drop of water entered the boat that did not drip off of me. The same went for driving rain at 60 mph on the highway. The little bit of water that dripped off of me was easily sponged out of the glassed in well between the bunks.
-
Good point Pete. I had a volunteer fill my oil and he way over filled it. It was totally my fault as I was distracted and I did not inform him about the sight gauge or the importance of not over filling. I had a syringe from WEST on board and it did not take much effort to to bring it to the correct level. Before the EC I just drained the oil because it was easy and it is a tiny amount. I had no idea if my ground crew would remember not to lay the motor the wrong way. I taped a 6" length of blue masking tape to the cowling and marked it "no oil". I decided that it was cheap insurance and because the motor is still fairly new it would be nice to give it new oil.
-
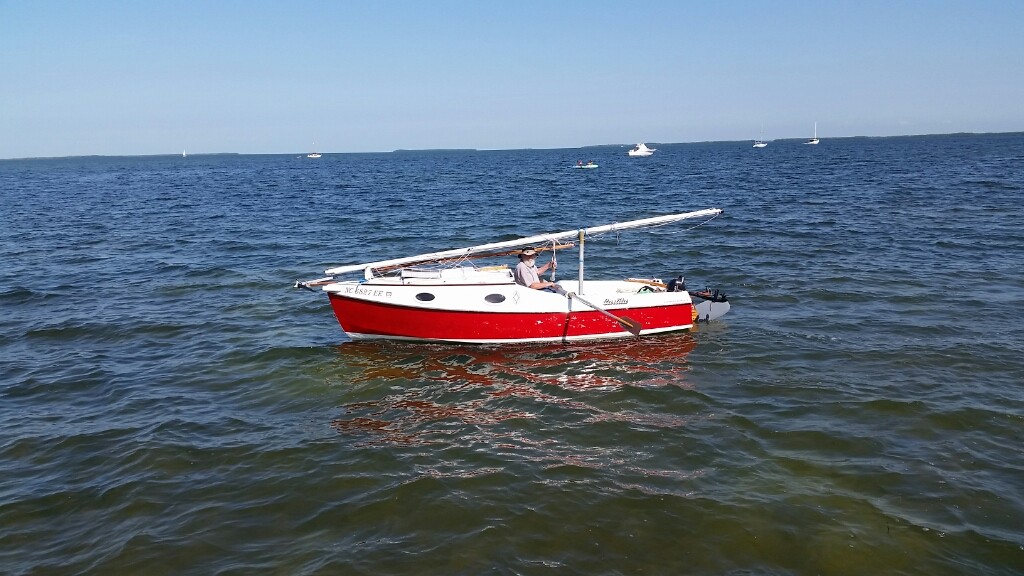
Drew, Another important factor in doing a mizzen tabernacle is getting the right height for the axis. I spent a lot of time getting the best compromise height for my mizzen crutch. Naturally it is good to get the stowed masts as low as possible for highway windage and garage height but the overriding factor for me was to be able to function on the boat in trailing mode. You need enough height to be able to get in and out of the boat without having to raise the masts. I live in my boat on the highway as well as loading and unloading for trips. I prefer wash boards to doors and for security I have a barrel bolt that I lock the sliding hatch shut with. It is impossible to get into the boat while I am in there without making a lot of noise. It takes a second to slide the bolt up to lock or down to unlock and slide the hatch open. For those of us that row you need enough headroom under the stowed masts to row. The picture shows me gently rowing the boat to the ramp to haul the boat. It was when my back was hurt and I decided that an easy row would hurt my back less than pulling the starting cord of the motor. As your boat is a 20, you probably do not need the mizzen to be as high. When CS17 mk3 #10 visited me at Key largo he had his masts stowed horizontal and he cursed it when he needed to get something from inside the boat. His setup was temporary but he put raising his aft crutch at the top of the list.

-
Carla informs me that that is the same weekend as the Oriental boat show. Being our local show and with Carla and Beth's strong support in community events I am told that I will attend.
-
Hey lennie, It is good to hear from you again. I was very pleased to see your boat in this years race. You did a great job and found a worthy new owner. You can see my report in the above topic, Carlita's EC 2017
-
PAR, I widened the chines slightly and lengthened the WL by raking the transom the other way but kept the keel rocker the same. The idea was to carry the extra weight of the ballast and the structure and to keep the performance about the same. The Mk3 was also given some more sail area which she can carry because of the increased stability. The only performance test that I have had so far was when John Bell and I were running down the Gulf Coast in a good afternoon nor wester. We were about a hundred yards apart and before we went our separate ways it looked to me that we had not gained a millimeter on each other for maybe an hour.
-
Amos, Southern Skimmer is a fast boat and with two crew and the comfort of a dry cabin they were able to get some rest when conditions allowed and managing their resources better by stopping and resting when the tide was against them and sailing better than the opposition.
-
A Source for Marine Plywood in the Upstate
Designer replied to Don Silsbe's topic in B & B Yachts Forum
We have bought a lot of ply from Hood distribution over the years. They carry a lot of brands with varying quality. They definitely carry Joubert but sometimes were out of stock in certain thicknesses. Joubert is the only brand that I would buy from them. -
I feel that the new centerboard is better. I still have not had the chance to do some tacking in flat, tideless water to see what my tacking angle is. I had to pinch to lay course in some fresh wind and was able to make the buoy I was aiming for which pleased me. I believe that the picture that was posted on the watertribe facebook page was taken at that time.
-
Thinking back, I realized that I made an error. Alan and Paul left Chocoloskee in fourth place behind the Thistle and the two CS17's. It was very lucky that the La Perla crew recognized the SOS. By Bones admission, he should not have left Flamingo. He was hallucinating and another crew tried to dissuade him from leaving without more rest. There was one more rescue. The Coast Guard plucked a kayak-er from his boat that was aground near the Crocodile Drag-over in Florida bay with severe hypothermia.
-
Joe , i just converted it to a pdf. What else do I need to do?
-
EC2017.pdf
-
Alex, There is very little gain to adding water ballast to a mark 1. If the goal is to prevent a capsize, it will not help much. The issue is what is called the down flooding angle. It is when you are shipping water over the lowest point which is the side deck. When you reach that point, the water starts to flood the boat and you are over. The problem is that the CG of the water ballast is not that far below the heeled center of buoyancy to have much of an effect. The mark 3 has much higher freeboard and a greater down flooding angle allowing the water ballast to bring the CG below the higher heeled CB. With that said, the mark 1 is a very stable boat with a higher than average down flooding angle. I have sailed 2 EC's in a 17 mk1 plus a lot of other trips and never capsized or even felt that I was close. 20 # of lead on the tip of the centerboard would probably have more effect in lowering the CG than adding water ballast. One of the most important safety features that you can do to your boat is to put in the time to make your hatches water tight. This will change your ability to self rescue quicker than any other factor and it is probably the most neglected item I see when I inspect one of our boats. My boat took on zero water and Alan reported dry cockpit lockers after the EC. When I looked at Water boys boat, I was pleased with the Lennies work until I checked his hatches. I dragged him over to my boat to inspect my hatches. He reported up to 3" of water in his cockpit lockers during the race. It is miserable having to cope with that in an EC not to mention getting gear ruined or at least wet. About a year ago we put in more time on the hatch plans to make them clearer. If anyone does not have the latest upgraded hatch plans let us know and we will get them to you.
-
Alex, Either can I. I wrote it and attached pictures in a word program and attempted to load it. I tried several times without success. I sent it to Alan and it went out okay. I am hoping that Alan can find a way to get it up.
-
EC2017.odt
-
For those following "Carlita" in the Everglades Challenge race, the start today was cancelled. Due to small craft warnings, the CG would not allow the race to start. The boats trailered to check point 1, Cape Haze Marina, where they were lauched by a friendly fork lift. Graham, Alan et al are in good spirits and ready to go tomorrow.
-
The time has come, we will be heading out this afternoon for the EC. I am glad that I returned from sailing to Florida as I have been working on the boat as much as I could and it is a lot better prepared than it was when I left. The lost parts have been remade. The time was not wasted as it showed me what I needed. The Spot tracker will be turned on Saturday morning and you can still follow our track on the same link http://share.findmespot.com/shared/faces/viewspots.jsp?glId=0eHa05kYuBYnYvSIGGCbp4PpdXZchEvKn. Alan and Paul are sailing the EC22 Southern Skimmer and there are two CS17's in the race. You can follow the whole race on the Water Tribe site at http://www.watertribe.com/Events/ChallengeGMapper.aspx . You will have to look at the roster page to find their tribal names. We will be in class 4 which is for monohulls.
-
Here are some more additions. I found that when it was cold or raining that I would dive into the cabin for shelter and dig out the wash boards and put them in place and slide the hatch shut. I decided that I would want to have their permanent stowage to be in the cabin rather than in a cockpit locker. The only place that I could find that did not interfere with lounging back against the hull was to lay them flat against the hull just above the side stringer. While they are rectangular the aft bulkhead sloped forward and the side stringer slopes downward. It was a less tight fit if the aft block was raised above the stringer. The first pic shows the washboards sitting in their chocks. The second shows the cam that locks them in place. To remove them, rotate the cam, lift the boards until they clear the lips on the chocks and drop them down. I got a few wisecracks about the other items but it starts to look organised now that they are done. I have a decent pair of 7 x 50 binoculars that I hardly use because they are stowed out of the way and it does not seem worth the trouble to leave the cockpit to get them. I wanted to be able to easily reach them, they had to be secure and the lenses need to be covered. The first picture shows them being held by the bracket upside down. Second pic shows the the bracket mounted alongside the cup holder. The third pic shows the binoculars in place. I can now use them and replace them safely and easily. The next two are obvious, pencil rack and paper towel rack.


-
The thing that I like about the glass butt block is that it is that it is a finished product. There is no need to coat or protect it, it will be there for as long as it is needed.
-
Alex, I did that joint the same way as the cockpit sole. I used a glass butt block on the inside of the butt joint about 3" wide and glassed over the outside. While the glass butt block had some thickness, the board thickness was starting to taper at that point and was there was no interference. I made up a sheet of glass for both parts at the same time.
-
Alex, I will finish the repair here. The first pic shows the trunk is finished and fitting the uphaul pennant. I laid up a sheet if glass with epoxy to serve as a butt block and under cockpit sheathing. My logic was that it would connect the underside of the butt joint and seal the bare ply under the final piece in one shot. You can see the glass butt block which has already been fitted laying the bottom. Second pic shows the glass butt block glued in place. It was filleted around the perimeter through the hatch using a mirror and a gloved finger. The third pic shows the final piece glued in and ready for glassing over the top side of the butt joint and then final fairing. The question is, was it all worth it? I am glad that I did, I would have always felt that I should have done it. I had not finished the final coat of paint in the cockpit and once I did I might have been more reluctant to tear it up. I did not have a good chance to test it on the last trip as there was not a lot of tacking and there always seemed to be a current but I looked at my wake whenever I was closehauled and I believe it is better. Next week in the EC will be the real test as I will be head to head with a lot of boats.


-
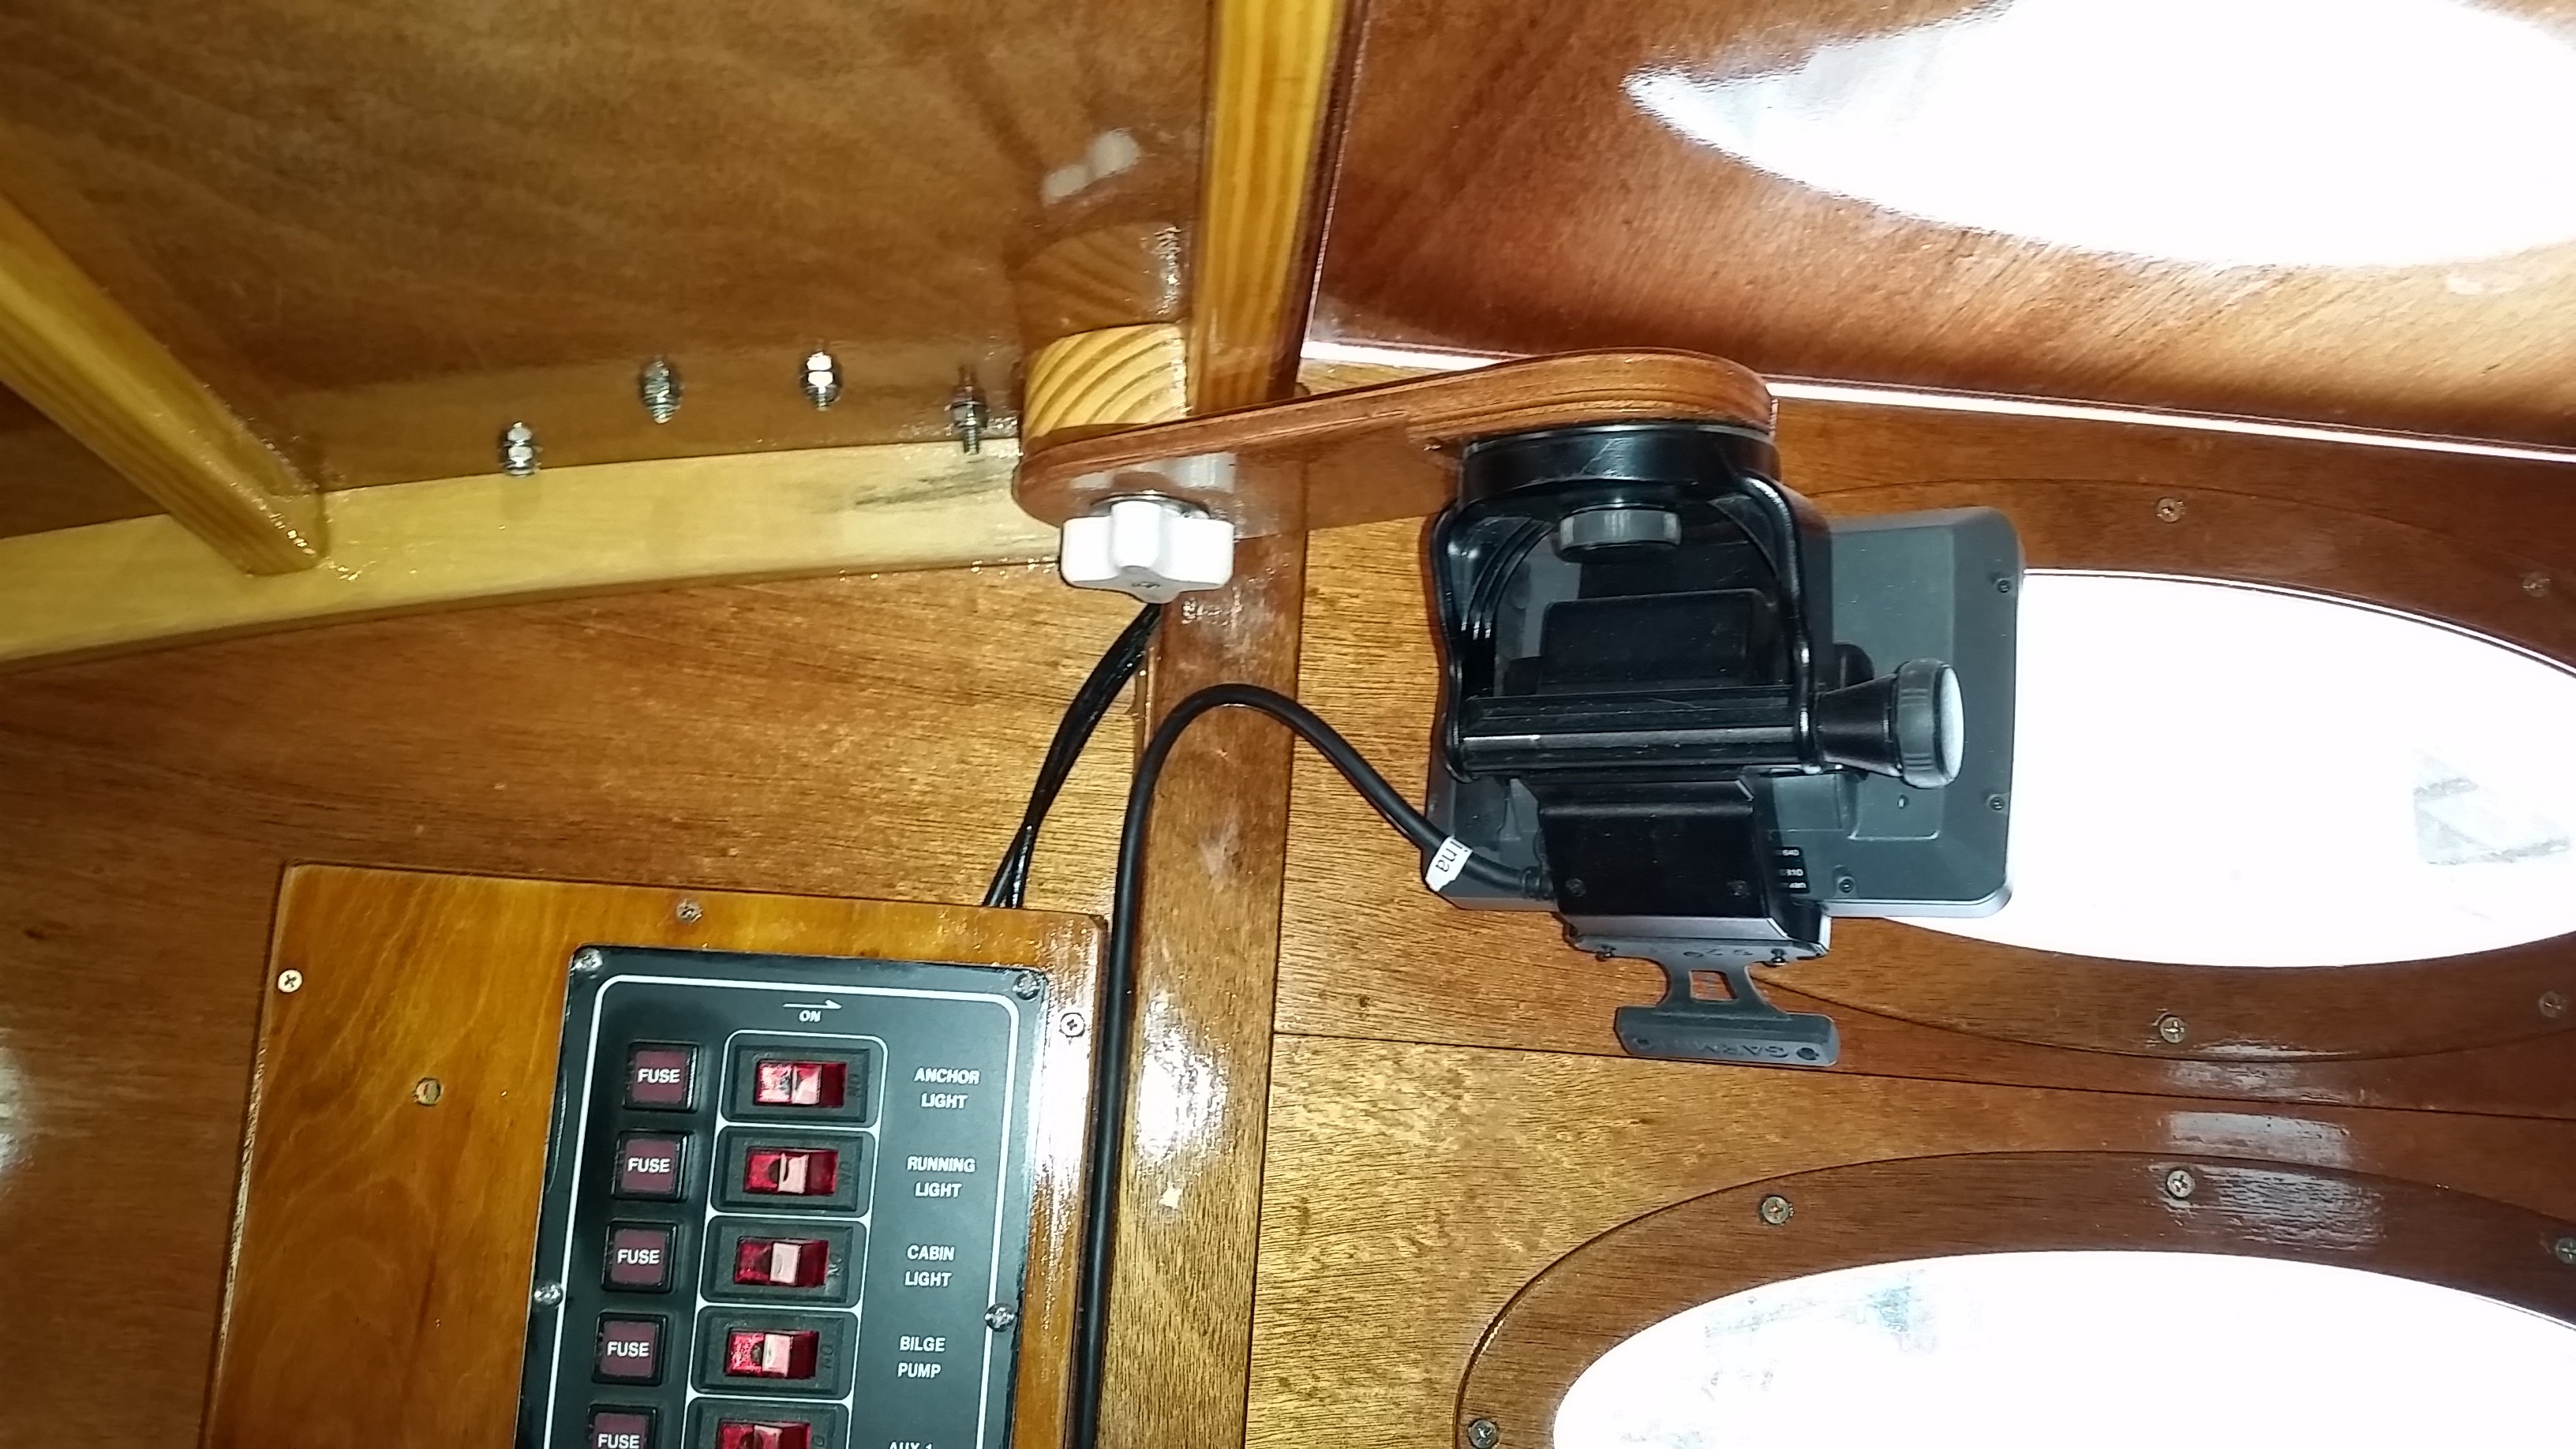
Here is the GPS mount. It started with a pine semicircle 1" thick with just a shaving or two off of the outboard edge to account for the deck camber. I needed the bottom surface to be flat, level and flush with the hatch frame. A 1/4" hex head bolt was drilled through the pine and set in epoxy for the main pivot. The GPS is mounted on a piece of 12mm ply about 3" wide and 8 or 9 inches long. You can see the GPS in it's stowed position , then in the open position and then from the cockpit but under the hatch which is where it can be used if needed to keep it out of direct sunlight. The is a wedge under the ply arm to give an upward angle. Beside the arm being able to angle,the GPS bracket allows for a 360 degree swivel on the vertical axis and it has a horizontal axis which should give me a lot of choices for different conditions. There are two large fender washers sandwiching the ply arm and it is tightened by one of our shop made starboard wingnuts. It is very firm.


-
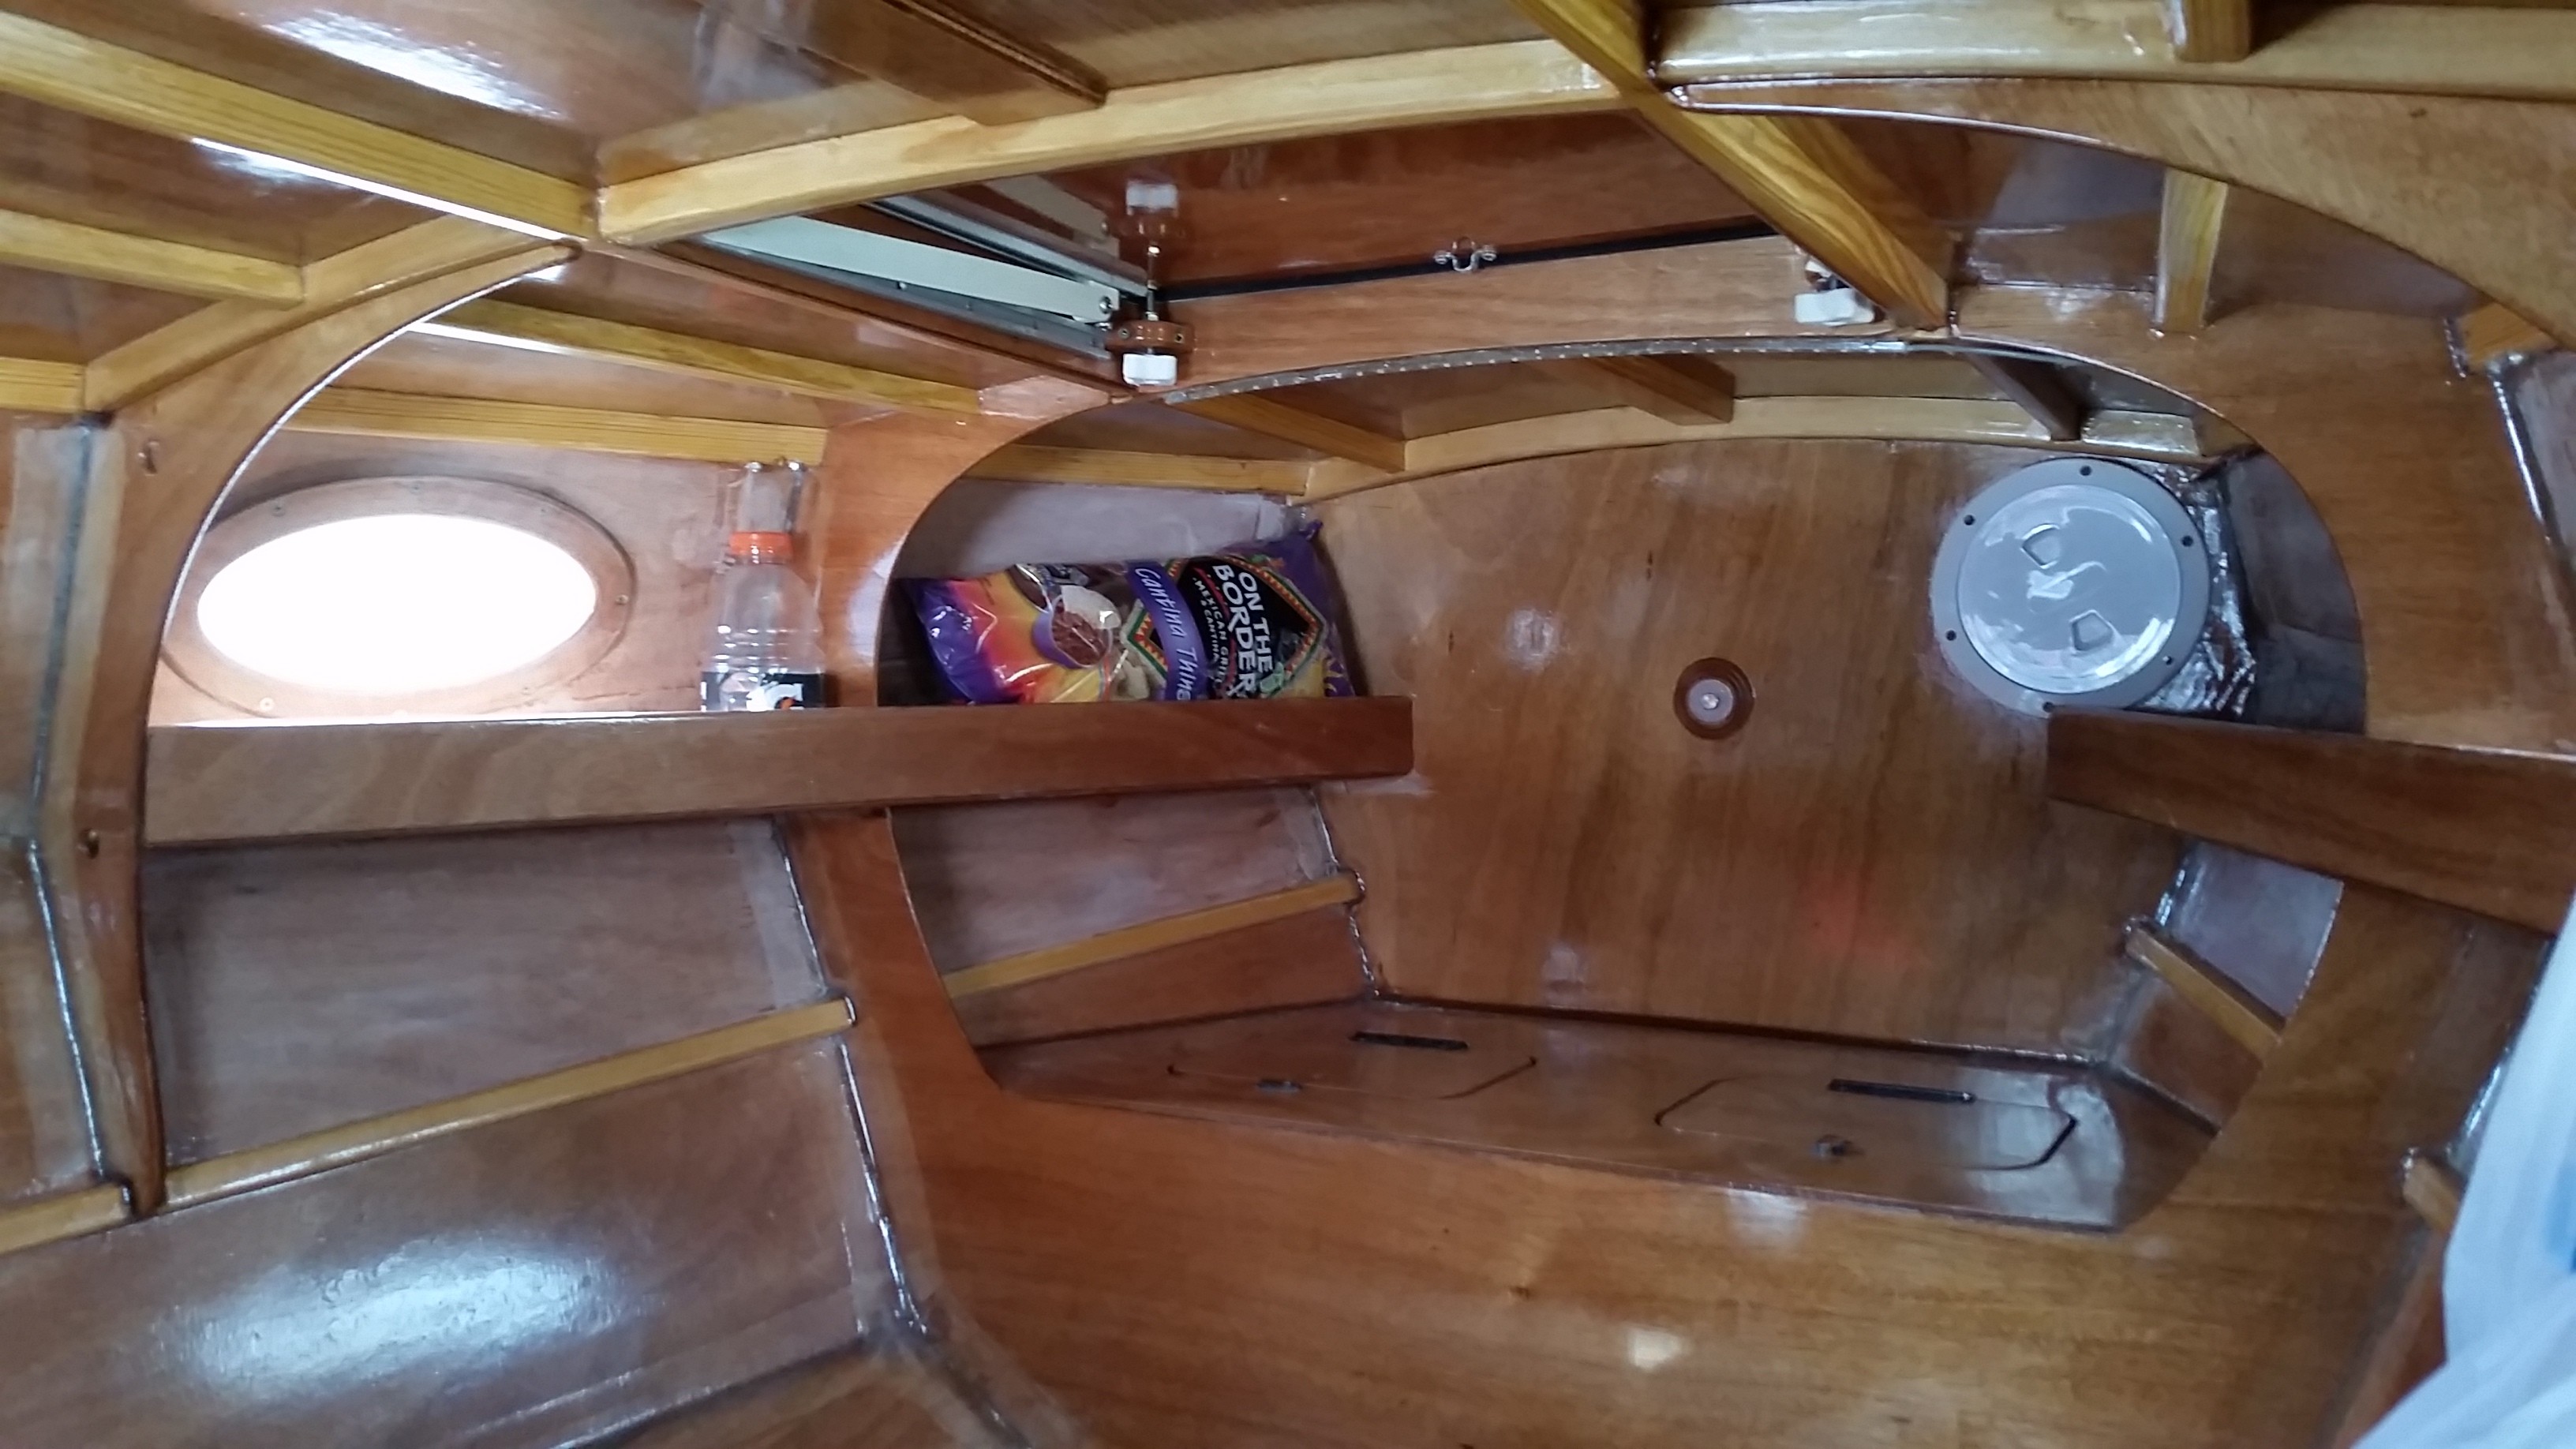
Okay Chick, Here is the first installment, the shelves forward. They run from the forward hanging knee to the forward bulkhead They are the width of the knee aft and start at the sheer strake aft and are level. They are wider than the knee built into bulkhead 2 as they run straight to bulkhead 1. The fiddle rail is bout 2 3/4" tall. The bottom is 6mm and the fiddle is 9mm ply and they are glued and filleted in place. I did not want large and imposing shelves but they can carry an amazing amount of stuff. I want to be able to stow light but large bulky items like that big packet of corn chips. I will drill some strategic holes so that I can enhance the fiddle rails with shock cord if I need to stow something tall. When I lean back against the aft end, the flat fiddle is comfortable against my back. I did not want a full shelf across the boat because wide shelves dump everything to the low side unless you fill it up with fiddles and it will visually make the cabin look shorter as well as impair my access the forward lockers. The hull behind the shelves was sanded before I installed the shelves for a better bond plus it is prepped for painting after I return.

-
Chick, I do not have any pictures yet. As you know when it comes to cosmetics Beth rules, all of the parts are out being coated. I never had ideal conditions for testing the centerboard extension yet. I did watch my leeway angle at every chance that I had and I am pretty sure that it is better.