Designer
-
Posts
1,758 -
Joined
-
Last visited
-
Days Won
182
Content Type
Profiles
Forums
Events
Everything posted by Designer
-
Here is the other video that I took. It is not that good but it gives an idea of beating in fresh winds. If you look closely when the camera aims at the oarlock socket, you will see the boat heel over enough for a splash of water come into the cockpit. It feels very secure, there is no hesitation, it just comes straight back up. You will see the vane is stowed and the auxilliary rudder is hinged up. The boat is steering itself to windward with just a line to the tiller from the windward side. Except for when it was necessary hand steer, this is how the rest of the windward work was done.
-
Here is my recollection of my Everglades Challenge in Carlita. My impressions of The CS17 mk3 Carlita on her shake down cruise in the 2016 Everglades Challenge: In her short life I have sailed Carlita more and harder than most owners will do in several seasons or ever. She was pushed in conditions that most sensible sailors would avoid. Without the clock ticking I would have elected to stay put or to sail to another place. She went through it all perfectly, never gave me any cause for concern, and nothing broke or failed. The only issues were caused by the crew. I managed to get the boat off of the beach by myself even though I was the only one in my area that put my rollers under the boat after the horn blew. I went slowly and carefully because if she went off of the rollers it would have cost me a lot more time. The only mishap was when Skinny Genes on the boat next to me snarled my mizzen halyard with his boom and pulled the halyard to the deck. I had forgotten to tie a stopper knot and therefore I had to take the mast down and re-reeve the halyard. Little did I know that stopper knots would cause me grief later on. Saturday was a wonderful sailing day. It is usually sloppy getting out of Tampa Bay especially if you take the shortcut inside Passage Key close to Santa Maria Island. I did some experiments with the water ballast and was well pleased with the results. After my slow start it was good to have moved into the middle of the pack by the time we exited the bay showing that she was not slow. The wind was aft of the beam and fairly light as we headed down the coast, so I hoisted Alan's mizzen staysail off of the bow sprit. We passed some more boats, I opened up the bailer and dumped the ballast. Later the wind started to move aft and I could not keep all three sails working. I tried to tack down wind which has worked well on Southern Skimmer but I could not generate enough extra speed to make up for the extra distance sailed and was passed by a few boats so the staysail was dropped and I sailed the rhumb line. The wind freshened through the afternoon giving wonderful and fast sailing. I refilled the ballast tanks. The self steering worked great and had no trouble handling the fast downwind surfing conditions. I took some video of it working. Even though this is my sixth EC I have never been through Stump Pass because the first checkpoint has since been moved further north. As we approached the Pass I had a Sea Pearl about 200 yards ahead and Mister Moon (John Bell) in his CS17 was a couple of hundred yards astern of me. We were running fast parallel to the shore, I intended to shoot the surf about a quarter of the way out to the entrance marker as the channel is nearly upwind. Suddenly the Sea Pearl veered to starboard and headed to the entrance marker, I looked back at John and he was holding course. I vacillated for as long as I could and decided that I had better go in by the channel. I could not lay the outside marker without jibing twice so I elected to run by the lee to the second marker as the waves were not breaking there too badly. I eased the main out further to prevent an accidental jibe, I felt the stopper knot unroll in my hand and suddenly the mainsheet ran all of the way out with the sprit going all of the way beyond forward of the mast. I am now in the channel and needing to beat to windward to stay out of the surf on the south side of the channel and the mainsail is flogging with sprit disconnected from the mast. The lashing to the snap shackle broke. I was actually glad that it broke rather than breaking the sprit. There is now a new rule aboard Carlita. All stopper knots have to have a tail of 5 - 6 rope diameters. Suddenly I realized that if I did not act fast and smart I could lose my beautiful new boat. I put the anchor out so that I could fix the rig. You do not realize how fresh the wind is when running fast until you stop. In few seconds three battens flew out of the flogging sails. The two top battens in each sail were tied in and the two lower battens were sewn in. As I looked to the Sea Pearl I saw him get rolled in the surf and before long I saw him joined by another boat. It turned out that a number of boats came to grief there. Fortunately John stuck to his game plan and surfed in without incident. Lugnut told me that he followed John's route and a wave broke over him and filled his cockpit, he thought that he might lose his boat for a few moments. Fortunately the anchor held and I was able to re-lash the snotter snap shackle. I tucked a reef in each sail and was able to beat into the channel. I was relieved to see the Sea Pearl skipper was okay but his mast step was torn out of the boat. By the time I got into check point 1, Alan was on his way out, we spoke briefly, John was long gone in Bandaloop. Paddle Dancer gave me some warm soup which went down well. After thinking about my situation I decided to find somewhere to anchor for the night and get some rest and see what I could do about battens. I was very tired after driving all through Thursday night to make the boat registration and inspection and get the boat setup on the beach Friday. For some reason I only got about 3hours sleep Friday night. I slept in Sunday morning and felt good. I had four short lengths of batten on board as they can be handy for jury rigging. I want to give a special thanks to West Systems Epoxy who handed out a repair kit to each boat. I opened mine up and was very pleasantly surprised at how complete it was. I think that every boat should carry one, it sure came in handy for me. I glued up three pieces to make the right length for the most important batten and used the extra piece although short for the next most important batten. I clamped the battens with duct tape to hold them in position until the glue dried. I then went about tidying up the rigging and a bit before noon I was underway again. I had a good run down Pine Island Sound and passed a couple of Watertribers. I emerged into the Gulf just before dark. The wind vane was engaged and I planned a nice overnight passage. Unfortunately, the wind increased, it got pretty bouncy so I had to reef down. After midnight the wind eased and it turned into a nice sail. The vane was reliable enough so that I could go below and get Google to wake me at 20 minute intervals to make sure that we were safe. I passed Caxambus Pass in the dark and elected to carry on to Cape Romano. It was still dark but I picked my way through the shallows off the Cape with the aid of the GPS and headed close hauled for Indian Key. I had a nice sail across Gullivan Bay to Indian Key and got some more sleep and called Carla before I fell into the Verizon black hole. I did not know that the fair wind to the Cape would be the last of the race. We arrived at Checkpoint 2, Chocoloskie at high tide around midday Monday. Reviewing the weather forecast showed a strong east to southeast air flow for the rest of the week and getting stronger. It made sense to leave immediately. After gaining open water in the Gulf I sheeted hard in and could just lay the rhumb line course to North West Cape. The wind was strong and I was reefed all of the way down. As we progressed, the fetch got longer and the wave height increased making for a very rough night. I got to give the water ballast a thorough test as we got laid way over in the big gusts. She never faltered and came right back up. We were often laid over far enough for water to come in over the cockpit coamings. I quickly became a disciple of water ballast. Jarhead told me at Flamingo that he was a few hours ahead of me in his Sea Pearl. He also did the rhumb line and almost capsized a number of times. It was good to sail in the lee of the Cape. I decided to anchor up for the rest of the night just north of Middle Cape, putting the pick down a little after 3:00 am. I thought that this must be one of the remotest places in North America except for a few mountain peaks. I did not find out until later that there were 4 other Watertribe boats around Middle Cape. They all saw me, but I never saw anyone; they all got going before I woke up. Lugnut later told me that he hugged the shore and had much smoother sailing and less wind. I got underway around 9:00 am Tuesday and beat around to checkpoint 3 at Flamingo. Greybeard uses AT&T which works at Flamingo, he showed me the current wind prediction on Windflow, it forecast continuous fresh easterlies until the weekend. It made sense to head south, the long way because the narrow easterly passes are impossible to tack through when the wind is fresh. Most of the boats went this way also. I was able get most of the way south before dark. I got the anchor to take on the second try and had a good night. The next morning my concerns were proven right, she lacks lateral plane, my tacks were pretty poor, tacking through 120 degrees on a good tack. I tried pinching, fat and flat and in between with the same result. This made for a long day which was made worse by poor navigating on my part. Instead of pushing on in the dark I found an excellent anchorage in the lee of Cotton Key. I got under way early Thursday morning, the wind was a bit heavier than the last few days and we knocked off the last 15 miles or so to the finish at Sunset Cove in about 3 or 4 hours. I am going to remove the lead ballast tip from the centerboard and add a foot to the length of the board and put the lead tip back on. This will require some surgery to the back of the trunk but it will be worth it.
-
Joe, I checked the link and it seems to be correct. You can go to U tube and type in Self steering EC2016 and it should come up.
-
https://www.youtube.com/edit?video_id=ZIoDDKKzXog The link is of the video that I took of the wind vane steering the boat on the afternoon of the first day of the Everglades challenge. As you can see the conditions were perfect here, it freshened later with speeds even higher. Fast down wind running conditions are the hardest to get a vane to work. I am happy to report that it worked very well. I later found that the boat steered very well upwind with the tiller lashed on center and let the boat steer herself. The last third of the race was upwind so I never used the vane after check point 2.
-
Core Sound 20 Mk 3 -- #4 "Chessie" . .
Designer replied to Pete McCrary's topic in B & B Yachts Forum
Pete, Putting on a rub rail first is not a good idea. It is not as strong as a seam that is glassed on both sides first. I did not tape the outside joint but took care of it when the hull was glassed. Yes, scarf the batten with an 8 :1 taper. I just tack welded the seam being careful not to force the epoxy through the joint and then removed the batten. You could tape the batten to be sure. -
Core Sound 20 Mk 3 -- #4 "Chessie" . .
Designer replied to Pete McCrary's topic in B & B Yachts Forum
Pete, I just got back home early this morning. I will try to answer your email here so that everyone can follow. This is how I put on the sheer strake on Carlita. (see picture) I back screwed a 1 x 2 around the top edge of the hull sides. The top edge of the 1 x 2 stood about 1/4" above the side to form a lip to hold the sheer strake in place. The sheer strake sat in place mostly without any wires except for the bow, there will be screws at the bulkheads and transom at the sheer. The 1 x 2 keeps the intermediate sheer fair. You should not need any measurements for the 1 x 2 as it should bear at the many bulkheads and the transom. You need to add props only if it is unfair when viewed from above. I elected to use an inwale rather than fillet and tape the cabin top to Sheer strake joint. I notched out the bulkheads so that the inwale ran from the bow, past the break in the sheer. I used the beam measurements at the hanging knee positions to keep the sheer strake as drawn, otherwise the hanging knees shapes will be wrong. I will include the next installment later.
-
Official Watertribe EC/UFC 2016 event discussion.
Designer replied to Alan Stewart's topic in B & B Yachts Forum
We did not get away last night, still a few jobs to finish and load up the gear. Looks like an overnight run to Florida in order to be at the beach in the morning and then, maybe a short sail. Without the tremendous help from Carla, Beth, Nat and Randy I would not have made it. I cannot say enough thanks. -
Carlita sails. In keeping with tradition. I got to have a half hour test sail last night. All I could tell in that time was that she did not leak, she maneuvered well and tacked like she was supposed to. The wind vane worked , the only critical thing learned was that during a little burst of about 6 knots, the kick up for beaching auxiliary rudder kicked up. I have added a quick release clam cleat which should do the job.
-
Ken, Yes, it is indeed a wind vane. I am off to finish the boat, this is our last day.
-
Don, We are definitely in crash and burn stage. Alan took the boat home late this evening, he will hook up with Dawn tomorrow and head south. The picture shows Alan peeking out from his penthouse suite as he adds the finishing touches to his accommodation. Carlita will go as a stealth boat or wearing 545 primer. The picture is from yesterday after adjusting the trailer to fit. We should get the finishing touches done, a quick test sail, load up and head south by tomorrow evening.


-
Steve, The cleat is 3/4" thick and 1" wide. Remember to bevel the top edge as the anchor well pitches forward to drain.
-
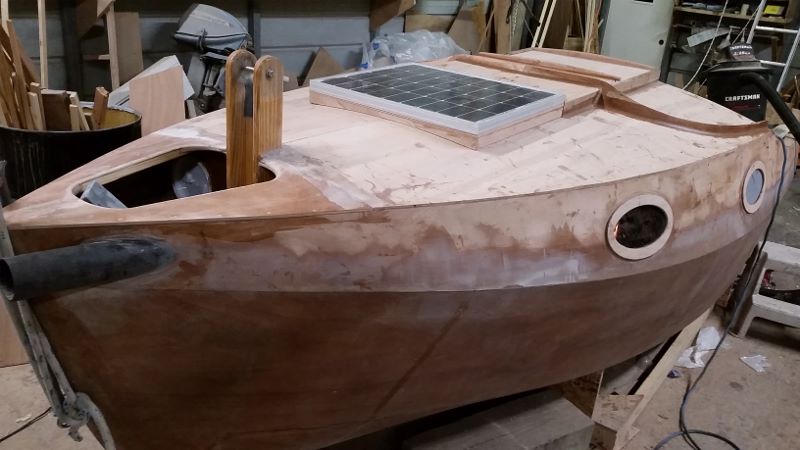
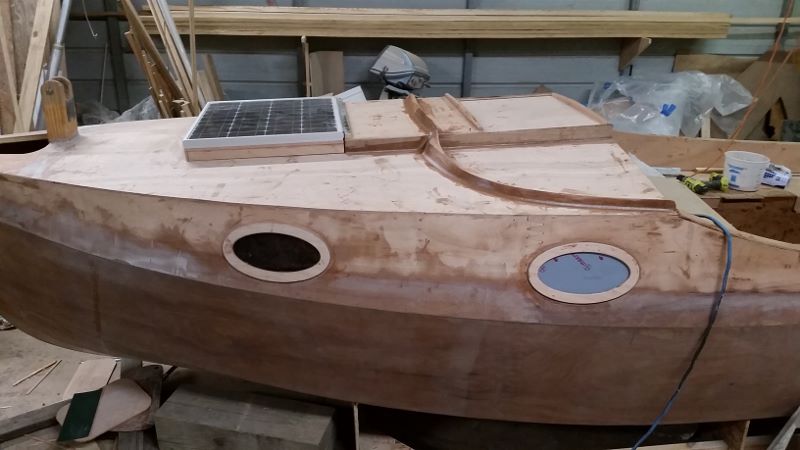
Sorry Tom and Chick, I should read this stuff before I hit post, I left out "knew". I should be at the shop but it is 27 degrees outside. I will go there in about an hour. I put some plastic over a ridgepole to make a cockpit tent, put in a heater and it as almost pleasant inside. I have the outside of the boat finished except for the coaming and mizzen mast tube. As rowing is important to me I have wacked a hunk out a side of the boat to lower the oarlocks. Yesterdays pictures show the trim around the companionway and the lowered oarlock lowering. You can see the cockpit greenhouse.


-
Chick, I thought that you all of this stuff. Meester, Your cockpit and cockpit hatches should be 6 mm ply not 4 mm. The CS15 cockpit hatches are a lot smaller than the CS17 mk3 cockpit hatches and we have been able to get by without reinforcing. If you are going to to put the hatches under higher loads, feel free to add a beam.
-
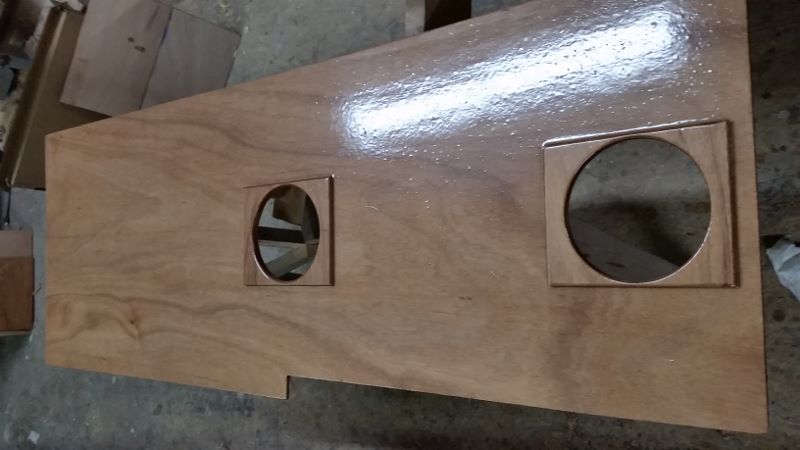
Here is what I did to the underside of the cockpit hatches. They are too large for the 6mm top to be able to support a large person to be able to walk on them. I put a 1" high beam x 3/4" wide and tapered the ends to 3/4" high. The ends of the beam have to be cut short so as to not interfere with the inside coaming which makes it a beam without fixed ends. To prevents the ends of the beam from failing at the glue joints under a high load, such as a big footed crew stomping on the hatch, I added a 3/8" ply end which is 3/4" high at the beam and 6" long. The ply ends were glued and screwed into the beam ends and then glued to the underside of the hatch. I had a 220 pounder walk on the hatch which showed very little deflection. Another detail that I like to do is to set the hatch sides about 3/16" in from the edge of the hatch top. This allows me to have an epoxy fillet on both sides of the hatch sides rather than just a fillet on the inside. Another advantage is that if you ever need to trim the sides of the hatch to prevent it from binding in the deck cutout, you are not planing the hatch sides away.


-
Pete, Straight Lexan with a wood cleat at the joint was my first idea but I felt that it would be flimsy. I also like to be able to drop in different boards like the mosquito screen and like the idea of having a 1/2" wide slot to take different boards. Having the luxury of a CNC machine makes quick work of making those parts a perfect fit.
-
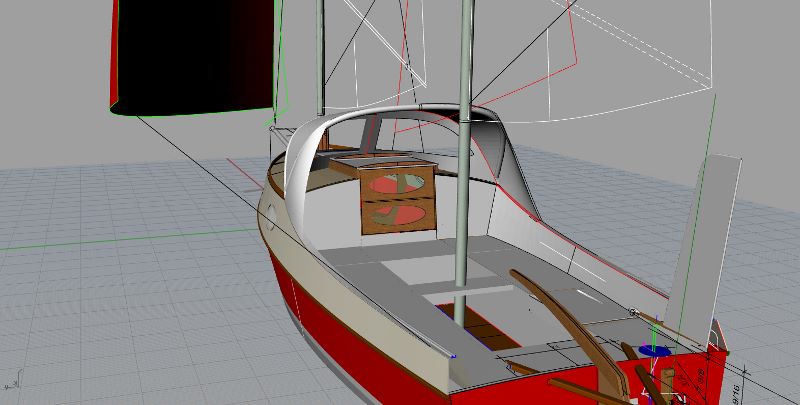
Here is a rendering on how I am going to do my washboards. There are two boards made of 12mm ply and will have 6mm tinted Lexan rabbeted in the back side with a 6mm ply trim ring on the inside. It will match the ports. By mosquito season I will make a screened version in one piece. There is a drip groove on the top edge and the joint between the two halves will be rabbeted. I prefer washboards to doors but that is just a personal preference.

-
Thanks Joe, it is exciting. Dale I was hoping that you would be at the beach. The weather is awful over the next few days but next week looks promising for painting.
-
Core Sound 20 Mk 3 -- #4 "Chessie" . .
Designer replied to Pete McCrary's topic in B & B Yachts Forum
Chick, The importance of filling the ballast tank all of the way is not just for racing fanatics but to stop the CG of the ballast from moving to leeward as the boat heels. If you want the highest point of vanishing stability, fill it up. The reason why the tank will not gravity fill to the very top is because the cockpit/ tank top has to be above waterline if you want it to drain. It is not hard to bucket a few gallons in through the open hatch until it is full. If you spill any it just drains overboard. Alternatively you can rig a pump, manual or electric. -
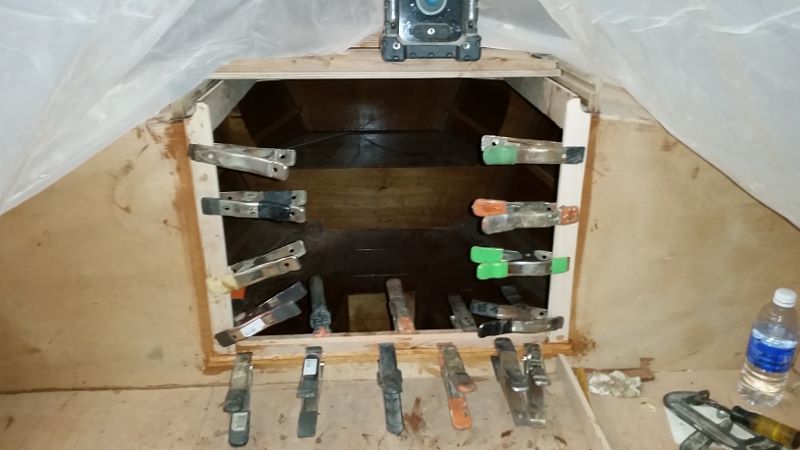
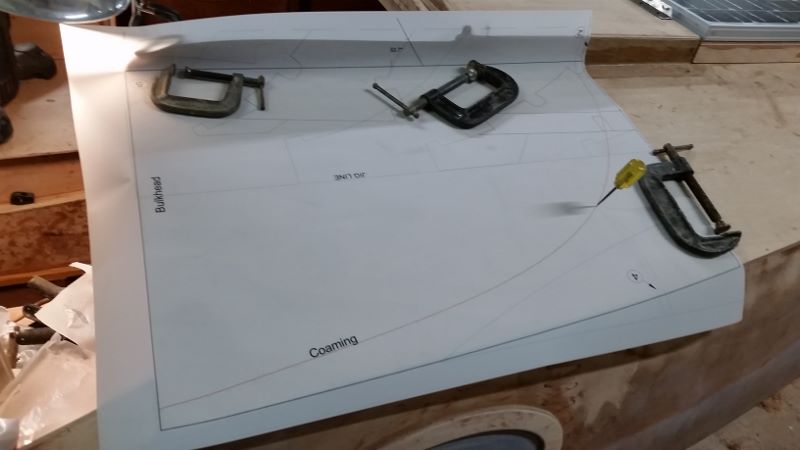
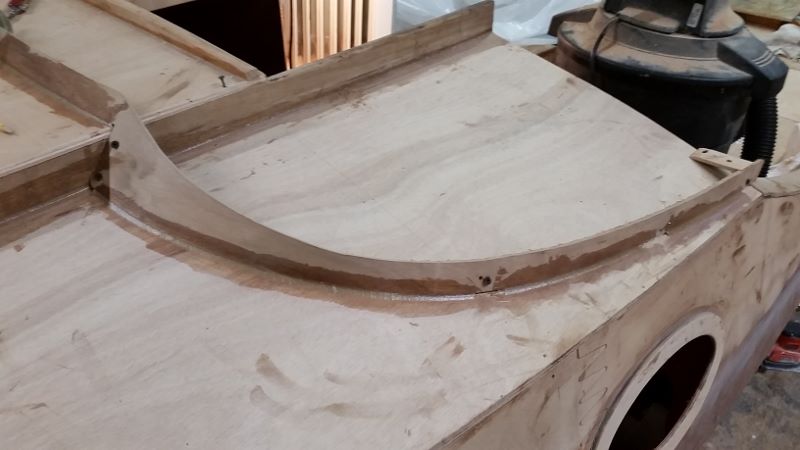
I have installed a coaming for the dodger. The first picture shows the mylar printout. It is on used mylar so there are some extraneous lines, the main lines show the bulkhead, deck edge, hatch rail and the coaming curve. There is an angled line showing the 53 degree slope of the coaming at the hatch rail near the middle clamp. The curve was marked with an awl onto the deck. The coaming is made from 6mm ply. I marked the shape on to the ply with the awl as I did on the deck. I am happy to report that the shape fitted perfectly, what you see is right off the bandsaw without any trimming. I made the first one with the grain running vertically, thinking that it would bend easier but it was too brittle and broke. Experimenting with bending the broken half, it broke again. Using the broken pieces as a template. I cut the next one with the grain lengthwise, it worked fine. I did use the heat gun on the wider section to give it some pre-bend. The second picture shows it glued in place. The third and forth pictures show the finished coaming at different angles.


-
Hey Chick, I thought that you were in the conversation. Mullet Key is where the EC starts.
-
Hey Lennie, I was excited to see that you would be at Mullet Key.
-
One more thing to add to what Chic said; the bunks should not go to the stern or follow the hull more than a foot or two aft of the companionway bulkhead. The reason is that there is less deadrise amidships than there is at the stern. What this means is that when you roll the boat off of the trailer, aft positioned bunks will lift the keel off of the stern rollers as the boat is moving aft, increasing the friction, just when you want the boat to roll off smoothly. If you sink the trailer to launch, it probably does not matter. I prefer to just get the tires wet and let the boat roll into the water rather than getting salt water into trailer lights, wiring, springs and bearings etc. not to mention rusting out the frame.
-
Just thought that I should update. The cold weather set us back a bit but the weather has been great this week. When it got too cold to epoxy I switched to metal work. You know that it is cold when you go to dip a piece of hot metal in the water to cool and the water was hard. I left a hot piece on top of the ice, it slowly melted a hole but when I picked it later it was stuck. Most of the epoxy work is done now except for coating the outside of everything above the hull. The centerboard and rudder are glassed or coated. The cockpit sole is about ready to go in, I have 5 coats of epoxy on the underside. You can see in the picture that I added another port for the compartment aft of the ballast tank. Tom came by for a visit and asked me if I was going to put some glass across the top of the aft center part of the tabernacle. He said that Southern Skimmer developed a vertical crack which I glassed. I cannot remember the incident but after I thought about I am convinced that he is right. After seeing it happen on Travis's P22 I had been recommending that builders add a bit of glass across the vertical grain. Don't freak at the carbon that I used. I was intending to use glass but I had a piece of carbon that was too small to keep so I used it. The masts sections are joined. I ended up choosing an Aqua Signal LED tricolor masthead light. It was a lot cheaper than Jay's, which got a lot of bad reviews for reliability. Our light was a bit more bulky but had a cute way to quickly remove the light from the mast. After examining the construction, we stripped all that away and go rid of the bulk, I probably destroyed the warranty, I did test that it worked first. I opted to not get the anchor light option as it was a fair bit more money and bulkier. Jay's light was definitely cleverer. Another positive thing that I found after pulling it apart is that the three LED clusters were all potted in epoxy as well as circuit board. It should be reliable. The last positive is that there is about an inch of separation between the red and green light which allows my Wind indicator to be mounted on center without compromising the light. It is very bright.


-
It is not necessary to glass a Spindrift 11 but you certainly can. The only drawbacks are cost weight and effort. If the glassing is poorly done it can be a mess to get a good finish. If you have not glassed before, it will be worth the effort to research the various techniques before you commit.
-
Hal, Chick is correct, The webs need to be glass taped to the bottom, the bunk tops are glued down to the webs, the bunk top to hull joint is filleted and taped, giving end fixity to the webs. The problem with the webs with the way that you had them is that load is transmitted to the end of the web and when the force is above the peel strength at the very end of the joint the end fails, the new end of the joint fails and so on as it peels away like a zipper that has lost a tooth. In your case the uninstalled bunk top was the missing zipper tooth.