

Paul356
-
Posts
721 -
Joined
-
Last visited
-
Days Won
80
Content Type
Profiles
Forums
Events
Gallery
Everything posted by Paul356
-
Our local shop makes "mooring covers" that go around the masts, which would allow you to keep the cockpit covered and sails bent on. this is an example, not from the local shop. https://www.landfallnavigation.com/zim-420-mast-up-top-cover.html?gclid=CjwKCAjwz_WGBhA1EiwAUAxIcciSIt6pMiSHcn5cNbAKxGeTJInvaXJ5zew1MwsC56V8bWZ8djgXqRoCqswQAvD_BwE
-
I'm pretty much in line with Thrillsbe's recommendations. All the epoxies he mentions are good choices. I would go with MAS for the same reason he mentions: not sure why, except that we've been using it at the volunteer shop where I work with good results. It has very little if any blush to clean up, depending on the formula. Their "economy kit" #3 might be of interest to you, since it includes thickeners and pumps as well as 2 gallons of resin. https://www.clcboats.com/shop/products/boat-building-supplies-epoxy-fiberglass-plywood/marine-epoxy-fiberglass/mas-epoxy-kit-economy-3.html Sailrite makes good kits. I've made a couple. A home sewing machine suffices, but a canvas machine is much easier. If you use a home machine, take your time and do some practicing. I'm not sure of the price diffences between a kit and a sail ordered from Graham or one of the other suppliers. It may not be that great, i.e., may not be worth the frustration. But your sail will be ok if you order it from Sailrite and take your time. The "southern pine" that Grant used to make the shipping container in which he sent my kit was pretty good stuff. I actually used some of it in my boat. In other words, living where you do, heed Thrillsbe's advice to look through the big box piles and you're likely to find some usable sticks, or sticks from which you can rip what you need. Up north here in Wisconsin, our big boxes have "fir" and "white lumber", which can be just about anything, many knots included. There is also pricey "clear pine" from New Zealand, of all places, which is very nice but expensive and not always straight. That southern pine seems quite the thing, by comparison. Good luck to you. Keep asking questions. --pb CoreSound 17
-
Alternately, I hit the img links and they downloaded and I was able to watch them that way.
-
Great days.
-
I was out on Saturday with a loose group of small boat fans based in Madison, WI. The wind on Lake Mendota was 15-20 from the SW, the temp was in the high 80s, it was sunny, and the day was beautiful. I thought I'd share. That's a friend's Sea Pearl in the video. What a great day. As the skipper of the Sea Pearl said, "That 17 really scoots." 20210605_124618.mp4
-
Im in MIlwaukee, if that helps. Reacher is in Marinette/Menominee.
-
Very very nice.
-
Those channels are pretty slick.
-
I'll second the vote for Doug Fir. Otherwise, look for a wider piece of "SPF" that has a 1.5" swath of straight grain through it that you can rip out, and you should be set. If the ripped piece curls on you, then your idea of 3 pieces would be good, or slice the ripped piece in two, swap ends, clamp straight when gluing. I guess the possible need to resaw the slided piece means you should cut it oversize the first time, doesn't it.
-
In addition to that pedestal wheel and the 25 hp Tohatsu, are sure Carlita has enough cup holders? We don't want to skimp on necessities.
-

Thinning epoxy/cleaning hands&tools
Paul356 replied to Mark Rendelman hull 24's topic in B & B Yachts Forum
Whatever you do, dont use acetone. Nasty on your skin and your lungs, and not necessary. -
Excellent. Great fotos. Best wishes with law school.
-
Insuring homemade (from a kit) boats??
Paul356 replied to Alan Stewart's topic in B & B Yachts Forum
I have boat us/geico on my cs 17. They have been renewing every year. Fingers crossed. -
Yep, don't tie the reef lines to the sprits, but you already figured that. Just tie the reef lines around the bunched sail. Bravo to you for going out!
-
Big breeze today in WI. Be vigilant.
-
Go, Graham. You'll have lots of hitchhikers.
-
Yowza.
-
I did not lead my rear reefing line forward. I just cleat it on the sprit from the cockpit. Thanks for video, PP.
-
Here are the photos again.

-
That's it. I guess I need to do something different with those photos. Good thing you've got my back.
-
There was too much line back at 'midship so I made (my wife made) some bags from Sailrite to tuck everything into. That was a big help. This also shows the location of the clam cleats.
-
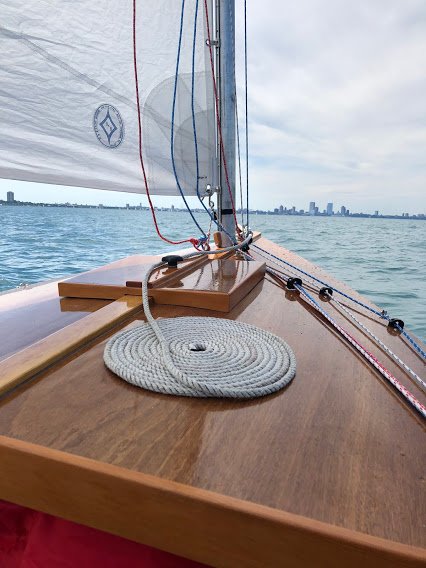
Here's a photo that shows it as well as anything, I guess. The lazy blue and red lines going up out of the top of the picture are the first and second reef lines, leading to hooks that are placed in cringles as the sails are hoisted. Ideally I would have led the far side of each line on the far side of the sail but I must have missed that as I was putting the slides on, and in practice it does not seem to make much difference. You can also see the taut halyard (white w/ blue twist) and snotter (blue) to the right of the mast and the downhaul (white w/ red twist) in a tight triangle just behind the mast, coming out of the clew cringle. All five lines come down to the deck. All are led away through bullet blocks that serve as turning blocks, and then through bullseyes, back to the starboard coaming amidships. You can see the one bullseye has three lines in it (downhaul and two reef lines), but only one of those three will be tight at one time. Some of the turning blocks are double bullet blocks, some are single. I use the same color coding for the lines on the mizzen, and the same blue/red coding for the rear reef lines on each sprit.
-
A good year, for sure. Not to mention helping your young pal across the street.
-
Core Sound 15 #162 — Building the “Norma T”
Paul356 replied to PadrePoint's topic in B & B Yachts Forum
Ha! Busy, sculling, often a two handed effort. I was able to scull out of a lee anchorage into a mighty 4k headwind last fall, once I cleared the rocks & could get the scull down deep enough (another issue). Until then, I was "bursting" along with a 10.5 push pole oar, I guess. -
That's what I did, add additional down hauls for each reefing line, led back to clam cleats on the stbd coaming, where the halyrd, snotter and down hauls are also cleared. I'll try to find a picture.

