Docpal
-
Posts
288 -
Joined
-
Last visited
-
Days Won
10
Content Type
Profiles
Forums
Events
Everything posted by Docpal
-
Blkskmr, What brand of digital compass is that?
-
She is almost a schooner at this point, great recovery !!!
-
Latest posting on FB shows them working on a jury rig- https://www.facebook.com/pcolaboy/videos/pcb.1184570241661422/1566714233371329/?type=3&theater
-
In looking at the latest Water Tribe tracking map it appears that they have given the Core Sound 17 and Core Sound 20 the distinction of having their OWN classes?

-
I think I posted this link years ago while building Petunia, but US composites has Kevlar tape in various widths, and it wasn't very expensive by the foot. I used it on all of my chines, bow, rudder, and center board. Took some epoxy to fill the weave, but it takes curves nicely it's pretty tough stuff - http://www.uscomposites.com/kevlar.html
-
This is what a CS 17 looks like hanging in the slings of a 20 ton travel lift. My yard does have a ramp so we slung her, hung her, and brung her to the trailer. In the process we saw something unusual: there was something hanging FROM the keel as we hauled her and upon closer inspection apparently the 'Slot Seal' I had Sikaflexed to the hull came loose rather recently judging by the lack of growth in the formerly covered areas. I had installed it as a sort of after thought back in the Spring, and to add to the experiment I painted the strip,and the areas around it with a water based bottom paint as a test. The results were mixed: looking at the third picture you can see the Slot Seal still attached to the hull with a small epoxied patch.ON it , and the surrounding red/pink painted areas (water based bottom paint0 you can see some healthy and presumably ORGANIC barnacles. While on the leading edge of the board there were NO barnacles at all,compared to last year's bumper crop (which was WHY I tried the slot seal). Not sure if the glop gave up because it was immersed under water for 4 months, whether the marina waters have solvents/petro in them (fuel dock),or whether they loosened from sailing. I had let the Sika cure for 4 days before launching, maybe not enough?


-
Nice find Phil ! They look like a great solution to a constant issue...http://www.clamcleat.com/cleats/cleat_details.asp?theid2=119 Thanks!
-
http://www.jamestowndistributors.com/userportal/show_product.do?pid=306&familyName=Buck+Algonquin+Bronze+Round+Oarlock#
-
Dave, I got a set of bronze oarlocks from Jamestown. Think they were Buck Algonquins, and the inner diameter is 2.25" . Nice and beefy. I also just learned something IMPORTANT about this afternoon about the idea of having oars in half. If you place them on a dock (or deck,or any flat surface...) and the wind kicks up as it did here today , the UPPER halves now have nothing to stop them from being blown by the wind, since the blades are only on the lower halves... In my case this meant that BOTH upper halves caught a good gust and made a break for the Bay ! Luckily as soon as I realized they were in transit I was able to round up a posse of jetskiers and finally gave them a purpose in their lives...So what could have been disastrous turned out to be informative, and humbling,all at the same time....
-
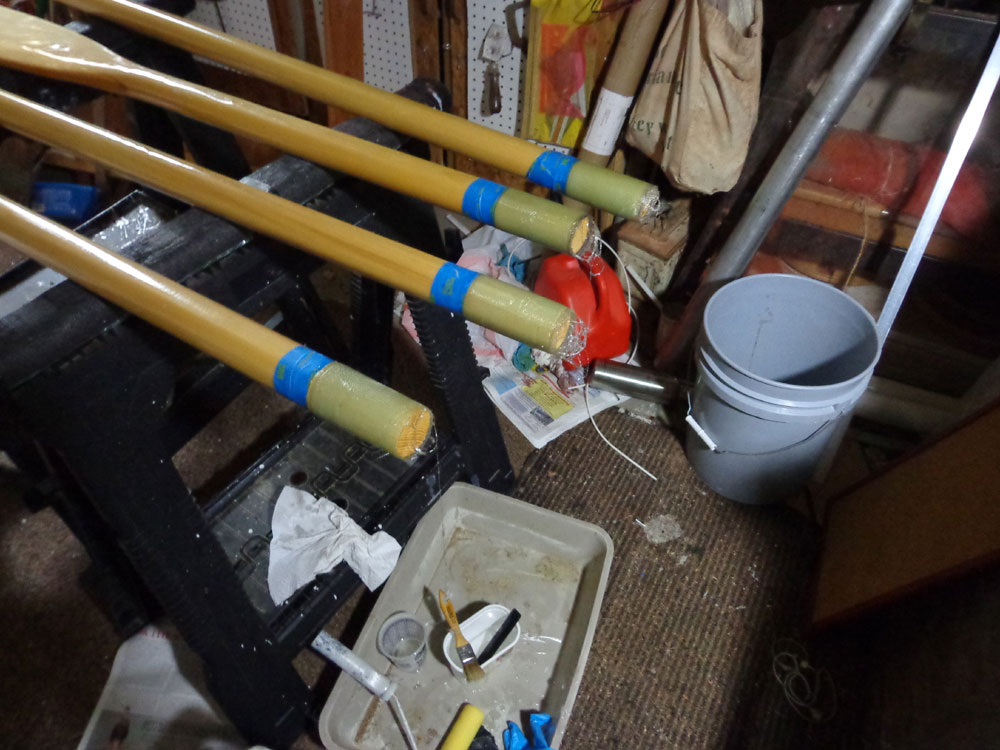
I've been following this thread daily as I was also installing a set of Duckworks ferrules on my oars as well. I didn't build mine from scratch though, I had ordered a set of spruce 9 footers off of Ebay, and of course they wouldn't fit inside the cabin of Petunia. Once the ferrules were advertised I ordered a set and then began the setup and installation process. In my case I had to back up a notch as the looms on my oars were not perfectly round. In order to build oars faster,and more efficiently, they had simply run some stock through a shaper to round off all four corners and so my looms were really ellipses, rather than round cylinders.Pretty close, but still not round. So I sanded down the larger sides of the looms,wrapped them with a nice,tight weave cloth, and then I only had a little (wet) sanding to do in order to get my tenons to fit snugly all around the inside of the ferrules. The ferrules are clever as they have a "step" inside one half which automatically lines up the other half. As someone pointed out earlier you actually lengthen the oars with the use of these ferrules, and now my 9 footers come in at a little over 9'6" which feels pretty good. I just did a test run this afternoon in the marina, and they felt VERY solid, with NO flex,or play at the joints. I'm not intending to use them for anything more than "backup power" when the wind is down, (and so is the Suzuki....). Here are a few shots of the tenons being wrapped, and then the oars in half and together. The orange strips at the tips are pieces of Kevlar tape which really add a lot of strength, and take some of the worry out of using them as push poles,and levers....


-
Trust me, I have been..
-
Dropped her in the water today ( watching a 20 ton travel lift move a CS 17 is somewhat comical,but they have no ramp at the marina I'm in...). Got the bronze " hatch holder upper" fitting which I bought 30 years ago at the London boat show installed on the forward hatch. I also got to "repurpose" the old spinnaker block from my previous boat,a 1937- 30 Square meter , and use it as the block for handling my mizzen stay sail. Good, old bronze pieces of gear are like jewelry on a boat....

-

Race to Alaska, new challenge for West coast CS boats?
Docpal replied to Richard C's topic in B & B Yachts Forum
Ed, Nice way to test out your modifications ! Congratulations on another successful finish....! -
Garry, I did think of that but noticed that I'm already impeding the slider's full opening slightly where I am, ( see middle picture above...). It looks like a trade off as the cabin top is a fixed size so I'm going to have to "split the difference" between the two hatches to get the both of them comfortably functioning. This is one of those by products of self engineering a design on the fly, as compared to having someone think the entire process all the way through before cutting any plywood...
-
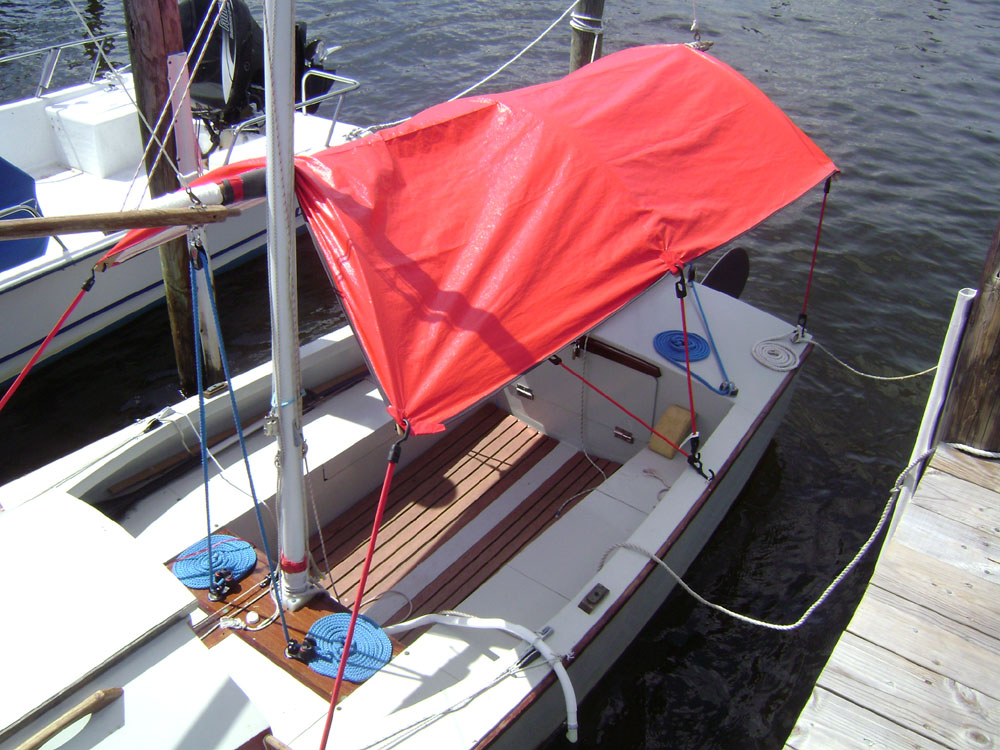
David, I have experimented with a cockpit cover,using a space blanket type of material strung over wooden battens,which are then suspended by the mizzen boom. It certainly helps with incidental rain,and gives great shade while at the dock, but obviously if I get the thunderstorms in question the wind which comes with them will make short work of this rig. I'll have to do a "dry run" (pun intended) of discharge hose routing to see if there is any loss of flow by adding an extra bend in the outlet hose. At the moment I have a gazillion last minute jobs to deal with so I can launch her and the path of least resistance might be to follow Dave's suggestion and just leave things as they are for this season. The attached picture shows the current rig of both cover and hose routing.

-
Dave, Yes it HAS to be in service while at the berth at all times since obviously the Anderson bailer is then out of play. I did what you suggested last season (leaving it over the side even while sailing) although with the cabin Petunia is a lot drier than most earlier CS 17's. One change I'm making for this season is the installation of a larger (group 24) battery. My 20 watt solar panel should keep it charged enough to offset even a local monsoon. I just thought I might be overlooking a simpler solution, but since the current method works I'll probably stick with it instead of poking more holes in her...
-
I realize that this post may not pertain to many (if any) other owners/builders, but since it's taken me SO long to resolve an ongoing issue I thought I'd post it in case anyone else attempts something similar in the future. When I built Petunia I knew what I wanted on my cabin top: one sliding hatch for the companionway, and a hinged forward hatch. I easily sorted out a solution for the slider and it's HDPE track, but I kept running into a mental block when trying to figure out HOW to put hinges on a curved hatch with deck camber... Finally I saw someone down at Cedar Key last year who had done something close to what I wanted on a deck that was slightly cambered and it gave me the idea shown in the attached pix. After seeing how much $$$ the local marine stores wanted for paper thin SS tangs I went online and ordered 12" of 1/8" SS flat stock from McMaster Carr. (Since everything else on her is over built,why not the hinges too?) After cutting the piece into desired lengths I used a heavy vise and a small sledge hammer and "persuaded" the SS into the desired angle (17 degrees). I then drilled them and dry fitted everything to the deck. But here is where I got bit in the butt by geometry again. Even though the hinges worked perfectly, the next issue was the fact that since the forward hatch was only 1.25" tall when I opened the hatch the rear edge would not allow me to open it more than 30-40 degrees without pinching. SO I got out the curved violin plane,a rasp,etc. and did sort of a 'hollow' on the rear side of the hatch. This gave me an extra margin of clearance to the point where I can now actually fit myself through the hatch in the event I ever feel that I have to do work at the base of the mast from 'inside'. I realize that I could have made an "L"shaped tang that connected the hatch to the deck pivot, but I also know that anything sticking up above the plane of the hatch surface would inevitably snag every line that tried to pass across the deck (such as mizzen stay sail sheets) . Now I just need to install the "hatch holder upper" ,make a bug screen drop in, and enjoy the feeling of fresh air below deck....


-
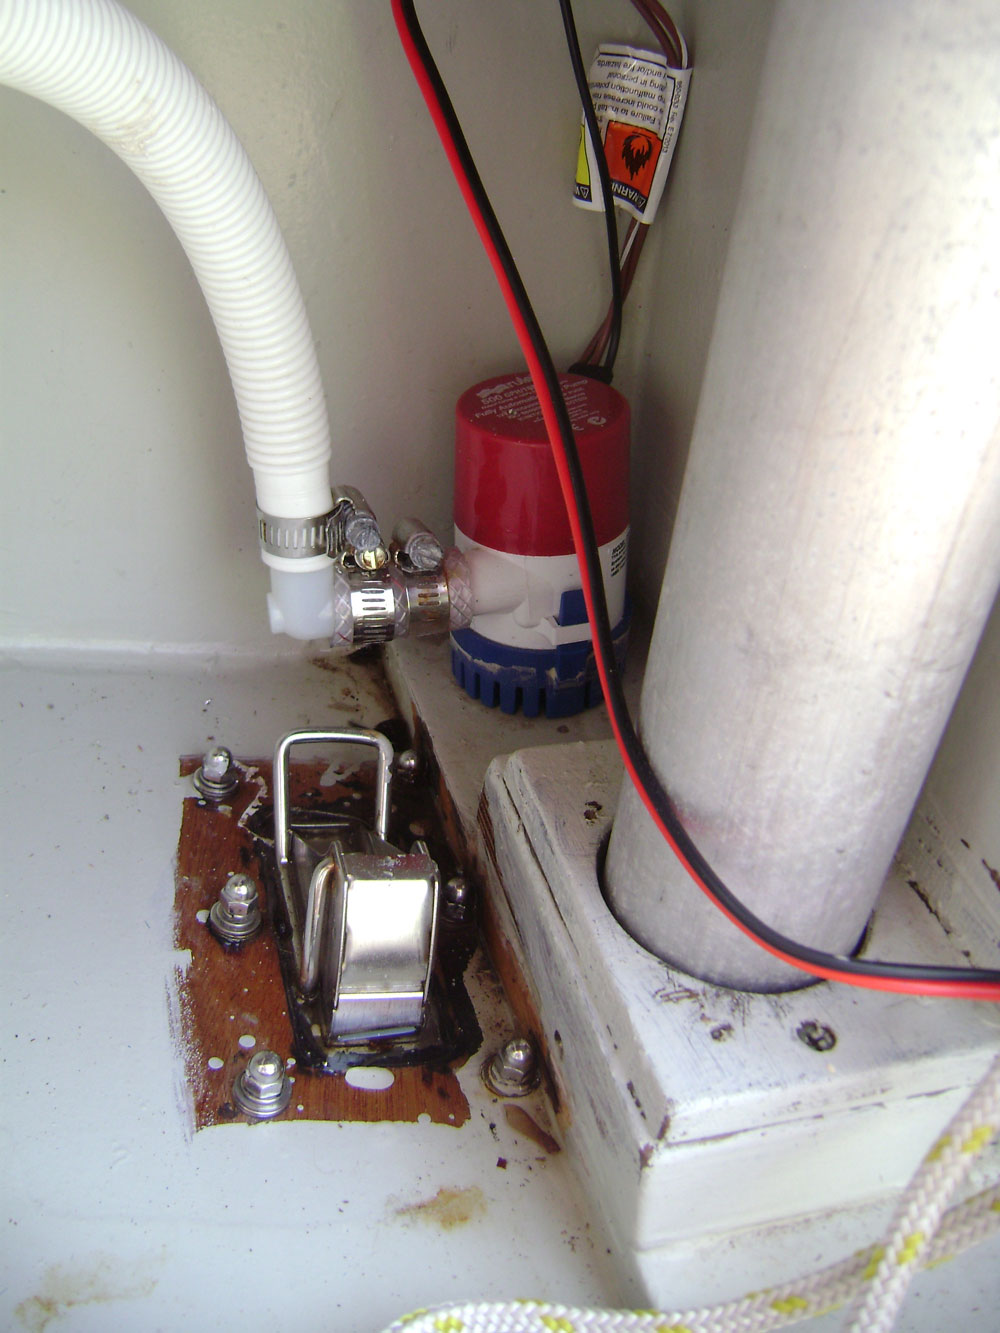
Due to a variety of circumstances( bum leg, lousy launch ramps in area, etc.) I have been keeping Petunia in the water at a local marina. VERY convenient as all I have to do is drive there, and go sailing. I'm on the Toms River which usually has all the wind I'd want (and sometimes more...) every day. And the river runs right into Barnegat Bay less than a quarter mile from my berth. I'm just about ready to launch her for the season but as I wrap up some last minute details I've been meaning to get around to I have one issue which still has me stuck: since we do get some good thunderstorms throughout the Summer I need to have a working bilge pump standing by. Last Summer I simply ran the outlet hose over the gunnel, but this is not only unsightly,it's inefficient as it extends the length of the hose a few extra feet. Based on my pump placement (see attached picture) the "ideal" solution for me would seem to just run the hose directly into the centerboard trunk, but I'm still weighing the good vs bad here. Good points: it's right there,and would mean no more than 12-15"of hose from the pump so I'd get maximum lift/suction not only while at the dock, but also underway. Bad points : awhile back I believe Graham cautioned me that putting the outflow hose too far aft would risk being affected by the steady stream of water pressure which builds up at the aft end of the trunk (if any of you have ever had a small leak at the aft end you've seen just HOW much pressure than can be....). Another potential problem is that this doesn't leave me a lot of room for an "anti siphon loop" and so it would seem that I could be creating an unwanted path for all of that pressurized water to back flow into the pump. I thought about running the hose a little further forward but due to the tight tolerances of the board/trunk there really isn't much room inside the trunk to let the water go anywhere, and the aft end of the trunk is where I seem to have the best potential for a clear outflow. Has anyone else come up with a solution for a similar issue?

-
Heat is also how we fully cure epoxy too though. It IS a thermosetting polymer....
-
Yup #229 is right around Petunia's era. His persistence has sure paid off in a beautiful looking boat !
-
SO, is that a modified/retrofit on the main mast where he has what appears to be a tabernacle on an MK 1?
-
Paul, When setting up the mount there are a couple of things to consider: you want to be sure that you have it low enough to get the cavitation plate well below the surface of the waterline so that when pitching/rolling you don't wind up in the air on every wave. Yet you also can't have it SO low that you can't reach the shift/fuel levers,OR have the throttle arm get jammed in the upright position.There must also be enough clearance to turn the entire motor 180 degrees for your 'reverse gear'. And then you need it to be far enough away from your rudder so that you don't take a bite out if it with your prop when making sharp turns. As shown in the above pictures it will/can occasionally snag the mizzen sheets when tacking, but I think that's also true of most transom mounted motors on CS hulls I've seen. And when you cut your 'notch' try to angle the bottom of the cut out so that it angles aft and will therefore drain any water quickly so you don't wind up with accumulated puddles in there. A good strong backing plate on the interior of the transom will give you a very solid connection with minimal vibration as well. I used 5/4" mahogany on Petunia... To date I have been very happy with the way it's worked....
-
You can always go with the Duckworks external motor mount which is removable - http://www.duckworksbbs.com/hardware/motor/mount/index.htm You'd just need to notch the transom as in the attached pictures


-
Official Watertribe EC/UFC 2016 event discussion.
Docpal replied to Alan Stewart's topic in B & B Yachts Forum
Alan has finished the UF ! What a great way to test out a new design...Both Alan and Graham have sure turned this year's event into a showcase for their design and sailing expertise...Congratulations ! -
Official Watertribe EC/UFC 2016 event discussion.
Docpal replied to Alan Stewart's topic in B & B Yachts Forum
Looks like Alan is now roughly 14 miles behind the current leaders,and gaining......