

JPower210
-
Posts
107 -
Joined
-
Last visited
-
Days Won
2
JPower210's Achievements
")


-
Get ready for the "you don't need a motor" comments ? I have a 17 as well, and didn't want to do a well- it's a great solution, just wasn't for me- I started out with a lift up model but didn't like it due to looks, put the motor up too high, etc. I ended up with a really cool antique mount that leaves a small bracket on the transom and the mount removes with the motor. I don't have a picture at the moment but I'll try and take one- I've seen similar on ebay and marine consignment stores. You could do something like this- which is readily available- I have a long shaft as well and with careful measurement, was able to figure out how low I could mount the motor and still leave room to tilt. So far it's worked out well- I also mounted as far outboard as I could to give me more room to work with. I haven't had any adverse trim effects from that.

-
Thanks Ken- I have to get my mental motivation up a little to get going on all the glass work that is next. Just a matter of picking the next milestone- I think mine will be getting the cockpit sole down- off to go mix some epoxy... ?
-
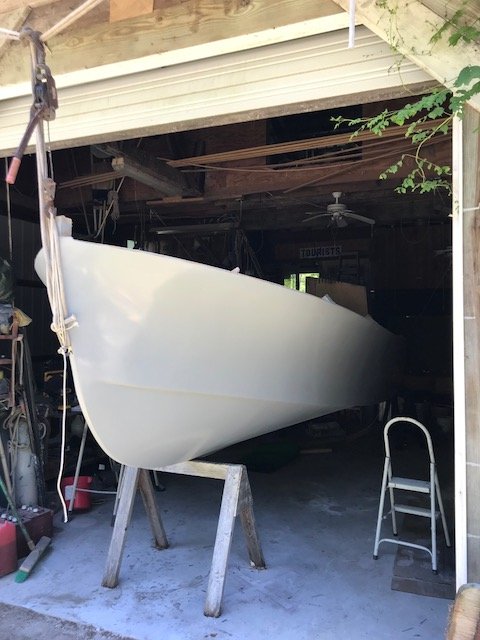
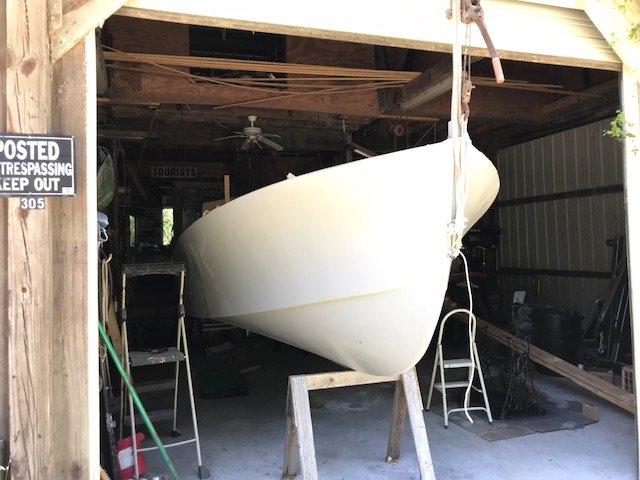
Slow but steady progress.... she is off the jig and upright. Hanging "in the slings" until I put a metal keel guard on later tonight and then I'll drop her on the trailer and start on glassing the inside. I really like the System 3 WR-LPU, but I hate spraying it. Rolling and tipping is tough as I am usually working alone. I'll need to wet sand and buff, but on the other hand I won't feel too bad if I get something on the topsides as I finish out the interior. Flipping was fairly drama free- block and tackle on each aft corner and used the bow eye as a pivot- just moved slow and thought about the next step.

-
No...no...no- Not possible- Chick- this one is your fault- ever since I saw Princess I knew there needed to be an OB20 in my life ? JP
-
Sprayed the first coat of primer this morning- plan is to get two/three more coats on today and then sand and spray the finish coats this weekend-


-
My wife rolls her eyes a bit, but supports my boat habit. Whenever she tells me I have too many, I just say ok, we'll sell them off and buy one that equals the length of all ?
-
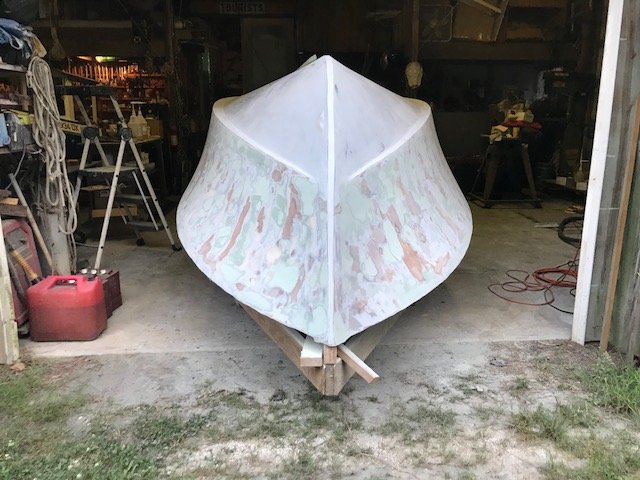
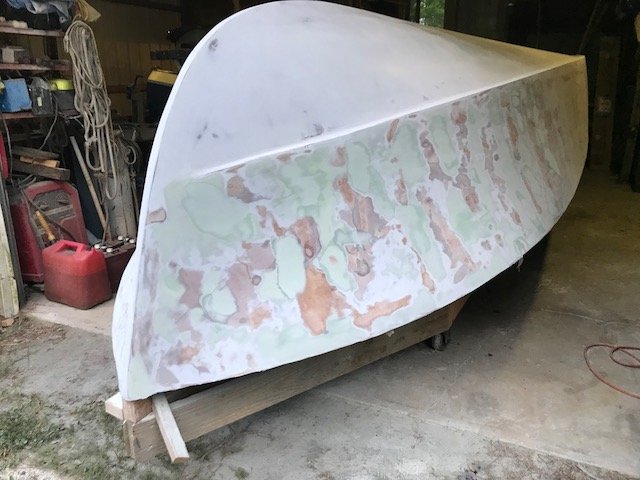
I figured a bit of an update was in order- I started my build quite a while ago, but competing projects have taken priority- full refit of a Westsail 32, etc... But I am back at it. I have spent the last couple of weeks spending quality time with the long board. Or as the case may be, the sorta long board with the flare of the OB's topsides at the bow. I think I have hit the end though. Plan is to spray primer later this week, block sand it, and then spray finish coats by this coming weekend. Most of my time is in the evenings, after the little ones are in bed, so I don't get long blocks of time to work. If all goes to plan, I'll let the paint cure next week while we are out of town and flip her when I get back. It's nice, (with the exception of longboard sanding) to take a break from the repair/refit on the Westsail and work with new construction.

-
Stewie's head... that's funny. Are you putting a hatch cover on it? You'll notice it a lot less if/when you do, and it's painted. My 17 has a flush fitting hatch in the same spot and it kind of disappears when painted and the hatch cover is there-
-
Congrats!!! Awesome to hear that Sandy is on the water- I'm not going to make the messabout this year, but let me know if you ever get down to the Beaufort area and we'll take Irie and Sandy for a sail together- JP
-
Carter- she is looking great- those planks at the bow are a treat, huh? I better get going on mine- you are catching up quick- I am fairing out the bottom glass now and looking forward to getting the boat right side up- weather/job/family commitments/other projects all seem to be conspiring to slow me down. Take care- JP
-
Carter- I use the nails as well as the staples in my projects- for the planking, I think the staples worked better than the nails due to more surface area with the two legs and the crown helping to prevent pull out. Those square head pocket screws that Ken mentioned are great as well. I was really happy that I did not have any screw holes to fill on the side planking. The blow out mentioned is easy to fix, but I did find that getting a staple length that was just shy of the double planking thickness, and watching my air pressure on the staple gun to just set the crown at the surface, avoided most of that. Looking good! JP
-
I would have thought so, but I didn't need anything but the staples. Couple of the planks required starting the fastening to start in the middle and working out from there. The aft planks were easy, the forward ones were a bit more work. Typically, I took the 8" section, and cut to rough size, placed where it was going to go and held it with a couple/few staples in the middle of the plank. Then I would scribe for fit to the preceding plank, break the staples and bandsaw to fit. Mix up my epoxy with cabosil, apply, and refit the plank and staple. I cut notches in a flexible scraper and used that to apply. Worked well, and I hung every plank by myself. So far, the only screws I have needed were on the tight bends on the bottom planking. JP
-
Congrats on the progress so far- I am building the 20 as well- as far as the stringers go- I tried to get away without steaming...but that did not work. Ended up with Juniper for the stringers for the last two runs, with the sheerline out of 3 separate pieces and I still had to steam- Like Ken I used a 4" piece of PCV, capped with a rubber cap on one end and a couple of small holes drilled along the length. I bought a steam generator, but I know I'll use it for some other projects. That was after I broke quite a few. The side planks are fun as you really get to see the shape come together. I put the last one on this morning! I do recommend composite staples for the job. I use the Red Hawk ones, but Raptor makes good ones as well- It made the planking go much quicker than it would have, especially on the second layer- Heed Graham's advice about narrower planks at the bow- I ended up with 24" most of the way down the sides, 1 16" course at the start of the curvature and 8" the rest of the way. Doing it over I might even consider 6" at the points of most flare just to take a little of the stress out. By the end of the planking I was definitely ready to be done, but I am quickly progressing to post fiberglassing sanding- at which point I am sure I will wish I was still hanging planks. Beautiful building spot, and looking forward to seeing your progress! JP
-
And I will add a little more detail- I decided on the 20 after seeing the 20 that Chick built in person- I plan to use it in the sounds here in NC, mostly as a weekend cruiser/day boat. I wanted a way to get out of the sun, as well as shallow draft and a place for my two little ones (2 and 5) to grab a nap as well as have a porta potty. My plan is to sew up a canvas enclosure for the cockpit for those times that all 4 of us want to sleep on the boat for an overnight, and to build the "kitchenette" that Chick designed for heating up a breakfast/coffee, etc. I have a larger sailboat for any longer cruises that I might want to do. The 20, for me, seemed to be the right design, that checked off all of the boxes, that would still be practical for a quick run down to the ramp for an hour on the water. I am lucky that I live close to a lot of great boating areas. I originally bought the plans, but, in the end, went with a kit. My time in the shop, between family and work, is fairly limited, and cutting plywood is not tops on my list of things that I like doing. I think the kit is saving some fairly significant time, maybe not in the overall project, but definitely in how quickly it looks like a boat, and that keeps the motivation going for my late night building sessions after the family is asleep. Construction so far is straightforward, I am close to finishing up planking the hull and will glass and fair next. Then I'll flip and start on the fun stuff. This being my second B and B boat, I can't say enough about the quality of the plans, the B and B crew, and the resource that this forum is. Good luck with your decision making and don't hesitate to ask more questions! JP
-
HI VTboat- my sense- based on my experience completing a CS17 and being in the process of an OB20, is that the cost will be fairly incremental, and the time will be more but not exorbitant. Building the boat does not take that much, it's all the finishing, accessories, level of trim, motor, etc. that add up in time and cost. I chose the 20 more for usability than anything else. I also liked the proportions a bit more, but most importantly, that extra 4 feet, for me, would have seemed a lot more as I got it on and off the trailer by myself, etc. I did not need the extra interior room for my purposes. Are you in Vermont? Where will you use the boat? JP