Miyot
-
Posts
339 -
Joined
-
Last visited
-
Days Won
16
Content Type
Profiles
Forums
Events
Gallery
Everything posted by Miyot
-
Fitting some deck.

-
Fuel tank installation. Still waiting on hose hangers to tidy up the fuel hose runs. I still have to permanently install the wiring chase and run the transducer cable and install the bilge pump. Tomorrow I'm going to cut and fit some deck, moving around the boat is difficult. What a mess the boat is.


-
Hey Hightech. No basement work until the boat is finished. I have just completed the bed for the main fuel tank. Some fitting work and install and glue the neoprene and I'll be ready to install both tanks. I have all the hardware and I'm figuring out where to drill holes for wiring and main fuel lines. I got nice flush mount fuel vents. They only stick out about 1/8". I have my chase for the wiring,shiftcables and hyd steering hoses. Also I have the trim tabs (Bennett) and hardware and they are ready for install as well. I got my wire for running power up to my console with hardware (bus bars, etc) After I install the tanks I will deck up to station 6 before doing any more work forward. Still lots to figure out. I also purchased my Chartplotter and sounder (Garmin 547XS) with Chirp transducer (I got it now so I can run the ducer cable now). I can't wait to get some decking down, I'm tired of tripping all over the place trying to move around the boat. I'll get some pics up before I deck her over. I'm pressing forward working on it every day. But not with the energy I had in the beginning. I'm glad most of my fuel tank work is done. Your boat looks clean, keep the pics coming. Dave
-
Ouch, splintery. We all have to use kiln dried lumber. No question in my mind air dried lumber, if you can find it, is by far superior. Sometimes when I'm motivated I'll mark little jobs that need epoxy with some blue painters tape. Then when I have enough little jobs lined up I'll mix up a batch and do them. Invariably I miss one and find it just after I've let the last remaining bit of resin in the cup harden.
-
You don't have to steam the entire length, only the end that is taking the extreme bend and twist, perhaps 6 or 8 feet. Even then I don't feel a steamer is necessary. Just wrap bath towels around the end to be bent and pour boiling water on them ever 5 min for 40 min or so and cover in between with plastic to help hold the heat in. For sure try bending without any steaming or boiling water. They may go in as is. All of mine but 4 went all the way without any steaming. Different woods bend very differently. My Doug Fir was tough and had to either be steamed or laminated. Southern yellow pine, according to Graham would be a good choice as it bends well. My Doug Fir was not the greatest and I had many defects to deal with but managed to get the job done. Your wood,according to what kind, will hold some shape but expect some springback. I had no problems after steaming to get the the stringers back into position. Something else to try would would be to cut a slit in the end of your stringer, perhaps 6 or 8 ft. long, spread that open and epoxy it up. Then fasten it in place. Thus acting as a lamination without fitting two entire pieces for the entire length. Laminating a 20 ft chine would be a messy business. Trying to get it to line up nice and square and having epoxy drip on everything. Like trying to hold two eels together. That just my opinion. I laminated my main sheer clamp out of I think 8 lams of Doug Fir. This ate up some time. My chine was 1 1/4 X 1 3/4 X 24ft., beefy.
-
I'll agree somewhat with your comment Tarbaby. I didn't actually steam my stringers but used the towels and boiling water trick. This actually worked quite well and I don't feel adds much water to the wood. With the heat involved it drys quickly. I considered laminating my intermediate sheer, which was quite beefy at 1 1/4 X 1 3/4. But you would glue the first half in which would be easy. The second layer would be a slippery mess and a little difficult to align and then clamp and clean up, but perhaps stronger. By the way, a steam box can be made very quickly. When I built my Haven 12.5 I made my steam box for the 44 ribs out of a piece of 4 inch PVC pipe about 4 ft long, and a 5 gal steel gas can and a radiator hose. A 50 dollar set up that took all of 15 min to build. I steamed the white oak keel 14 feet long by 8" wide by 1 3/8 thick using nothing more than 5 mil thick plastic wrapped around it into a tube and running my radiator hose into the end. Again a 20 min job. I guess I like the steam cause I have used it in other builds and it works. That new hull your working up is a pretty one, the model is excellent.
-
My bad, I thought you were gluing planking onto stringers that were not yet glued at the stem.
-
A little tip on steaming. You only have a minute or so to get the wood bent in place. It should go all the way. Fasten it and let it dry. If your actually sticking the end of a stringer in a steam box, a half hour per half inch of thickness is about right. This can be a little tough with with 20 footers. Wrapping the end to be bent with bath towels and pouring boiling water on every 5 min for about 40 min works well but is work. Plastic sheeting wrapped around this mess helps keep the hot moisture where it should be in between pouring of the boil water. When you think its ready, get those towels off and get it bent and I mean in less than a minute. Either it goes or it breaks. I let mine dry 24 to 48 hrs and had no problems. With the heat involved it will dry pretty quickly, but i was using Doug Fir.
-
Fishman, you need to fair all of your stringers and frames or molds before you begin planking, just as you did the bottom. Bend a batten against the stringers, it should fit flush everywhere it touches a stringer or frame. Put the batten at a slight angle so it crosses several stringers and also a frame and check for fairness. Don't depend on the epoxy to fill gaps. If your batten is touching the corner of a stringer as it bends around the hull but doesn't touch it flush all the way across, that spots needs planed until it is. Back aft things should be pretty close, but all has to be fair. I would finish gluing up all of those stringers before I began planking. Up at the bow where the stringers are forced to twist much more there will surely be fairing to be done. When you bend a plank into position it should be flush with everything it touches. Chine, stringers, frames, stem. If you put your stringers in correctly, the frames will need to be beveled to match the curve of the stringers. This is really apparent at the bow. I spent several days fairing the topsides of the boat before I began planking. I wouldn't commit to any planking until all the stringers are glued. I had one that cracked a month after it had been glued. Perhaps I bumped it during construction. I epoxied it in place and clamped it up. All was well. If one broke in a bad place and you were already planked up and needed to splice in some length to get the bend, it could be a problem. If your already fairing, disregard all this, my bad.
-
Very good!
-
Roll pins, good idea.
-
Looks good. I feel bad for you, you know, to be so far back in the building process. That stage of construction is but a distant memory for me. Must be very depressing for you to be nearly at the beginning. Just a little humor , you know, to perhaps raise your spirits. You'll get it done sometime. I know thats a long long way off. But were pulling for you.
-
I use an impact drill as well. The lath screws are self drilling but I always drill a pilot hole first. The doug fir loves to split without one. The screw extractors are available at highlandwoodworking.com 15.99 for one size or 42.99 for a 3 size set. #6 up to size #14.
-
Fishman, what kind of screws are you breaking off? Some take a screw driver and heat the end of it with a propane torch. When it gets hot, put it to the screw head and hold it until it heats the screw. This will soften the epoxy and you should be able to back it out. You can buy the screw extractors for broken screws, like a mini hole saw. If you get the metal lath screws at Lowes, you will not break any more. In the entire build I believe I broke only one of the metal lath screws, I had used that screw several times . It was not in the hull, so I used my smallest hole saw and cut it out and made a plug for the hole. Another way to avoid breakage is to remove the screws before the epoxy cures fully. This can't always be done if your not available at the proper time or your glue up is under a lot of stress and you can't back them out until a full cure is reached. When to back them out is a judgement call. Somewhere between 10 and 14 hrs. According to your room temps and type of epoxy mix you are using. I used silicon bronze screws for a lot of my build. Especially attaching the inner hull layer to the stringers. If one broke and the placement is good, not inter fearing with later fairing or such, you can just leave it in and forget it. Now I found removing screws much less of a problem if you drill the hole after clamping the part together with the epoxy already on the join. This leaves a pretty clean hole with very little epoxy getting on the screw. When you remove the drill bit, a small amount of epoxy will be on it, so you have to clean your bit occasionally A quick check of the hole you just drilled and perhaps swab any remaining epoxy with the tip of a small screw. Only takes a second, but is usually not needed. Clamping and then drilling with the epoxy already on the part leaves a pretty clean hole. I rarely broke even a soft bronze screw. If you pre drill the hole and then remove the panel or part and then add the epoxy, reassemble and screw it down, you will get a lot of squeeze out through your pre drilled hole and will inevitably get stuck screws. I would pre drill a few for alignment and the rest would be drilled after the piece was in place Work the epoxy, love the epoxy. Ask it to do what you want the way it wants to do it and it will love you to. Just a little epoxy humor. Really I hate the messy stuff. Adding doublers and such that aren't under stress, remove those screws at about 8 hrs or a little sooner if your room is warm or your using a fast hardner.
-
Hey Hightech. It is a tight fit vertically, but just for the fuel outlet and dog house (fuel fill and vent). I have 2 3/4" clearance from the top of the tank to the bottom of the deck. Plenty of room for the deck beams. I only have 1/2 inch clearance at the dog house and fuel outlet. Hatches will be installed just above these which will give me a little more. I'll add a piece of neoprene inside the hatches to avoid any chafing should they ever touch.. I have plenty of room for the allowed 3% expansion. The forward tank (another 40 gal tank in the next compartment forward) has a little more room than the aft tank vertically, so I'm in pretty good shape. The aft tank is only for off shore trips and will be burned first. Also I'll have a fresh water tank in the compartment forward of the main fuel tank. I'm not sure yet as to how many gallons, but I'm thinking around 25. This will help offset some of the weight of the aft fuel tank for those off shore runs. Fuel fill will be run to the port gunnel as well as the vents to the port side. I hate cutting holes in the stringers, but the hoses have to get out somehow. I will add some reinforcement to these spots by adding a doubler of 1/2" ply to these spots. The fuel fill hose will be tight here but it will go. I got the corrugated fuel fill hose for flexibility at the chine where it makes the 90 degree bend to go up to the gunnel. Details details. Pressing on. Lets see some pics. Dave
-
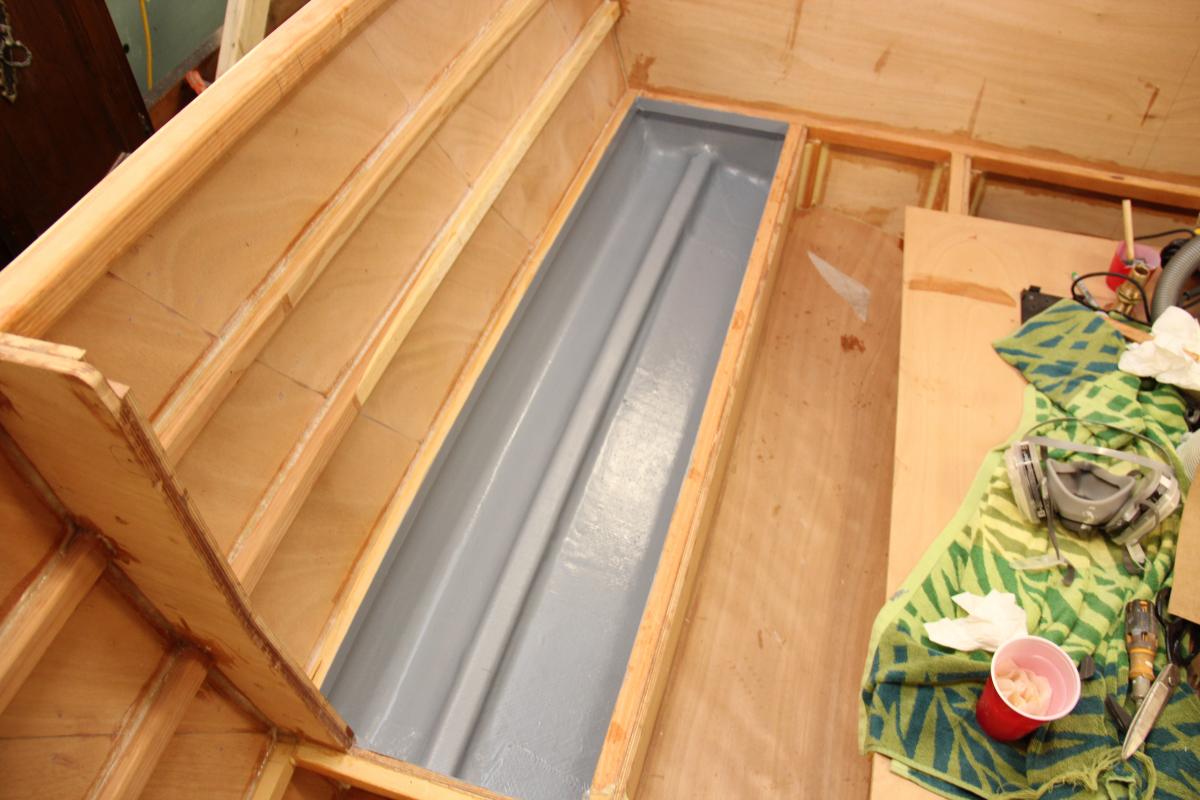
Aft fuel tank installation. I made a pattern of the fuel tank to aid in fitting the supports, you can see it leaning against the aft bulkhead. The tanks being plastic, I wanted a very accurate and snug fit. I'll line the tank bed with neoprene so it won't chafe. I have room for tank expansion, but is still a close fit vertically. A very nice fit for the two 40 gal tanks. They are Moeller tanks. 80 gallons should give me the range I'm after. Glassing and glue up will take some time. Here are some pics. Its hard to see, but the tank supports have about a 1 inch gap between them and the hull. They attach only to the keel and bottom stringers. Allowing any bilge water to flow freely under the tanks as well as air circulation.


-
Greg Rossel's book is excellent and I think is a must have. Good scarfing info and lofting as well. Not much on epoxy though and is aimed at more traditional built craft craft. Gougeon Bros. epoxy info is excellent and can be found online. I bought two books on glassing boats and can't recommend them. (won't mention titles as they were not worth it) Sorry to be of no help. Check for info online. A lot can be found.
-
Starting to make some way. I started out slow, but I'm starting to get a rhythm. Glassing the inside and painting on a coat of interprotect 2000E after the glass tacks well. I made a pad in the aft compartment for the bilge pump and float switch.


-
Well a plus for me is i'm not a sports fan. The last year I haven't done anything but work on the boat. I will ski a little this winter. Id like to finish the boat in May, but there is a lot to do. Keep the pics coming. It is looking good.
-
Hightech, where you at? Whats going on with your build. I am back in the saddle and have begun glassing the inside. I didn't work on the boat for 3 weeks. I tried to but just couldn't bring myself to do a thing. I was totally burned out. Well a year of boat construction is behind me now. I'm feeling pretty good about working on the boat again and some excitement has returned. Man there's a lot of work in a boat. I'll get some pics up when I make some headway. Ordered my trim tabs, bilge pump, etc. I got 80 board feet of Mahogany, pretty stuff. Anyhow I'm pushing on.
-
CarolinaFlare, the strong back is 24' 3 5/8" long and the boats beam is 8' 6". The strong back is about 4' 7" wide. The transom does not extend past the strong back. My boat extended about an inch or so past the forward end of the strong back.
-
I like the one with the screws. Being in a hurry, I fooled around and used clamps. One side slipped (the same spot your screw clamp is in) after I had left the shop and so is glued slightly out of alignment. It still bothers me. If I look for it I can see it. I have not touched my boat in nearly 3 weeks. I have gone down to the boat with every intention of beginning the next phase of construction. I walk around a bit and look at things. Sit in my chair and think and look at the boat and promptly return to the house and watch TV or something. Complete burnout. I have managed to reconstruct the wall to the barn so I can heat the shop. Got my propane tanks filled and did a good cleanup. I'm ready to start on the inside of the boat. Perhaps tomorrow.
-
Your fit looks good in the photo. If I understand you right, you cut the edge of your chine flat to match the slope of the bottom planks. I would think that more difficult than beveling your bottom planks to match the chine flat. I took a half inch thick piece of scrap ply and just laid it on one of the frames and slid it against the bottom planks. It will be touching the bottom plank at the top corner (or bottom corner if the boat was right side up) and a gap will be where the fit is not right. Then just plane the bottom plank in that spot until your scrap piece of bottom ply fits flush against it. Do this at each station or frame. That gives you a start. They are the most difficult spots because the frame is in the way of a plane so you have to use a chisel. Then use a plane to join these spots together for the full length of the chine on your bottom planks. You can clamp a batten along the outside of the frames just at the chine and slide your scrap piece of ply along letting it ride against your bottom planks to help you judge how much to plane off the bottom planks for the flat you are creating. So now you have a flat planed onto the edge of your bottom planks and when you fit your chine flat it should but up nice and square to your bottom planks. This is a slight winding bevel ( the angle changes from stem to stern). It is actually easier than it sounds. So long story short you bevel the bottom planks instead of the chine. I think you can see the flat or bevel planed on the bottom planks.

-
Your fit looks good in the photo. If I understand you right, you cut the edge of your chine flat to match the slope of the bottom planks. I would think that more difficult than beveling your bottom planks to match the chine flat. I took a half inch thick piece of scrap ply and just laid it on one of the frames and slid it against the bottom planks. It will be touching the bottom plank at the top corner (or bottom corner if the boat was right side up) and a gap will be where the fit is not right. Then just plane the bottom plank in that spot until your scrap piece of bottom ply fits flush against it. Do this at each station or frame. That gives you a start. They are the most difficult spots because the frame is in the way of a plane so you have to use a chisel. Then use a plane to join these spots together for the full length of the chine on your bottom planks. You can clamp a batten along the outside of the frames just at the chine and slide your scrap piece of ply along letting it ride against your bottom planks to help you judge how much to plane off the bottom planks for the flat you are creating. So now you have a flat planed onto the edge of your bottom planks and when you fit your chine flat it should but up nice and square to your bottom planks. This is a slight winding bevel ( the angle changes from stem to stern). It is actually easier than it sounds. So long story short you bevel the bottom planks instead of the chin
-
The boat looks good, but I like the little folding chair. I bet many thoughts and ideas are made there.