Pete McCrary
-
Posts
692 -
Joined
-
Last visited
-
Days Won
40
Content Type
Profiles
Forums
Events
Gallery
Everything posted by Pete McCrary
-

Spindrift 10, #1329 -- "Seabiscuit" . .
Pete McCrary replied to Pete McCrary's topic in B & B Yachts Forum
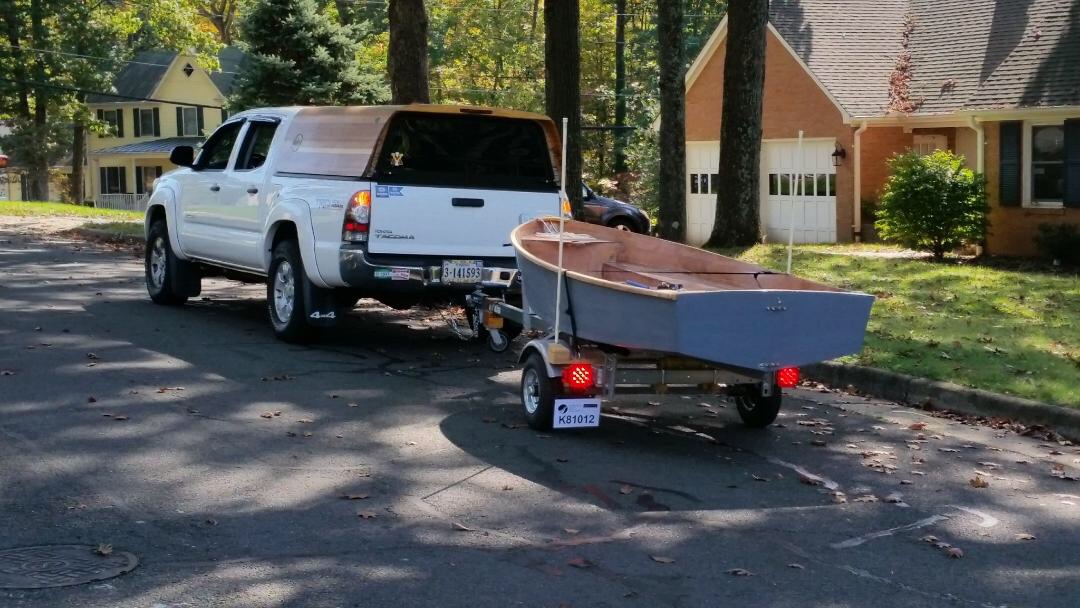
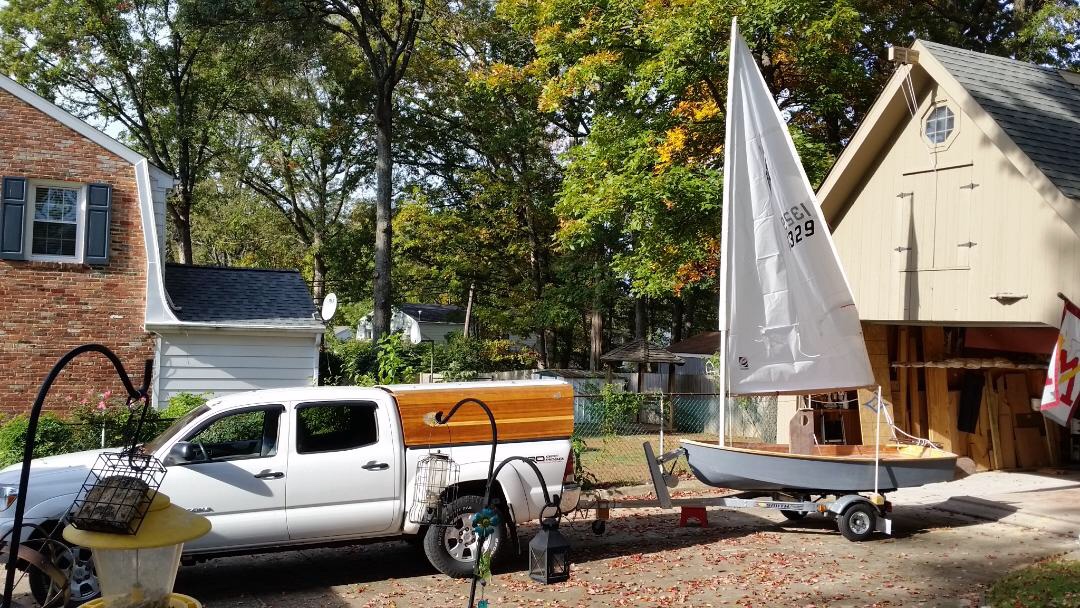
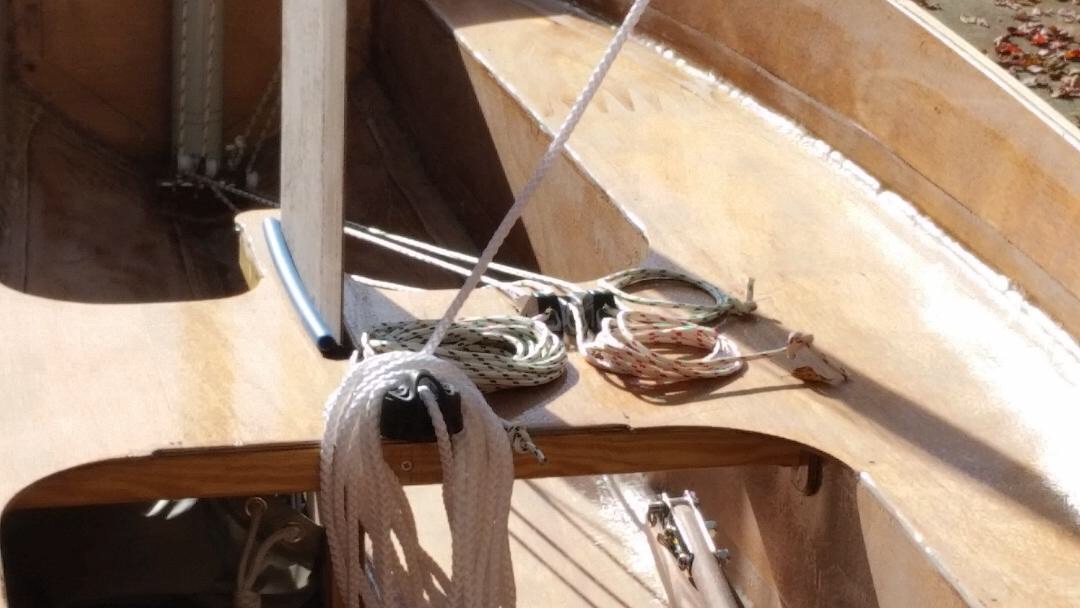
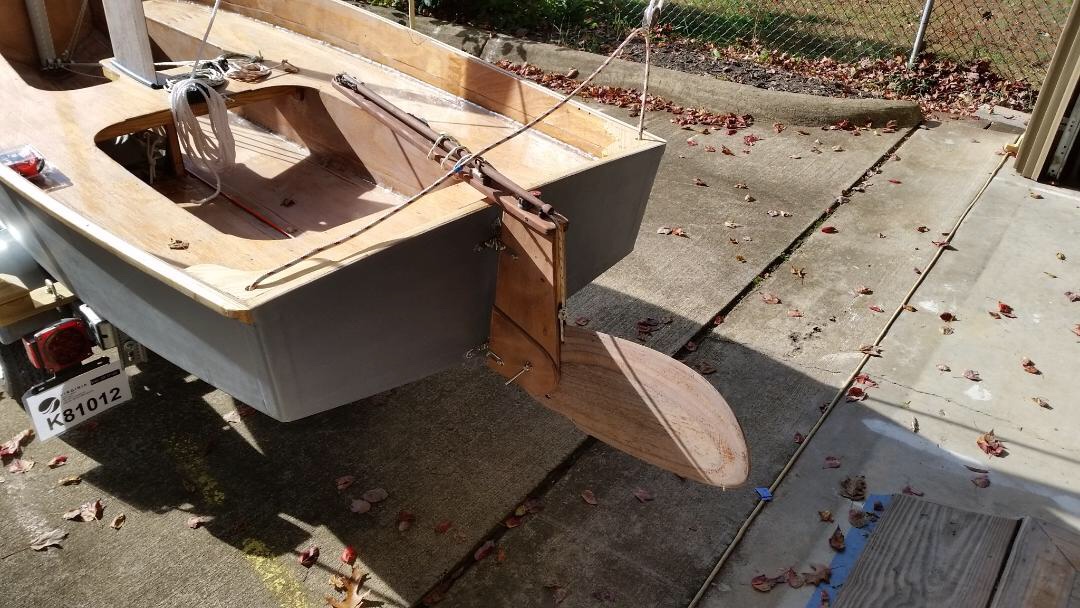
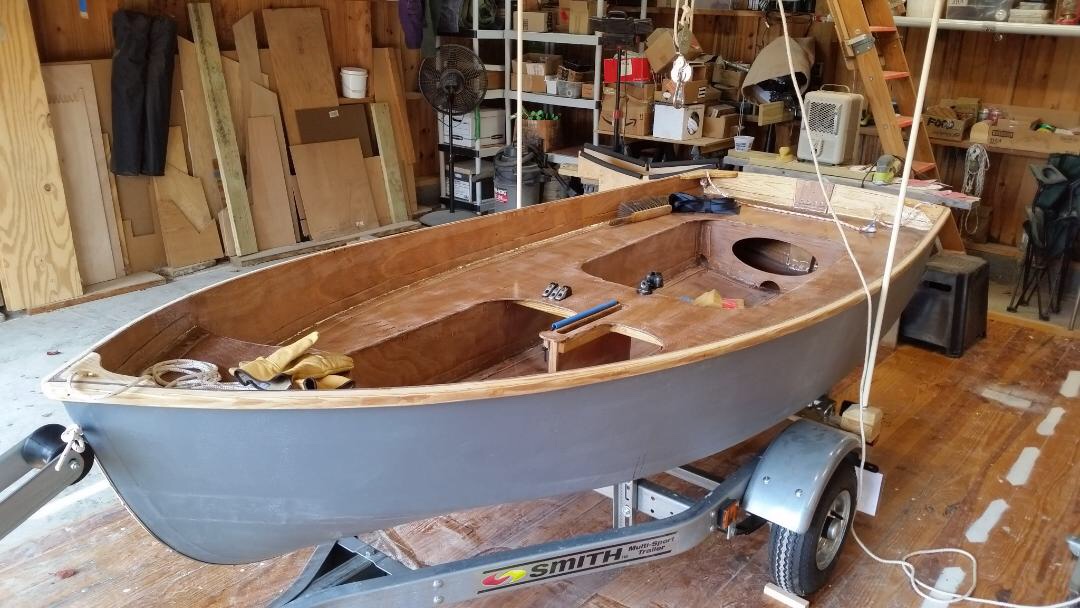
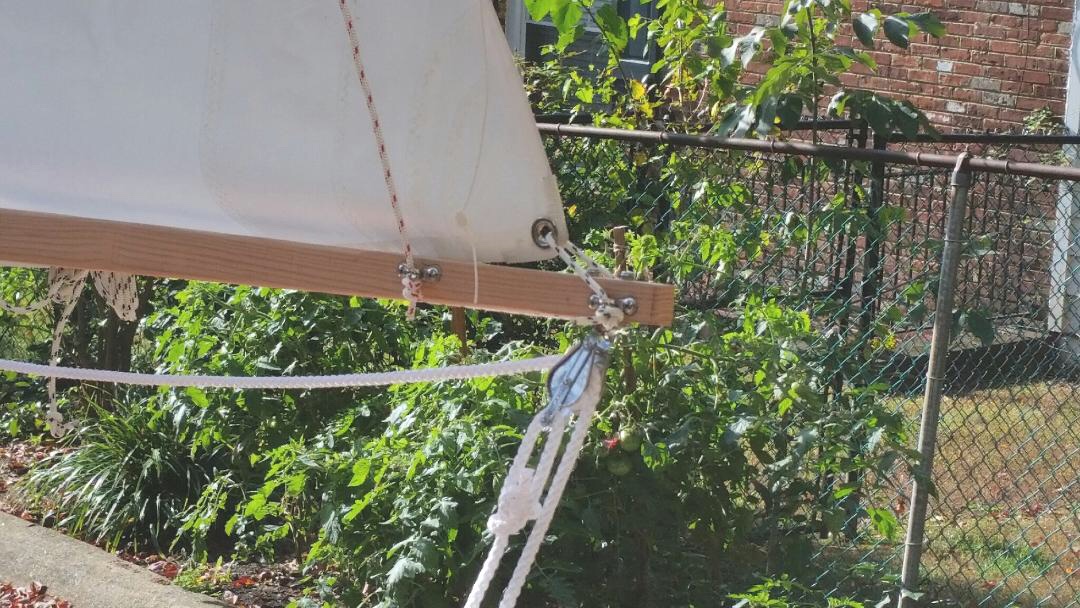
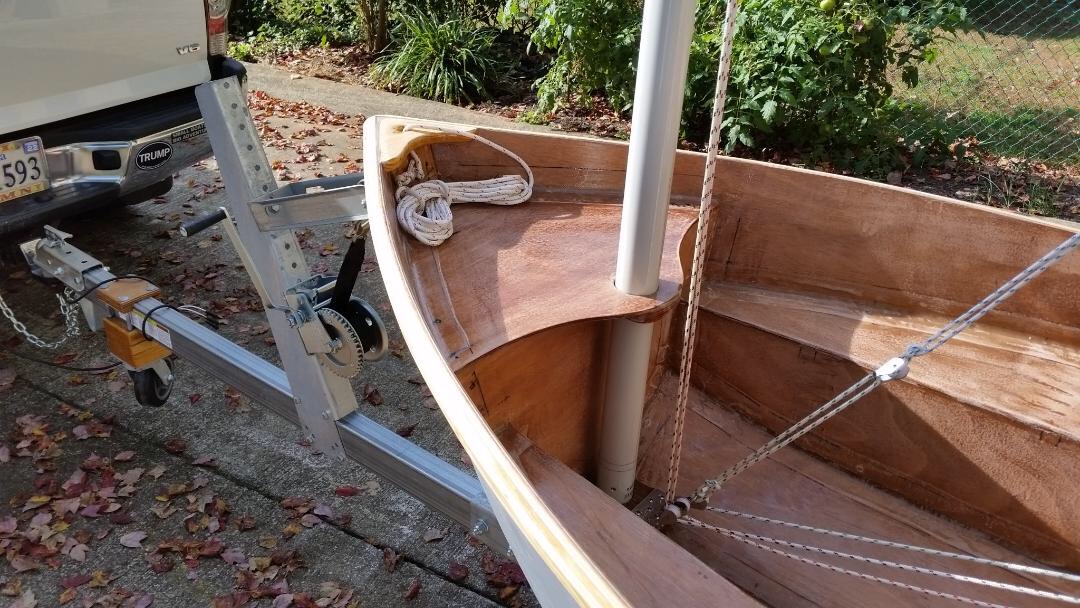
Although she will be in her underwear, Seabiscuit will be at the Messabout and submit to a shakedown cruise. This morning she was fitted to her trailer and in the afternoon a dress rehearsal and a “dry” fitting of sails, rigging, etc. Everything fit ok, but some trimming will make it better. An x3 pulley lifted her off the cradle and onto trailer. Passed the driveway exit test without dragging the skeg. Mast stepped and painter coiled on foredeck. Halyard, reefing line, and boom vang tensioner. CB held up with bungee cord and pvc. Controls at the helm. Ready for sailing. Mainsheet coiled over swivel cleat. While trailering, rudder assembly will be stowed within the boat. Out haul and reefing line. Dry fitted, but definitely not “road ready.” Reefing line at the luff. See you all on Friday.


-
Spindrift 10, #1329 -- "Seabiscuit" . .
Pete McCrary replied to Pete McCrary's topic in B & B Yachts Forum
The gooseneck bracket has been attached to the mast with thickened epoxy and four wraps of 3” FG tape. Next I was planning to install the cheek block at the mast head — but I realized that would prevent the top mast section from “nesting” with the two other [larger] sections. So, I thought up this solution. The double “bull’s eye” was cut from a scrap 3/4” marine ply. The pulley is an RF-20101 ball bearing. Installed with a thru-bolt into the masthead plug. All three nested together. The profile of the cheek-block [installed] was too large for the space available between the ID of the 2” tube and the OD of the 1.5” masthead tube (difference ~< 1/4”). Seabiscuit will be turned over this afternoon. I’m pretty sure she’ll be at the Messabout next week.


-
Spindrift 10, #1329 -- "Seabiscuit" . .
Pete McCrary replied to Pete McCrary's topic in B & B Yachts Forum
Moving right along. I’m feeling like Seabiscuit should be ready for a road trip the end of next week — with two coats of 545 Awl Grip primer on her bottom and all rigging in place and interior with 3 coats of neat epoxy and seat tops glued down. Here are some recent photos. CB slot routed out. Keel glued on. First coat of primer. Second coat to be applied tomorrow — no sanding needed. Both sets of mast bushings completed. I had a section of a 2” dowel left over from a project. Just the thing for the “plug” needed at the mast heel. Just three wraps of FG needed to make a snug fit. Annie is of Polish ancestry — and when seeing this photo her niece said “A pole holding a pole.” The mast weighs just 8.75 pounds. Nice and straight, isn’t it?


-
Mast bushings for Spindrift Tens . .
Pete McCrary replied to Pete McCrary's topic in B & B Yachts Forum
Got it done! Not as difficult as I thought. Alan’s 29” length of FG — just about right to add 1/8” diameter to a 2” OD. And I needed about 90” to add 3/8” diameter to a 1.5” OD. Didn’t have to spend too much time scrubbing with 80 grit. Here are the two small diameter poles nested within the big one. Pretty neat. Pete McCrary
-
Mast bushings for Spindrift Tens . .
Pete McCrary replied to Pete McCrary's topic in B & B Yachts Forum
Matt. What were the ID of the large tube and the OD of the small tube? And did you note how many layers amounted to the needed thickness? -
My Core Sound 20 Mk 3 (Chessie) and trailer were sold back in July to Erik (NowWeDoItMyWay). Here’s a photo of her trailer: By the time I sold Chessie, I only had a few occasions to launch her on the new trailer. She rolled right off and otherwise performed as expected. Erik would be able to report her performance after multiple launching and recoveries. Here’s a link to my posting of the trailer’s design and construction:

-
Spindrift 10, #1329 -- "Seabiscuit" . .
Pete McCrary replied to Pete McCrary's topic in B & B Yachts Forum
Amos, I’ve found that esigners’ weight estimates are often on the low side. But Graham’s was right on! I’m trying to keep Seabiscuit’s weight down so that I can man-handle it without always asking for help. The Messabout is just a little over two weeks away. Not sure if I can have her ready by then. Maybe only with her bottom covered with a primer. We’ll see. Today the CB slot will be routed out, dressed, and glassed. Here are the latest photos: The roller had to be raised one inch in order to get the bottom higher than the lowest adjustment for the bunks. Trailer is now ready for boat-to-bunk adjustments.


-
Spindrift 10, #1329 -- "Seabiscuit" . .
Pete McCrary replied to Pete McCrary's topic in B & B Yachts Forum
The bottom plywood edges all now have nice 3/8” radiuses and she’s ready for all epoxy and FG work. But today, taking a break, I dryfitted the gooseneck and cheek block to the boom. Should’ve been 1/4 hour job, but Racelite made it into a two hour job. The cheek block is to be mounted on the starboard side of the gooseneck using two of the [gooseneck] holes and drilling a new hole replacing the third bolthole (from fwd end of gooseneck). However, with that done, the sheave shaft didn’t lineup with the gooseneck’s second bolt hole by about a half-hole width. Ever try to drill a half hole?! It’s near impossible. So, I didn’t. There was space enough to use the gooseneck bolt hole and instead of a bolt, I just used a bolt shaft and captured it with a small piece of hollowback half oval. Starboard side. Locky there was enough space for the sheave to freely rotate when repositioned. The other side showing the SS half oval retainer.


-
Don — Can you give me a reference to the origin of “wormshoe”? You reminded me that I had previously heard the word (at least a nautical word with “shoe” in it). But I can’t find it. An interesting word as many nautical terms are.
-
I thought of solid or hollow back half oval OR “flat” stock, brass or ss. But I wanted a 5/8” x 1/8” it to cover the 3/4” yellow pine keel for Seabiscuit, my Spindrift 10. Hard to find and too expensive. So, I’m going with a white oak 5/8” x 1/8” (maybe 5/32”?) cut from a 3/4” quarter-round 8’ molding purchased from Lowes. The yellow pine keel strip will be glued in place, and the white oak strip bedded (on its top) with 5/8” x #8 SS FHWS counter-sunk (flush) at 6” spacing. If it gets torn up, I’ll just replace it. The 8’ molding cost $9.44. Might even get two strips out of the 8’ molding? I’m considering installing it bare (i.e., no finishing). White oak holds up well in moisture and any finish would quickly be stripped off by beach sand, gravel, etc.
-
Spindrift 10, #1329 -- "Seabiscuit" . .
Pete McCrary replied to Pete McCrary's topic in B & B Yachts Forum
Graham may be glad to know that her weight (measured at ~ 89.5 lbs) is right in line at the high-end of his design estimate. Configuration: outside surfaces bare, all interior flotation spaces & corners filleted, taped and triple-coated with neat epoxy; gunwales, foredeck, breasthook & quarter knees glued in place; and CB trunk glued in place, filleted, and taped. Seat tops attached (dry-fitted). CB Trunk filleted, glassed,.. firmly in place. Seat tops dry-fitted. There will be dry-wall screws between the weights. A Taylor “spring” scale — 220 lbs max. Accuracy +/- ?? lbs. Seabiscuit suspended by her Bow “bowline” loop. The pound scale set at zero (pretty close). I called that 89.5 lbs. Maybe 89.75? We took this occasion to “dry-fit” Seabiscuit to trailer. Must raise roller 1”. Now she’s ready for bottom work. We celebrated by treating Jim and Patricia to lunch. I’ll begin bottom work tomorrow. My plan is to launch her maiden voyage at the Messabout. Hope to see some of you then.


-
Spindrift 10, #1329 -- "Seabiscuit" . .
Pete McCrary replied to Pete McCrary's topic in B & B Yachts Forum
CB Trunk’s base has been trimmed to fit the slight v-bottom — and tac-welded in place. Proper filleting and FG tape to follow. Earlier the foredeck framework, quarter knees, and more seat cleats were glued in place. And finally, the Bresthook and bow-reinforcement block were installed. Both have 1/2” holes drilled thru. With a bowline loop and a “stop-knot” — one line can serve as a bow-“eye” and painter as shown here. Turnover is scheduled for Saturday!


-
Spindrift 10, #1329 -- "Seabiscuit" . .
Pete McCrary replied to Pete McCrary's topic in B & B Yachts Forum
Looks like Puddle Duck has a very nice sailing pond. You’re lucky they allow sailing on the reservoir. Please come and visit. We’re nearly always here. Just email pkmccrary@verizon.net so we won’t be out-‘n-about. Here are two more photos of Seabiscuit progress. Glueing the inboard seat cleats. Third coat of epoxy on the insides of the CB trunk w/Kingposts being glued on.

-
Spindrift 10, #1329 -- "Seabiscuit" . .
Pete McCrary replied to Pete McCrary's topic in B & B Yachts Forum
Dry-fitting seat supports. The long outboard cleats need some “persuading” in order to conform to the extra bending of the side panels near the bow. And also along their entire length. The inboard seat supports also needed to be pushed outward to so as to be just under the seats’ edges. My plan is to round over the seat edges to a radius of 3/8”. Glue outboard seat supports tomorrow — inboards next day. For gluing (Seat supports) the seat tops wI’ll be removed until the CB trunk has been fully assembled and permanently glued in place.


-
Mast bushings for Spindrift Tens . .
Pete McCrary replied to Pete McCrary's topic in B & B Yachts Forum
Also with trailered boats — all spars, oars, etc. within the hull. -
Mast bushings for Spindrift Tens . .
Pete McCrary replied to Pete McCrary's topic in B & B Yachts Forum
Correct me if I’m wrong — but isn’t the just-described (Alan’s 10/3/2018) for permanently attaching tubes for a not-to-be-disassembled mast? Inappropriate for a Spindrift 10 three-part mast? -
Spindrift 10, #1329 -- "Seabiscuit" . .
Pete McCrary replied to Pete McCrary's topic in B & B Yachts Forum
To get her DWL level, I had to raise the fwd cradle 3/4”. Used a mason’s string level. Rounded the fwd rub-rail. Note taut string. Getting her ready for filleting. Seat tops now joined.


-
Spindrift 10, #1329 -- "Seabiscuit" . .
Pete McCrary replied to Pete McCrary's topic in B & B Yachts Forum
Major milestone reached — gunwales installed. And she’s just about ready for tac-welding. When dry-fitting I managed to trim the gunwale foreword ends for a nice joint. That sharp point will be rounded to spread stresses caused by encounters with docks, other boats, et cetera.

-
Mast bushings for Spindrift Tens . .
Pete McCrary replied to Pete McCrary's topic in B & B Yachts Forum
Thank you, one and all. I’ll get started with confidence. -
I just reviewed Alan’s video on mast bushings where he used 29” of FG 3” tape (cut to 1.5” for the lower bushing) — to increase the 2” od tube up to the id of the 2.25” (bigger tube) — an increase of just 0.125”. That’s in fairly close agreement with my calculation of 5.333... wraps, assuming FG thickness measurement of 4 layers at 3/64”, or 2 layers = 0.0234375” (one wrapping) and ignoring epoxy effects. Five.333... wraps on a 2” od would be about 33.5”. But I’m going to go with Alan’s 29” — which is just 87% of my calculation and thickness assumptions. My calculation for the 1.5” od tube up to the id of the 2” tube (an increase of 0.375”) would be about 16 wraps around the 1.5” tube. At that diameter the length (by my calculation) would be about 75”! But by using Alan’s real-life experience to get an extra 0.125” on the 2” tube — wouldn’t 87% of my 75” (i.e., 65”) be a better choice? From experience, do any of you builders have a length recommendation for adding a 3/8” thick FG bushing to a 1.5” od tube? Sent from Yahoo Mail for iPad
-
Spindrift 10, #1329 -- "Seabiscuit" . .
Pete McCrary replied to Pete McCrary's topic in B & B Yachts Forum
Originally I ripped a pair of 1-piece gunwales (Douglas fir) — but they were much too stiff to dry-fit to the sheer. So, using those pieces, I ripped two 1/4” strips (wasting the middle third) and bought 1/4” x 1.5” [flat] moldings (clear white pine) for the middle strips. Shown here are the assembled strips dry-fitted to the sheers. Next cooler day, they’ll be glued to the sheers. Anticipating some considerable stress on the stem and transom joints, I made strong tac welds. Tac welds at the transom. Next I fabricated the rudder pivot-bolt so that its “clamping force” could be adjusted without any tools. The “handle-nut” need only be rotated 3/4 - turn for full “tight” to “loose.” The carriage bolt is held tight by a 1/4” plywood “washer” shaped like B & B’s scalloped diamond. Note that the “single-wing-nur” need not be a lock-nut due to its imbalance on a [mostly] horizontal shaft. The other side.


-
Spindrift 10, #1329 -- "Seabiscuit" . .
Pete McCrary replied to Pete McCrary's topic in B & B Yachts Forum
Well, ... after about three days curing (the puzzle joints), Corey (my future grandson-in-law) and I transformed a stack of flat plywood into the shape of a fine-looking boat. Here we are just getting started with granddaughter Kate recording. Corey and I started the process. Fwd and temporary bulkheads dry-fitted. Corey doing the hard work — tightening up the loosely wired keel. Fore and aft views. Temporary bulkhead set with side planks just 1/16” proud on each side. Side-to-side transom top almost parallel with top of temporary bulkhead — maybe port-side of transom 1/16” high? Note that the chine cable-ties have not yet been tightened up. We’ll take another look when transom is in place and everything tight. Same view from aft might look a little better. Next will be trimming the transom’s bevels and dry-fitting it to the hull.


-
Spindrift 10, #1329 -- "Seabiscuit" . .
Pete McCrary replied to Pete McCrary's topic in B & B Yachts Forum
Got a lot done today. Rudder assembly ready for glueing. Three inch FG tape epoxied to both sides of each puzzle joint — and weave filled. After an overnight cure the panels were adjusted so that the inboard sides laid face-to-face, continued the keel bevel from the bottom edges right up the stem. With all holes lined up, loosely wired the keel edges together. Then stood it all up to make room for the cradle. Tomorrow the cradle will be fine tuned and screwed to the floor. Mr granddaughter and her fiancé (Kate & Corey) will arrive on Friday to assist in the transition from butterfly to Seabiscuit. A fine excuse for a family celebration! In the meantime I’ll work on other components and making the trailer ready.


-
Spindrift 10, #1329 -- "Seabiscuit" . .
Pete McCrary replied to Pete McCrary's topic in B & B Yachts Forum
Thanks Graham. You probably told me that back in 2016. -
Spindrift 10, #1329 -- "Seabiscuit" . .
Pete McCrary replied to Pete McCrary's topic in B & B Yachts Forum
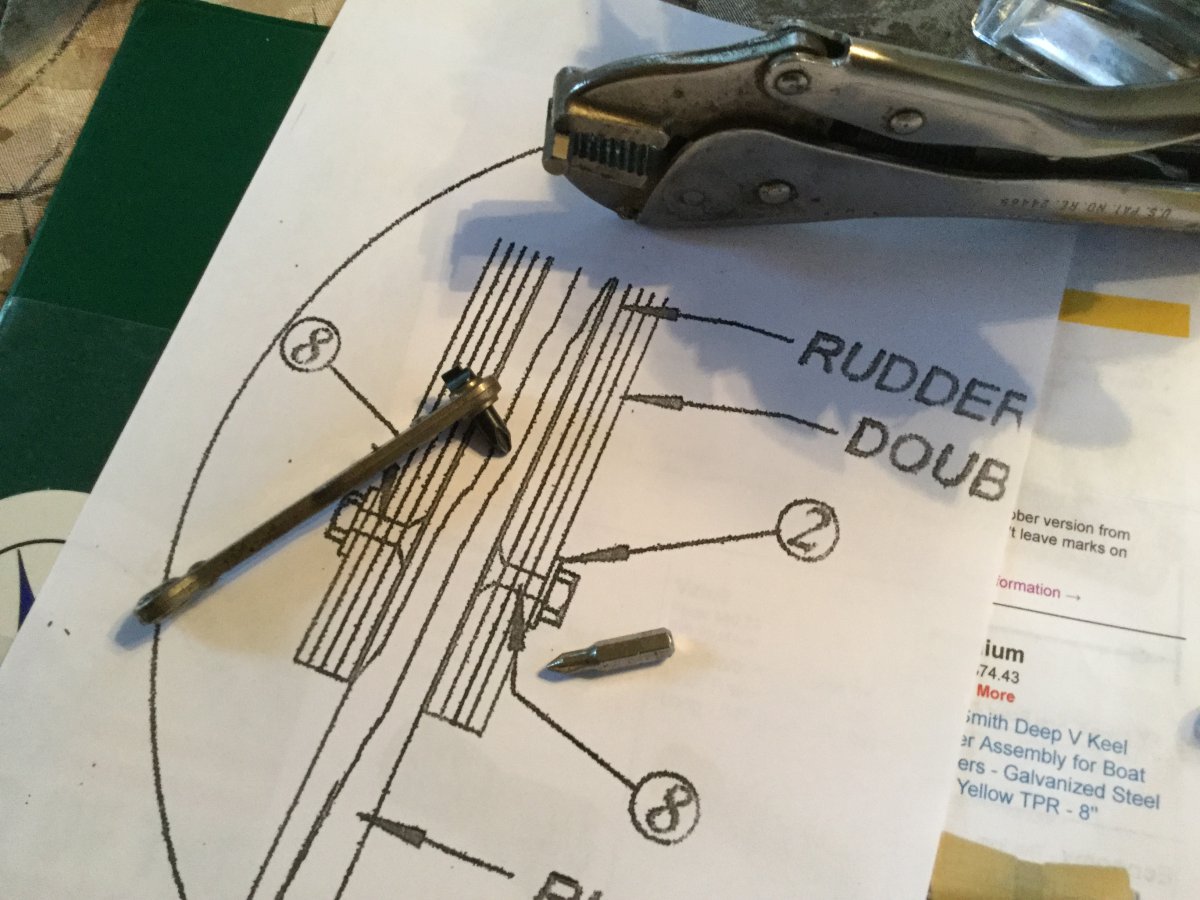
FELLOW BUILDERS: A little help please. Photo below shows my problem: How to hold a 3/4” FHMS in place while screwing on a lock nut in order to secure the lower gudgeons to the cheek that is only 1/2” thick —within a space only 3/4” wide. I know I managed to do it for “Chessie,” but that was several years ago — and I can’t recall the procedure. I doubt that finger pressure will do it. I have (shown) a ratchet driver, but it is 1” wide. I could use a hex drive with a “Phillips” bit, but the shortest bit I have is also 1”. I’ve considered cutting (or grinding) the 1” bit down to 3/4”, but got nowhere after about 5 minutes with a hacksaw. I’d appreciate knowing how others solved this “small” problem.