Pete McCrary
-
Posts
692 -
Joined
-
Last visited
-
Days Won
40
Content Type
Profiles
Forums
Events
Everything posted by Pete McCrary
-
I'm thinking of building a sailing Catspaw 8 as a dinghy for "Chessie." My 10th [and last ??] boat. Reaching out to existing owners and experienced sailors regarding: Sprit rig vs bermudian: pros & cons. Centerboard vs tacking leeboard: pros & cons. BTW, what is a "tacking leeboard" as opposed to "leeboards"? Is it a single leeboard that is moved from one side to the other when tacking? I suppose if the wind is not too strong, the "lee" board could stay put and become a "windward" board? Is moving the board [from one side to the other] a difficult task for a solo sailor? Maybe too much for an 84 year old sailor? For the sprit rig, can all the spars and oars be stowed within the fore & aft dimensions of the craft? As well as a leeboard or centerboard (or is it a daggerboard)?
-
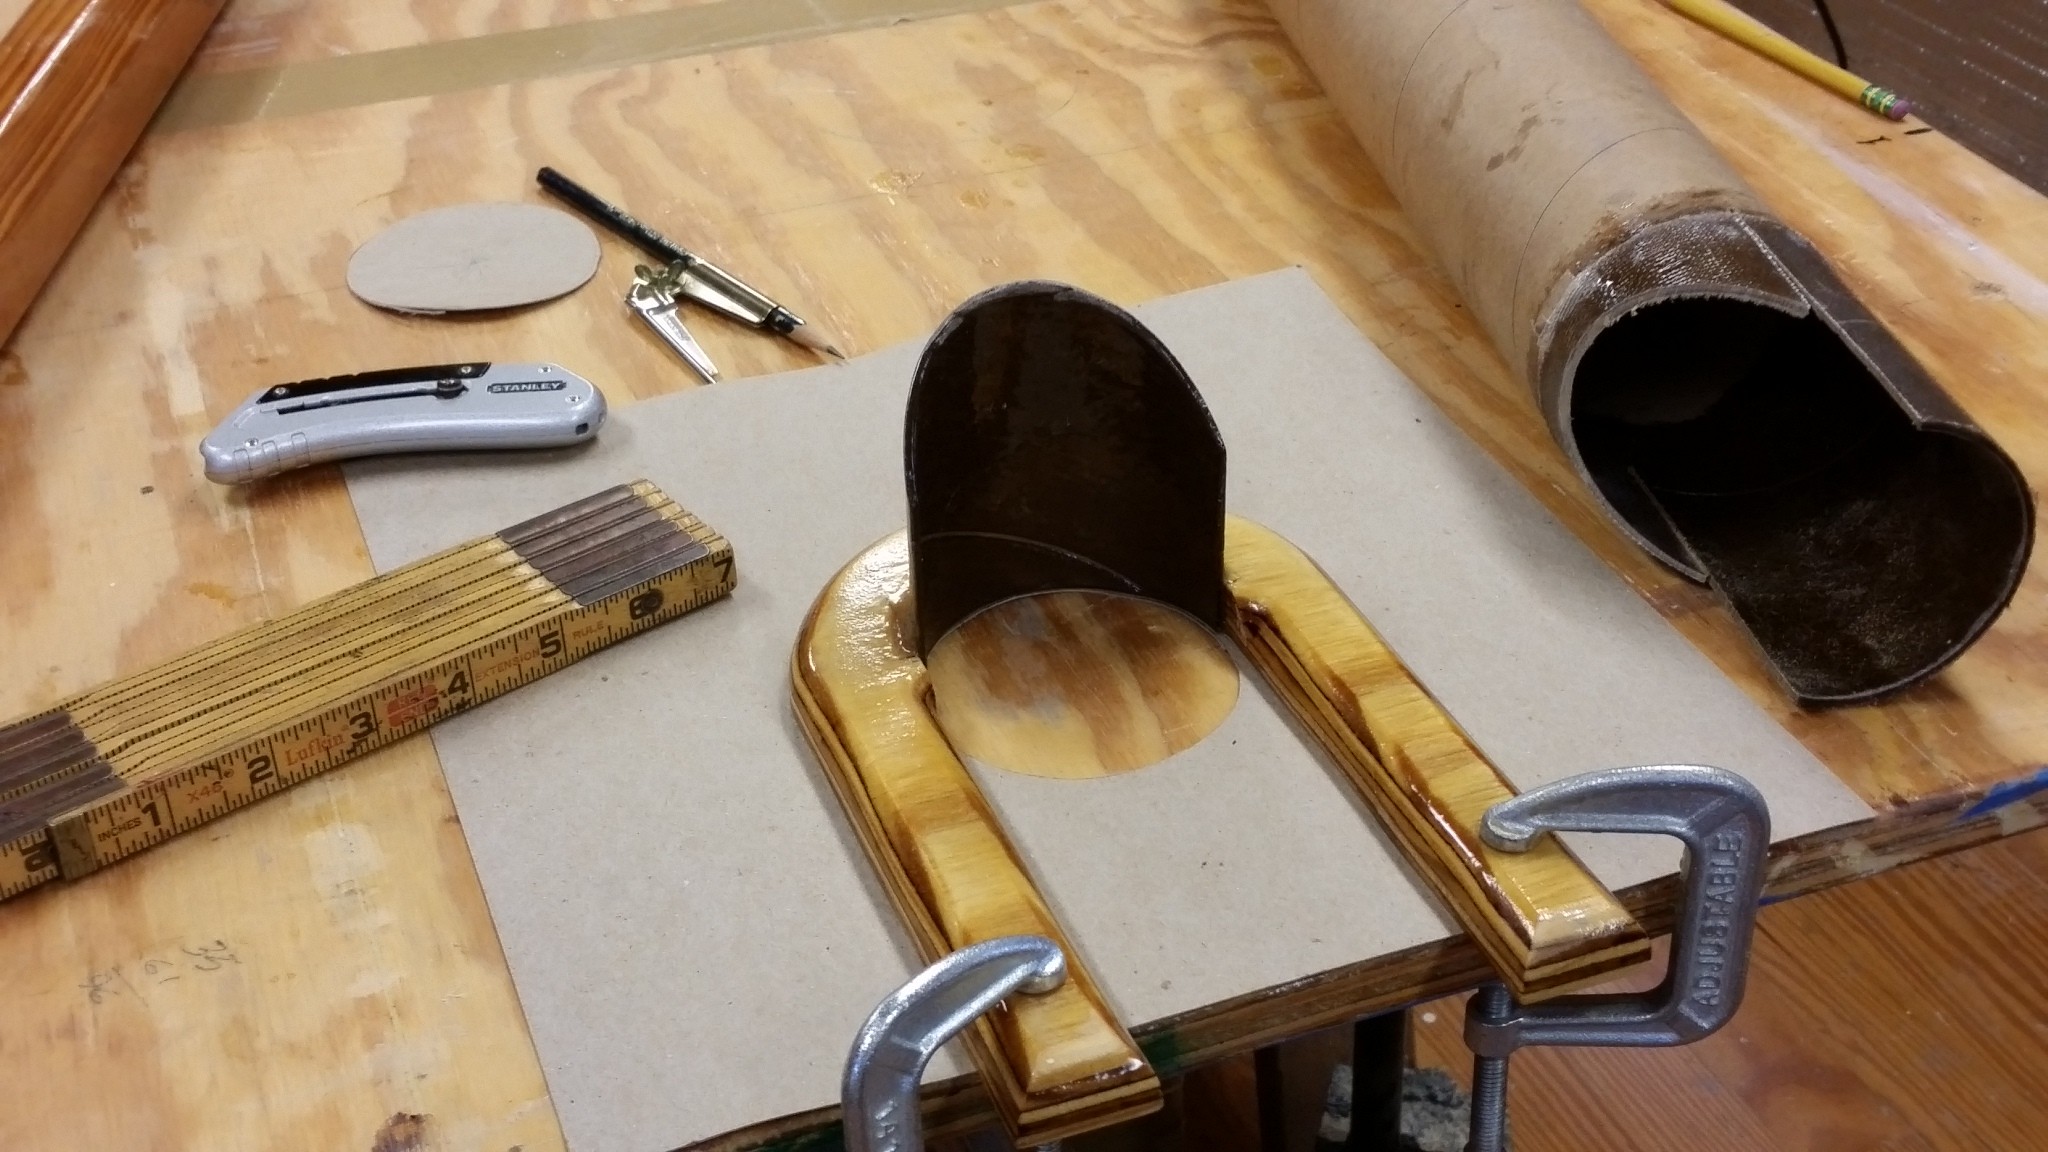
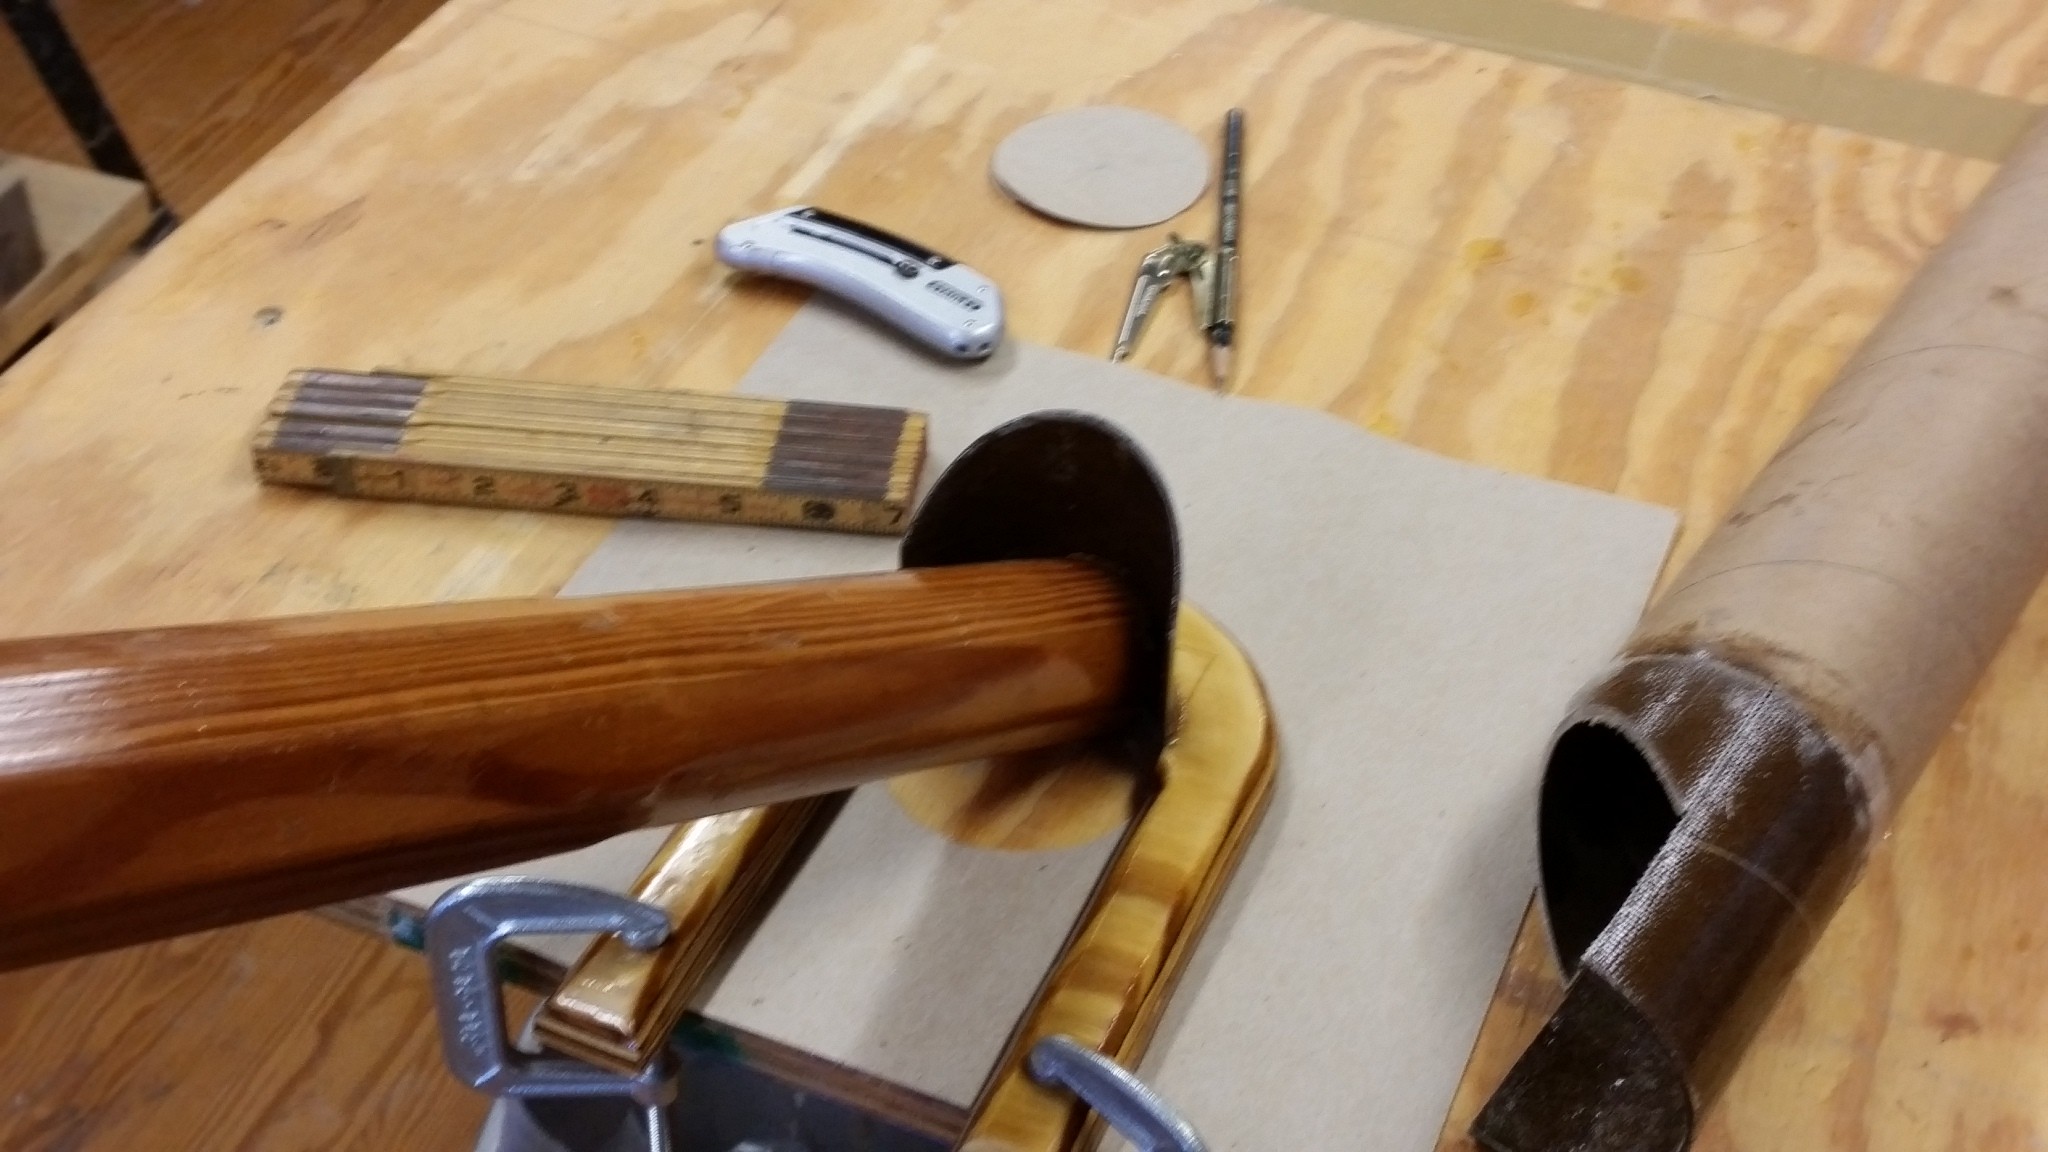
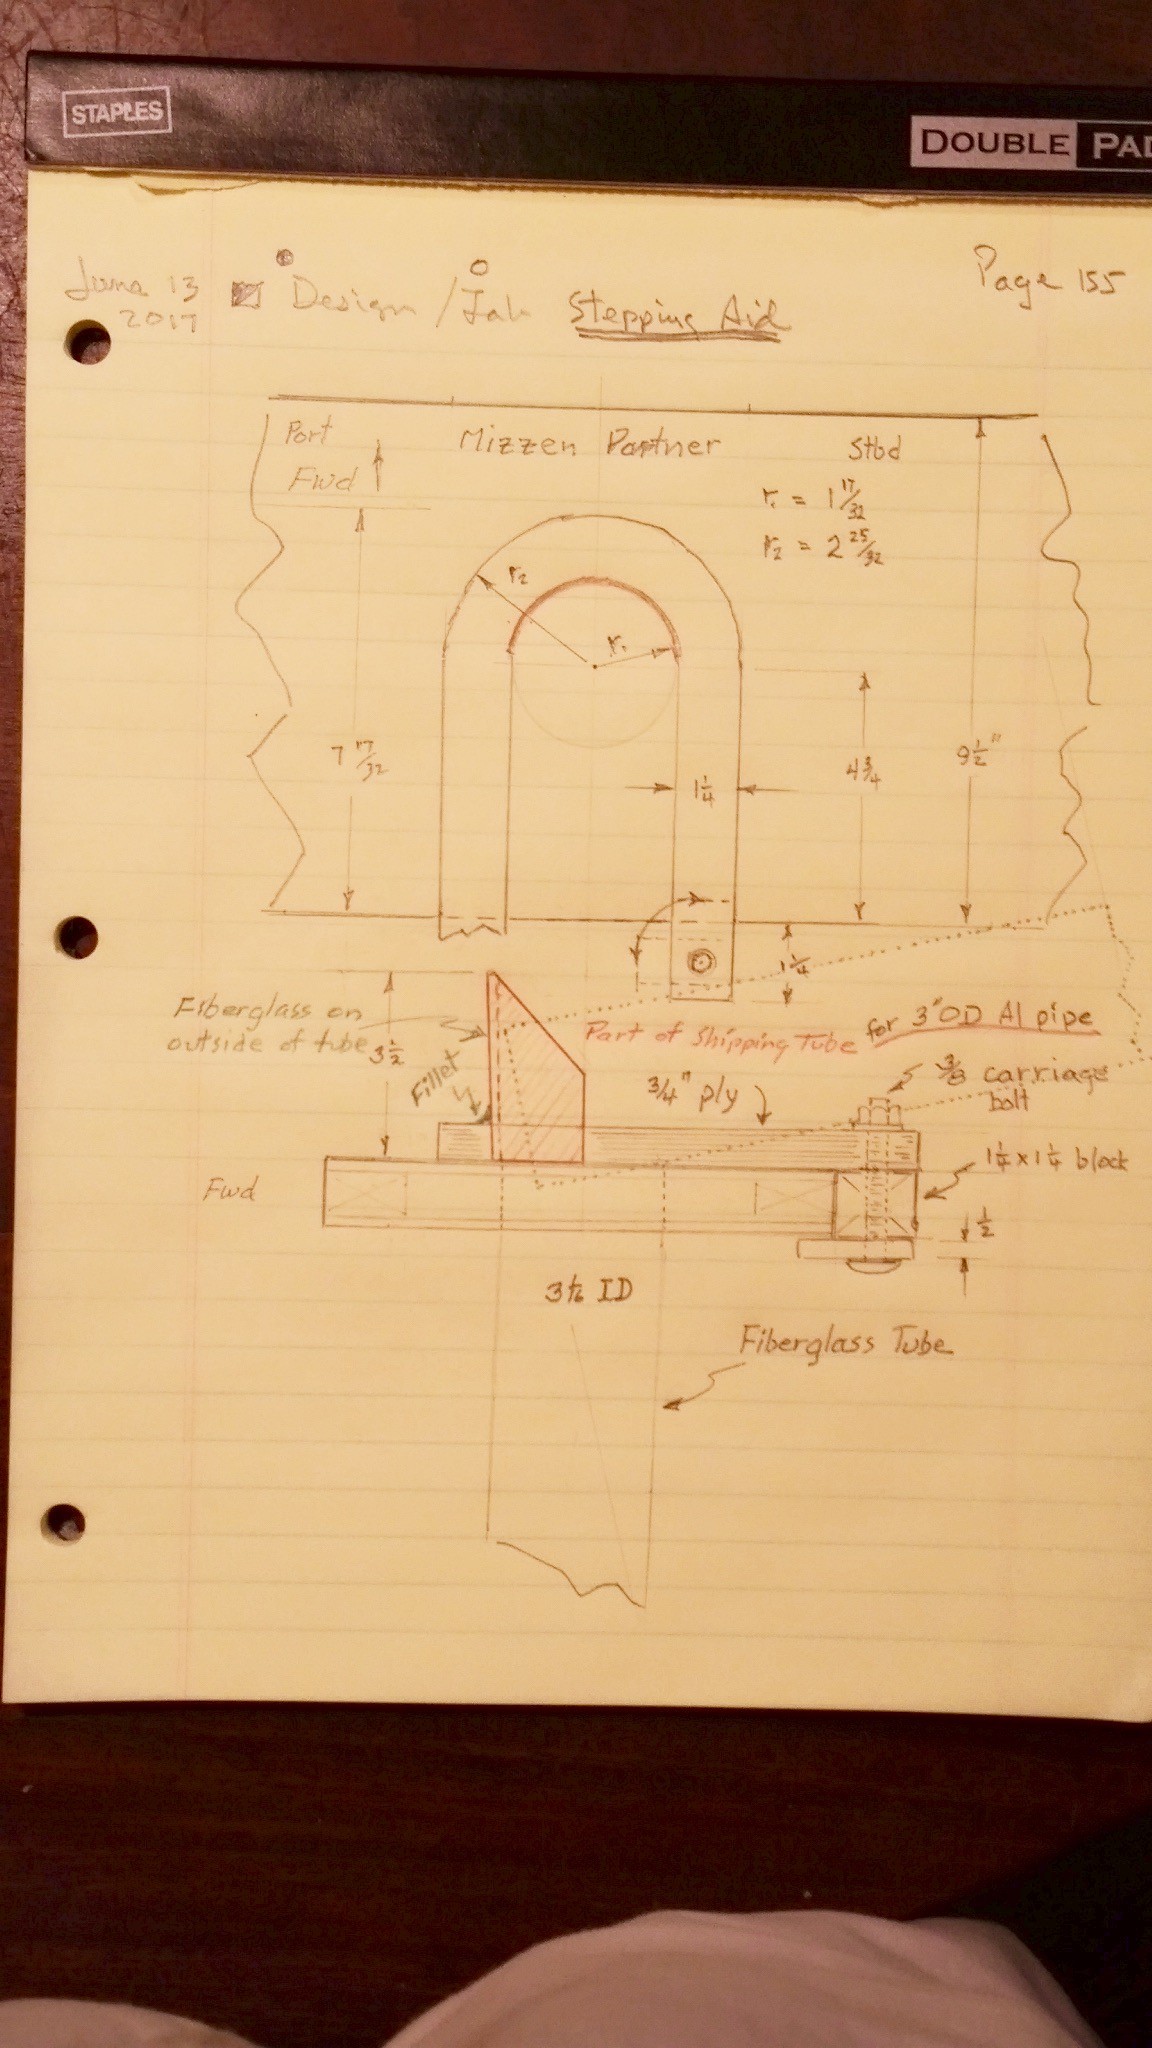
No, Drew, I haven't been sailing. "Chessie" has been on the water -- which revealed significant leak(s) around the CB trunk. In rough water the ingress was approximately 1 to 2 gal/hour. At a slip in calm water it was much less. That was Memorial Day weekend (end-of-May). Since then I've been investigating the sources of leaks into the port-side just aft of Blk 3 and also into the space under the footwell aft of the ballast tank. Proper repairs will require tilting her to gain access to the CB under the boat. My shop is not equipped for that -- so "Chessie" is now at B & B. I expect to retrieve her in a couple of weeks. In the meantime I'm getting things ready for regular sailing and cruising. Hope to be at the Corsica River Yacht Club Annual Regatta on 7/22 ( http://www.cryc.org/migration/index.htm ). The mast-stepping aid is just about finished: The half-tube was made from a 3" ID shipping tube, reinforced with epoxy and fiberglass. Once the mast-stepping aid is fitted to the mizzen partner, the clamps will be replaced with brackets over the edge of the partner. The aid is stowed after stepping. The next photo demonstrates how I anticipate its use. I think the process will feel very stable and safe.


-
Don,... Although I couldn't make adjustments to it, I used the European compass on "Tattoo" for several years and noticed no problems. But I was only sailing on local waters and didn't pay much attention to it because I [overly] relied on my GPS. But I'd never had a magnetic vehicle compass (car or boat) that didn't have compensation adjustments. I think that's just "nuts." I love gadgets -- except those that I can't fool with.
-
Be careful about European compasses. I had one for my CLC PocketShip "Tattoo," but it didn't have any way to adjust it. No little adjusting pins (east-west & north-south) for the offsets (compensation?) to correct magnetic disturbance caused by magnetic material on your boat. Nothing in the "owners"" manual. I found a source indicating that in Europe compass adjustments are done inside the compass by persons "officially" qualified by the government. I bought it from West Marine and had no idea it was from Europe until I tried to reach the manufacturer.
-
Thanks, Paul,... I'll certainly mark inches on my mizzen. Hadn't thought of that. I'm sure it'll help when unstepping.
-
Thanks, Steve and Chick. The extended tube would do the same as my contraption -- and much simpler. About the only advantage I see in mine is that it can be attached to whichever side of the partner is easiest for stepping. I'll start fabrication today.
-
Stepping the mizzen mast for my "Chessie," (a Core Sound 20 Mk 3), without assistance is a hazardous procedure. Although the mast only weighs about 22 pounds, when near verticle, it has to be held overhead by two hands while standing on the cockpit deck -- and simultaneously monouvering (while watching) its base and aligning [the mast] parallel to its stepping tube -- and then lowering it into the tube. It's a balancing act made without any stabilization other than two feet on the deck! And if there are any gusts of wind -- it's quite dangerous. Here's my concept that would add a stabilizing 3-D corner that would also guide the heel of the mast right into the tube: The stepping aid would be easily installed over the mizzen's partner tube. Then, holding the mizzen at its CG with one hand and the mizzen almost horizontal, the heel is then placed at the 3-D corner formed by the stepping aid and the partner tube. While pressing the heel against the corner, the mast is raised (i.e., rotated) to near vertical to the point where it drops into its tube. No "balancing" is required and the mast is always under control. At least, that's the concept. I'll try it and report the result. Critical comments and suggestions welcom.

-
Attention builders! My almost new (only 3 hours operating time) Suzuki 2.5 (15" shaft) is for sale. $500 cash. I purchased it new in 2015 for use with the CS 20 Mk III that I was building. However, on the 2nd time in the water (just me and an empty ballast tank) there was excessive cavitation. With 2 or 3 adults aboard it was ok. But I sail mostly solo, so I need a long shaft. The motor is presently at the B & B shop and upon payment they will release the motor and provide a receipt. I will ship the owner's manual and tool kit when I know the address of the buyer. In a few weeks the motor the will be at my home in Manassas, Virginia Email me, if interested. pkmccrary@verizon.net It fits nicely in a CS20.3 locker. Graham says it will also fit into a CS17 locker.


-
The new Suzuki 2.5 comes in both short (15") and long (20") shaft versions. Here's a photograph the long-shaft version: I've yet to know what the purpose is of the square rudder-like thing shown above the anti-cavitation plate. It seems to me that (for a transom-mounted OBM) it would prevent a reversing (180 degree) rotation UNLESS there is a motor bracket that extends substantially aft of the transom top edge. Even further for a transom with a negative tilt (like a CS20.3). I guess that wouldn't be required if it had a reversing gear? BTW, the short shaft version has the same feature. Does any forum member know anything about this feature of the new Suzuki 2.5 ??

-
During my first motoring solo in "Chessie" (a Core Sound 20 Mk 3) with empty ballast tank, the 2.5 Suzuki (15"shaft) cavitated excessively. The cavitation plate was just at the surface of the water. However it was deeper and ok with 3 adults aboard. But I sail mostly solo. I'm going to have to replace it with a long long shaft (20" version). But the photos of the new 2.5 Suzuki (both long and short) have a "plate" on the shaft that would seem to prevent full rotation for reverse! unless the motor is mounted on a bracket that extends aft of the transom by about 6" to 8" or so. At least the top of that "plate" would have to be below the bottom of the transom (just like the cavitation plate now has to be). Am I seeing this wrong? BTW, my 2.5 Suzuki (15" shaft) is a "new" old version (no big plate on the shaft) -- except it has only 3 hours of just-fine running. I'll sell it for $500 -- buyer pick up in Manassas, Virginia.

-

Core Sound 20 Mk 3 -- #4 "Chessie" . .
Pete McCrary replied to Pete McCrary's topic in B & B Yachts Forum
Amos,... I used 3/4" yellow pine. Yes, I'm happy with it -- although I'll try not to have any hardware on the caps. I have purchased but not yet installed a pair of flush (lift-up) mooring cleats for the stern. I plan to install them just forward of the transom. -
Core Sound 20 Mk 3 -- #4 "Chessie" . .
Pete McCrary replied to Pete McCrary's topic in B & B Yachts Forum
"Chessie" is anxious to travel and wants her skipper to make her road-ready. She has her tires at 50 psi and her tow vehicle on standby in her stall: She'll just have to be patient. Tomorrow I load her with safety equipment try to make rain gutters for the aft locker's hatch. Thursday she'll be made road-ready for departure Friday am for Solomons Island and the Chesapeake CatBoat Association's annual Patuxant River Shootout (handycapped races) on Sunday. I hope that we (son Jim & I) beat them all. But they will probably assign a handicap factor that will set us back to reality. After this weekend sail we take Chessie to North Carolina for B & B to look her over and give me a few tips on sailing a "cat-ketch" rig. And especially lowering sails and furling them as if in an emergency. Hopefully we'll get a few good photos which will be shared on the forum.
-
Core Sound 20 Mk 3 -- #4 "Chessie" . .
Pete McCrary replied to Pete McCrary's topic in B & B Yachts Forum
Started last Saturday installing the portholes. Cutting, dry-fitting, shimming in 16 places because of the curved surfaces, and recruiting help took until this am (3 days). My Annie agreed to be the inside-the-boat-person. The first one took an hour. The next three about 75 minutes. Here's what the starboard side looks like: Sometimes my driveway boat activity is observed be our neighborhood Barred Owl: Wingspan ~ 5 feet. We call him (her ?) "Owl Jolson" . . "Chessie" is now on schedule for a sailing family outing Memorial Day weekend at the Maritime Museum in Solomons Island, Maryland. Then a grandson's confirmation in Norfolk. After that Annie & I and "Chessie" will be at the B & B yard and dock on Friday, June 2nd, for a checkup and sailing tips for her cat-ketch rig. Building her has been a pleasure and a challenge over a two year period. That was a year longer than I anticipated.

-
Core Sound 20 Mk 3 -- #4 "Chessie" . .
Pete McCrary replied to Pete McCrary's topic in B & B Yachts Forum
By that do you mean the space under the footwell sole? If so, then it's covered with a deck plate just like the one over the ballast tank. The cockpit lockers (port & starboard) have hatch covers where the framing has gutters all around. I expected those lockers to be bone-dry -- but they have significant water intrusion after rain. I haven't been able to locate the leak points and I'm beginning to suspect the hatch covers. But the gutters look like they would channel all runoff into the footwell. I didn't install any gaskets -- thinking that the gutters would do the job. The deck plates in the footwell sole are keeping rainwater out. They are closed by a hand-turned knob which compresses a rubber gasket. The locker aft of the footwell leaks a lot of rainwater. Here also I didn't install a gasket. But I think I will have an easy fix for that. Presently rainwater flows in from the aft deck and down the inside-side of the hatch right into the bilge. I think I can channel that runoff to the bottom of the hatch frame and into the footwell. As mentioned before I had drilled 16 holes (1/16") in the sheerstrake [locating the four portholes]. After drying out the boat, I covered them with masking tape. And last Thursday we had at least 1.5" of rain -- and no water intrusion into the cabin. That problem seems to be solved. Speaking of portholes -- I've started their installation. Here are a few pixs: The layout provides a 1/8" spaceing all-around for bedding. A hole cutter (D = 2.75") at the corners made the job easy. I'll epoxy and waterproof the edges before before bedding the portholes. You can see my thumb holding it in place. The "spigot" will be trimmed flush before bedding. Hope to get all four installed this coming week.


-
Core Sound 20 Mk 3 -- #4 "Chessie" . .
Pete McCrary replied to Pete McCrary's topic in B & B Yachts Forum
Maybe this is how I'll road-transport the rudder assembly: Maybe also tie a yellow ribbon on the end of it. Today I rolled the [lowered] masts sail-tracks up, and took a file and some emory cloth to the sail tracks to rid them of any "burrs" or other dinks that could impead easy sliding of the sail slides. Especially where sections [of sailtrack] meet. Also some Teflon lubricant. Then turned them over with sail-tracks down. Next I'll lub the sail slides. Solo raising/lowering of the mainmast is getting easier. Here are photos showing just how high the mainmast must be raised in order to open/close the forward hatch. I'll make a permanent mark on the mizzen to index that position. It's 18.5 inches above the mizzen where the OD change from 3" to 2.5". After the initial launching (w/o sails) and with only about 90 minutes on the water -- I found more than a gallon of water in the bilges around the ballast tank. My initial concern was that there was a leak. Now, I'm not so sure. It could have been rainwater intrusion over several weeks outside and not yet made completely rain proof. Before the 90 minute voyage the cabin sole was dry -- but I didn't check the bilges aft of Blk 3! There could have significant water in those places that I didn't know about. And a gallon in just 90 minutes is a very big leak. So, now I'm investigating. At this point she's completely dry inside -- and as rainproof as I can make her. Bedded hardware including the Lexan windows in the dropbaards. There are only little 1/16" holes in the sheerstrake indicating the locations of the not-yet installed portholes. And they are partially filled with 4 coats of primer & paint. She's closed up tight with a rain gauge on the garage. After a few inches of expected rain I'll make an inspection of the entire interior. If there is any intrusion -- I should be able to locate it. Next I'll fill the ballast tank with a garden hose and see what happens. Hopefully, I'll learn that rainwater was already in the bilges when we made the 90 minute cruise. If that test passes, then I'll make another cruise on tHe water. This time sailing. I'll report the results of thes observations.


-
Core Sound 20 Mk 3 -- #4 "Chessie" . .
Pete McCrary replied to Pete McCrary's topic in B & B Yachts Forum
And I've seen on this forum a brake light that "blinks" loudly as opposed to simply going brighter. Motorcyclests love them. Any auto parts store. -
Core Sound 20 Mk 3 -- #4 "Chessie" . .
Pete McCrary replied to Pete McCrary's topic in B & B Yachts Forum
Or a bright Sunbrella cover (uv protection) for the rudder -- supported (overhead) to one of the masts overhanging the transom. -
Core Sound 20 Mk 3 -- #4 "Chessie" . .
Pete McCrary replied to Pete McCrary's topic in B & B Yachts Forum
'Hadn't thought of that. Something to consider. But if the tailgater is that close, the likelihood of major additional damage is very high. In other words, the probability of an actual collision occurring, where there's only damage to the rudder, is very low. -
Core Sound 20 Mk 3 -- #4 "Chessie" . .
Pete McCrary replied to Pete McCrary's topic in B & B Yachts Forum
Got all the rigging done including the anchor setup. But not in time for the SWS Spring Cruise. Good thing I bent the sails while in my driveway. Needed to widen the downhaul hooks -- needed a small blow torch and some leverage to open them up. Also discovered (I should've known) that the sail tracks should have been carefully trimmed (with a file or Emory paper) and lubed with silicone. Same for the sail slugs. Made a list of adjustments needed. That'll be next before her first sail. Here are a few pixs: I'll probably trail the rudder like this. I'll rig a safety line up to the [lowerer] mast. Here's the anchor in its "on-the-water" position. Notice the accidental lineup of the fluke with the graceful extension of the sheer line. The roller and anchor seem to blend in nicely with the boat. I was concerned that it would be an ugly appendage. This is how the anchor is secured while sailing. But for road transport, my plan is to carry it in the anchor well. Here she is, sails bent on, in her driveway. I'm trying to raise a crew of one experienced sailor for her first trial sail. Probably have to do it solo. Results will be posted.


-
Core Sound 20 Mk 3 -- #4 "Chessie" . .
Pete McCrary replied to Pete McCrary's topic in B & B Yachts Forum
I have two small (i.e., 3/16" line) cheek blocks that I have planned for topping lifts on both masts. Couldn't they could be substituted for the halyards? -
Core Sound 20 Mk 3 -- #4 "Chessie" . .
Pete McCrary replied to Pete McCrary's topic in B & B Yachts Forum
Wonderful !! Two problems solved together. No 8' pole! I only need to fabricate a temporary crutch for the main while I step the mizzen. Probably a folding "X" set on the aft deck. Thank you very much. -
Core Sound 20 Mk 3 -- #4 "Chessie" . .
Pete McCrary replied to Pete McCrary's topic in B & B Yachts Forum
Until I realized that the hatch couldn't open with the mast folded -- I had planned to hold the mast upright (while moving to the cabin) by reeving the halyard thru the anchor roller and belaying it to the anchor cleat. But even that won't work if I can't stand in the hatch opening. I really don't want to walk on the cabin roof, especially with boat on the trailer at the ramp. A fall to the Tarmac could be crippling or worse. With my CLC PockerShip I had to walk on the cabin roof to the foredeck-- and didn't like it one bit. At least on half the trips I had the side stays to hang onto. -
Core Sound 20 Mk 3 -- #4 "Chessie" . .
Pete McCrary replied to Pete McCrary's topic in B & B Yachts Forum
Good point. My neighbor helper had serious injury and boat damage raising (or lowering ?) his mast when a wake toppled them both. Best practice is don't do it. Maybe in a canal. But in about 7 yrs of sailing folding mast boats, I've only needed to lower a mast on the water one or two times. -
Core Sound 20 Mk 3 -- #4 "Chessie" . .
Pete McCrary replied to Pete McCrary's topic in B & B Yachts Forum
Thanks guys for the rudder-transport tips. Now, another problem. Once I hinge the forward hatch cover I'll no longer be able to raise the mast while standing in the hatch opening. So I've been thinking of solutions for a solo sailor. Here's my conceptial sketch: I'm sure this "wheel" has been invented before -- but I haven't been able to find a sketch of it. So, in the next day or so I'll be trying this. The idea would be to fabricate a pole ~ 8' long with an concave arch cut in its 3"- end that could find purchase just under the eyelets used for the snotter. By standing in the companionway, the sailor raises the mast by hand to his shoulder, then placing the 3" end of the pole under the mast (and below the snotter attachments) -- and then raising the mast by leveraging the pole [against the mast and the purchase provided by the snorter attachments] until the foot of the mast is snug against the tabernacle. At this point he would wedge the foot of the pole against a jam-block at the aft end of the garage roof and its breakwater. Then he would duck below and thread the mast-securing nut to its bolt. Fini. Lowering the mast would be a little easier [physically]. Standing in the opening of the forward hatch, the pole is jammed between the mast's snotter attachments and the garage roof's breakwater. Below, the mast-securing nut is removed and then, returning to the hatch opening, the sailor removes the jam pole and lowers the mast and rests it on the partially opened hatch cover (positioned so that the mast and hatch cover are perpendicular to each other). If the mast can be reached (from standing in the companionway), then it is raised slightly so that the forward hatch cover can be closed and the mast then lowered completely into its transport crutch at the mizzen [position]. Bear in mind that it is important to this octgarian not to have to climb up onto the cabin roof. PLEASE !! Critical commentary, suggestions, alternatives, watch-out-fors, etc. would be very much appreciated. This has to be solved before I hinge the forward hatch cover. And I'd like to do that before her first cruise. PS -- The pole would be stowed on (or in) the tow vehicle. If anticipated cruise would encounter low bridges (or a canal cruise), then it could be stowed in one of the cockpit coaming (seat backs).
-
Core Sound 20 Mk 3 -- #4 "Chessie" . .
Pete McCrary replied to Pete McCrary's topic in B & B Yachts Forum
Yes, but for the last 40 years, Annie doesn't go on the water, even for a short day-sail.. That's why I make everything work solo. My overnight crews have [so far] always been teenage grandchildren with the understand that they will promptly obey every polite request, rude demand, etc. with no questions asked. From watching my grandchildren in the presence of their parents -- I just can't trust the pre-teens to understand how important that is.