normoose
-
Posts
52 -
Joined
-
Last visited
Never
Content Type
Profiles
Forums
Events
Everything posted by normoose
-
You can find clear sprue 2 X4s. I have done it and will continue until the mast exceeds...say 16' or so. Saves time and money. These are pocket yachts not deep water cruisers, although each builder has to satify his or her own estetic end results and be safe at the same time. I build these small boats cheaply but when done, I am completely confident and satified with my work and the safety by design. Thanx for your input.
-
Ray, Do you have any special backers holding the keel to the hull bottom where you have placed your 370 lbs? I believe that by spreading out the load and having a 3/4" plywood center in the keel [which is for strength around the lead and connecting the stem and stern post] and having large bolts at the thickest point forward going deep into the lead, I should be OK. There will be a ga-zillion screws holding the original design keel onto the boat [over-kill] and I will be using larger screws and bolts only where needed over the larger lead area. Common sense and experience will get me through this as I am not concerned with loosing or distorting the keel because I added 440 lbs to it. I will have plenty of lumber around the perimeter of the lead along with fasters inside of the lead itself. In the forward compartment I can have a 1X4 backer running along the center-line but I will have to wait and see. As you can see by what I have been drawing, I am taking in all of the suggestions available on this great site. The drawings are ever changing. I have never used a forum for boat-building tips before but rather relied on memory, experience and common sense. The questions raised are valuable and make me think twice so I appreciate the input. Don't stop. OK?
-
Plain old clear spruce 2X4s with 1/2" plywood center is sufficient for such a short mast. Only an opinion but you can take 2 flat but crowned 2X4s and glue them together with crowms opposing each other with a 1/2" plywood center and exceed the strength of a solid spar. --------------------------------- "I am an adventurer by fate, not by choice."- V. V. Gogh
-
I am planning on making the ballast in place using the full width of the keel and covering with glass mat, cloth and resin. All surfaces on the vessel will be coated with resin, inside and out before painting to keep moisture at bay. Once the hull bottom is attached the keel will be rigid along the lead line. The lead will be bolted or screwed into through the deck and joiners at the ballast's thickest, forward end and will have steel rods [vertical and horizontal] inserted into the lead and wooden keel for strength. I will use large lag bolts to attach. The center layer will be 3/4" plywood except where the lead will go to except the stem and stern post lamination. [lead being a full 2 1/4" thick by 8" high at forward end, 8 0r 10' long tapering to 0" and weighing 437.5 lbs @ 10' long] Lead weighs 710 pounds/cubic foot and by using this shape and thickness I could calculate the volume and weight as a wedge [(2t+t)bh/6; where t=thickness, b=bottom length anf h=height at highest end in inches and 1 cubic foot=1728". So ((2)2.25+2.25)X8"X120"/6=864. 864/1728=.625. .625X1728=437.5lbs.]. If I used the center laminate space only, I would only get ((2).75+.75)X8"X120"/6=360cubic inches and 360/1728=.21 and .21 of 710=148 lbs. Not much help there. I am trying to keep the lead as low as possible and to have the most weight at the focsl or under and aft of the mastbox. The casting is the same process used on the tiny cat where I poured the lead directly into the center-board a little at a time. This small [1"X10"X10"]lead zero buoyancy mechanism was held in place with 20d commom nails driven into the inside edges of the opening prior to pouring. I poured too much lead and then used a belt sander to get a smooth surface followed by glass cloth and resin. and used 1/4" luan plywood underlayment for the boat's skin. I used this boat for 2 seasons before selling with no ill effects or water penetration, often leaving the boat in the ocean for a month or more at a time. All of this can change at a moments notice but this system will give me more reaction time to wind gusts and keep the nose pointed where I want it. I can hear the readers now, "That is too much weight for the keel structure to support.", but if some common sense is used and the ballast is reinforced and fastened to the keel and hull bottom securely, I should be in good shape. I also will use Bondo putty for fairing the keel into the hull bottom and covering screw heads as it will also be sealed and protected with mat and cloth. I also need to use screws and drill holes in keel for the Bondo to adhere to when fairing the keel, besides the clean plywood and 1 by stock, blown clean and tack ragged. Here's a quick image. I am open to advice and appreciate different views/ideas as always.
-
I am thinking 400 lbs+/- and tapering more towards the aft section. I have a degree in mechanical drafting and computer technology besides working with wood for 50 yeaars so I also ave a machinist's bible for figuring out the volume or space needed for the desired weight. I am attaching an ever changing image. I've heard that there're worth a thousand words. :wink:
-
Hey Ray, Thanx for the link to your images. I have similar ideas for my ballast. I believe that I will probably use the keel's form and leave 2 or 3 inchs top and bottom there by distributing the ballast over a larger area. I will have more under the mast and cabin. It will be wider in the forward end and taper as it goes aft. Thanx again for your input. Norm
-
Rock on Ray! I agree and I am the type to go exploring the islands of Muscongus Sound and Bay, which is where I am from. I have taken a 16' center-board dory with a sail [no reef lines] and rocks for ballast from West Palm Beach and Ft. Lauderdale to Freeport, Bahamas and Bimini numerous times. That is a 40 mile stretch and never came close to capsizing. The beauty of building your own vessel is the modifications that you can make to please yourself.
-
No I don't have it Ray. I sold it one day at Lands End when taking it out of the water to a tourist for a fantastic profit. It was too small anyway.
-
Hello, I have been playing around with some planned modifications, including keel ballast. I built a Payson/Bolger "Tiny Cat" which is a center-board catboat. I cut out a box shape in the center-board, drove nails to the inside and poured 11 lbs. of lead to get zero buoyancy. I am not sure how I am going to get the ballast that I want but like I said, " I am playing around", with the kit design in AutoCAD and thought of cutting out a section of the Vacationer keel and pouring in some lead. I have uploaded an image to show what I mean. There are so many ways to achieve some ballast but I like the idea of the ballast not changing the shape of the keel.
-
Hello, I always use 2 - laminated 2x4s with crowns opposing each other and a 1/2"x1/2" groove cut down the middle. This makes a very strong spar. Hope that this helps. Norm :roll:
-
Hello, I word to the wise....make sure you saturate the ends of plywood that will be joined to prevent drying of the tape where the resin is needed most. You can do it!!!! :idea:
-
Hello, If you make a mistake cutting your plywood parts you can now attach a piece to get the desired length with either butt joint and glass tape and resin or a scarfed joint and glass tape and resin. It may sound strange or even unbelievable but I am attaching an image from one of Harold "Dynamite" Payson's books or plans or maybe downloaded from his site. What is even stranger is that it works. I doubled the bottom of a 10' skiff (2x1/4") that I built in 2001. I had to overlap and skew my joints and used the process shown to complete the build. I also used this technique for the front seat as I was out of money and wood so I used scraps, with no backers! I can still get in and out of the skiff without getting my feet wet by standing on the butt jointed seat top.

-
Hello, MS Office 2003 has an image editor that does wonders with images. Crops, compresses for email, web, etc., lightens/brightens, change size and more. Hope this helps.
-
When i was a child I asked my grandfather why he ripped the mast stock down the middle, cut a small dado or hollow [1/2"(wide)x1/4"(deep) in each half and glued them back together. He said that he was doing it to strengthen the piece. I asked him again when I was a little older and he explained in detail how taking the hollow out was for wiring and that he would glue them back together after spinning 1 of the halves 180 degrees so that any crown would work against the other, adding strength to the original stock. Then he would and I do the shaping of the mast or large spars. I never saw anyone do it that way until my grand uncle [Pop's brother] built a 44' pinky skooner. I didn't ask him why. Then in south Florida I found a Jamaican builder following the same procedure so there must be some others that think along the same lines but everyone has there own way of doing things. It makes sense to me in that the crowns working against each other not only straighten the mast but also add some degree of strength over solid methods. Go figure. :idea:
-
CAD program for converting lofting plan to stitch and glue
normoose replied to Joe Sundstrom's topic in Design Forum
I have Careen 4 and 5 on a CD or DVD somewhere. I wi;l look for it and notify the group when it is available. Norm -
oh yeah, Tom. i am getting ready to start building a vacationer and won't do it without researching as much as possible as i am hard on my boats and take them where others wouldn't. I have read every post that I think can help me with my design modifications. Nice to her from you. Norm... ------------------------------------------------------------ "An adventurer by fate, not by choice."....V. V. Gogh
-
:wink: Very nice Cap! I have saved the image for future reference. Thanx. Norm
-
I have been researching and thinking of modifications that I will be making when I get started on my Vacationer and extending the rudder box up higher would enable me to use a tiller if I am disatified with the wheel setup. Of course I change my miind and design plans often. The proof will be in the puddin'!
-
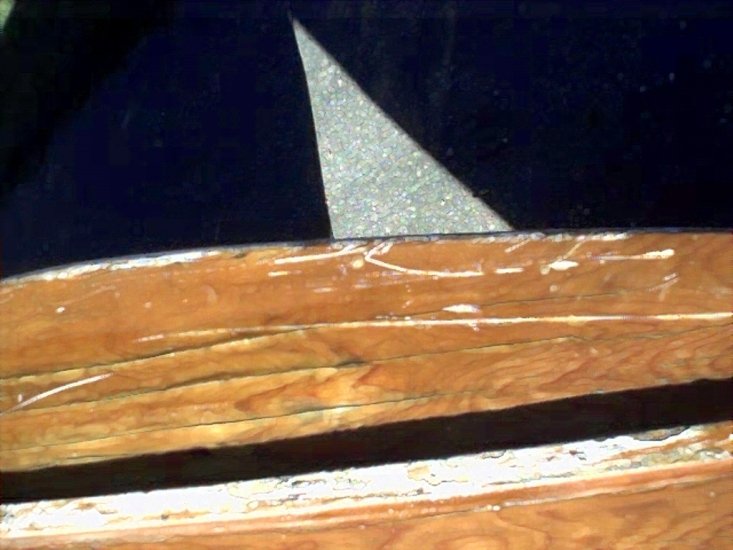
I am attaching an image of the 10' pointed skiff that I built on a rainy Memorial Day weekend in 2000. I deviated from the plans that I found on Payson's web site. It had a scaled drawing of the craft so I bought one of his books out of curiosity. The book is very informative and has many small, tack and tape plans in it. Some, like the skiff have enough information for some to build from. The skiff called for a 1/4" bottom but I doubled the thickness and you will see why if you look at the attached image of the bottom after shooting the rapids on the local river. I have also found the store that many have been searching for. :wink: foundit.bmp
-
I am not saying that I would not use lead if I didn't intend on beaching the vessel often or running aground, thus scraping of the toughest epoxy. Iff I was building a long range cruiser, lead or concrete would be the choice. I would really like to install 3/4" plate steel in the center of the keel during construction, leaving enough wood to attach and to cover the bottom of the keel as well. I do not think that this design calls for a lot of ballast and steel is my first choice, then concrete and finally lead. We all have are own ideas and i appreciate the input of everyone, even if I don't always agree with with environmental issues by using lead. I am very rough on my boats and use them to the max. I love the idea of being able to beach the boat without anything but the original keel style and size. I believe that I can achieve this by researching and getting the input and experience from others that have built these boats. I can not wait to see Ray's boat in the soft water, the placement of the ballast and to see it in action. I believe that I will learn more than most people by using the images that other forum members have sent to me and to see where Ray has placed his ballast. I have a good idea of where to put my ballast now, without seeing the images or Ray's Weekender but will take all of the advice available. I really want everyone to know that no advice is wasted on me and all suggestions are thought out and stashed in my mind for future reference. In the end, the boat that I build will be ready for what I will do with it and to it.
-
I think that I will have to build the vessel, get some sand bags, and add concrete to the each side of the keel and seal it. I would usee lead but I don't even use lead sinkers to go fishing anymore. Washers are cheap and you can cast them a long way. I am inclined to add plate steel or concrete, both of which can take the abuse of beaching anywhere [almost] and provide stability in open water hopping from island to island or from mooring to mooring [an anchor or 2 should do it]. I plan to over build as usual as I am an adventurer by fate, not by choice." V. V. Gogh Thank you all for the links and advice. I have only joined a few BBS and find that this site has it all thanks to Frank.
-
Thanx Ray, I have been searching and reading posts to this forum all day and have to agree with your suggestions. Thank you very much and hope to see you at the pond. A greatful, Norm :wink:
-
I have never been on a sailboat that didn't have emergency rudder material. :shock:
-
I like this idea. I made a concrete keel for a 52' ketch rig that was shaped like a double bit axe that drew very little and handled like dream. I really like this idea. Now where to locate bulk of the ballast, which has to be determined before construction. Thanx for your post. Norm ----------------------------------------------------- "I am an adventurer by fate, not by choice". Vincent Van Gogh
-
Thank you for your input and assistance Ray! I don't know if I will use a bulb or not but want to see where the bulk of the weight is located on the boat for best performance. I can't wait to see your boat in the water and on the trailer! I look forward to seeing your vessel. I have seen other posts about ballast being used but no pix. I will have to search I gues until I can see yours. Thanx again for replying to my post and the offer to see you Weekender! 8)