

Chespearl
-
Posts
37 -
Joined
-
Last visited
-
Days Won
2
Content Type
Profiles
Forums
Events
Gallery
Everything posted by Chespearl
-
Graham, Thank you for sharing your experience and doing the calculations. Your numbers tell me 10 kts may not be a reasonable expectation even with a 90-100 lb motor. Maybe life at 6-8 kts is just fine too. Borrowing some motors for testing is a good idea. If I come up with anything worth reporting I will share it on the forum. Brian
-
PadrePoint, Thank you. That is helpful information. I'd guess that my boat is a 300 lbs lighter than yours, even more if you had the rig and rudder installed for your test. So maybe 400 lbs lighter for the fishing configuration I'm considering if i'm by myself. Sounds like 5 hp won't get your boat above displacement speeds, but I still wonder if it would work for me. Anybody else have any experience with this?
-
I know this will seem heretical to some, but I use my CS17 at least part time as a motor skiff and fishing vessel, motoring it in the local river without the rig, using a Honda 2hp air-cooled motor. I'd like to find something faster and quieter. Has anyone put a larger, heavier motor on a rig-less CS17? 5 hp, 8 hp, 10 hp? My open transom CS17 is well-built to the plans. During the build I added some stout quarter knees in the corners under the side decks. I'd like to mount the larger motor on centerline, directly on the transom, no rudder, steering the outboard with a PVC pipe tiller extension. I know a 5 hp Honda weighs ~ 60 lbs. Would that give me 10 kts with two people, 3 gallons of gas and fishing gear? Any experience or lessons learned would be appreciated. I really don't want another boat just for fishing and I'm not looking for or expecting perfection, just something that works and is reasonably safe and stable @ 10 kts in typical river/bay conditions. Thanks, Brian
-
A friend of mine was observing the EC 2020 start and took these photos of one of the Cores Sounds that had a hard jibe shortly after launching. I know these plastic sail slugs can fail and that is certainly preferable to damaging some other parts of the rig. I don't currently carry spares but I'm going to get some. My understanding is that sufficient halyard tension takes most of the potential load off the sail slugs. Something to be mindful of in high winds when raising, lowering sails. Brian


-
That is a wonderful story Steve. After reading that Urban Dictionary definition, there's no way you couldn't change the name . Obviously meant to be. Cheers,
-
Thank you for the kind words Steve. I will certainly remember this year's MASCF. ARJAY not only won her class (ketch) but was first home of the 30-ish boats in the sailing race. Full disclosure: the race was a real light air drifter. My crew and I leaned her way over to leeward and got weight as far forward as we could. The way she ghosted along, one person said it looked like we had an underwater electric motor. This was my second time sailing the boat. Bob McMichael also won his class (lug rig) in his CS15. Kudos to Graham for designing such a sweet and versatile boat! Core Sounds rule!
-

B&B's first annual "Capsize Camp" July, 20-22
Chespearl replied to Alan Stewart's topic in B & B Yachts Forum
Just want to add my two cents - Kudos to Graham, Alan and all the other folks who made this event happen. The ability to recover from a capsize was an important feature for me when I chose to build the CS17 design. I sincerely appreciate the event participants, the videos, the ongoing R&D (mast float), and the community discussion. I will be practice capsizing my boat in the near future. I am interested in purchasing plans for the masthead float when available. Brian -
Here are a couple photos of Bob underway in MELLIMAC on the Shallow Water Sailors Spring Cruise. I was hoping to be sailing CS17 #191 ARJAY but I'm still working on the rigging so I was in my old no name Wayfarer again. Bob's boat sure looks sharp!
.thumb.jpg.0514b345048bb117b7aa8fd6af9c7417.jpg)

-
Par, Appreciate the insight. I will try to keep an eye on this as best I can. Cheers, Brian
-
Matt, Here's what I used in the bottom of the boat: https://www.amazon.com/BlackTip-Jetsports-traction-Sea-Doo-Footwells/dp/B00GC3JID4/ref=sr_1_1?ie=UTF8&qid=1515090557&sr=8-1&keywords=blacktip+traction+pad I used the grey "wishbone" pattern stuff. It was easy to cut with a sharp utility knife on a piece of cardboard. The one 78" x 39" piece was plenty to do the bottom of the CS17. One slight irritation: the wishbone pattern on the piece I got was not straight with the sides of the piece. I worked with it and it looks fine.
-
Thanks guys! The rings around the main and mizen mast holes are cosmetic. I guess they give an additional inch of bury for the masts. Used a couple different size hole saws to cut them out of scrap mahogany. Did the vinegar and steel wool trick to darken them. They are epoxied around the mast tubes.
-
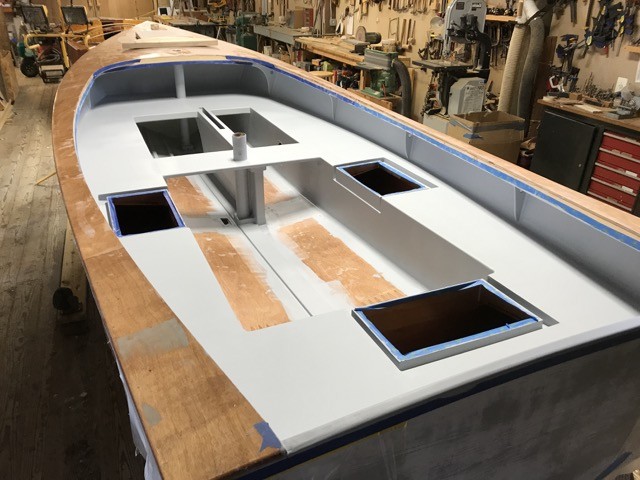
The last couple weeks ahead of the holidays were pretty busy, getting everything done that was necessary to get the boat out of the shop. Wet sanding and polishing the hull, touch-ups, lots of hardware installation. I put some self-adhesive "traction pad" material in the bilge. Looks good, feels nice on bare feet. Deck was done with KiwiGrip. All hardware bedded in butyl tape. Squeeze out still visible in photo. Yes, I like staring at the coamings... Installed the centerboard but actual rigging will be done later. This was my solution for a latch for the front hatch. Hinges are on the other side. These are 1/4 x 20 knurled stainless bolts that thread into stainless inserts in the hatch coaming. Yes, this will be tedious to open and secure, but I wanted something simple, totally secure underway, and low profile, i.e., would not catch any lines. Yes I have spares for when I drop them over the side... I put in two sets of oarlock sockets, fore and aft. The risers are mahogany and to make them match the coamings I soaked them overnight in vinegar and steel wool. It darkens the wood nicely. Then three coats of epoxy, varnish.... So 19 December was a big day. Not an official launch as I still have to finish the mast, rudder assembly, lots of rigging, put the name on, etc. So I will do an "official" launch when all that is done. But I did splash it and rowed it up the creek to my house. It is nice to have a crane and lots of friends. Note the holiday decorations on the lighthouse! She floats! These are nine foot oars and I had a pair of ten foot oars in the bilge. I tried them both on the row home. I think the nine foot oars are adequate and will be easier to stow. Here she is at her new home. I've used this floating dock in various configurations for various boats for 15 years now. Works very well. I hope all my fellow B&B forum members are having a good holiday and looking forward to a good 2018! Cheers, Brian


-
Congratulations acreew! Hopefully I'm not too far behind you with #191 which I'm building in Solomons, MD. Hope to see you on the water next year.
-
Unfortunately I didn't get to the messabout this year, but I have been making lots of progress. I got the outside painted. System Three WR-LPU Bainbridge White, HVLP spray gun. I will wet-sand the outside (600, 800, 1500) and then will hit it with a buffer. I put some 3/4 " stainless hollowback rub strips on the keel, 1/2" on the stem. Half inch was hard to find and more expensive than the 3/4". I bedded it in butyl tape, still not sure this was a great idea. I like butyl for mounting most hardware but I think I should have used something that cures harder. Next up was flipping her and fitting my (used) trailer. I would have preferred a wider trailer but this was one that I had and it will work. This week has been all about the coamings. I had previously steam-bent the inner and outer front pieces. Inner front piece went in first. All three inner pieces glued in. Now the three outer pieces all glued in. Used almost every clamp in the shop!


-
It has been a while since I last posted. I have been working on the boat. It just hasn't been very photogenic (I've been sanding!) Here are some highlights of the last couple months. I really like the side deck braces with the little holes. I expect they will be very handy for tying fenders, etc. So I added two more on each side. After lots of sanding I got the boat primed, inside and out. The deck will be Kiwi Grip and the floor will be closed-cell pad. To move it around the shop I put the cradle on wheels. Easier to move but more difficult to climb inside. Withe some help from my son and his wife I steam-bent wood for the coaming. It worked out well. I am doing the coaming in two layers, each ~1/4" thick. I steamed the wood for 20 minutes and used a steel bending strap on the outside of the bend. I do not know for certain what species of wood I'm using. It has been stashed for many years and it is beautiful stuff. Some think it is walnut but it doesn't pass the scratch and sniff test. As of yesterday I believe I am finished with spraying the finish coats on the inside. I'll know for certain when I go to the shop this AM. Still have some roller and brush work to get to the places I can't do well with the spray gun. I'm using System Three WR-LPU Bainbridge White (actually very light grey, but looks a little greenish under the fluorescent shop lights) in a HVLP gun.


-
I've been covering the outside of the hull with 6 oz. fiberglass cloth. I'm also using 100% polyester fabric from Joann Fabrics as peel-ply, which works very well. The specific fabric I'm using is white Sunline Anti Static Linings Fabric, Item #: 1431766. Joann always has a variety of coupons and sales so I got this for $4.00 per yard, 58 inches wide. Ten yards will do the hull. Here is a photo of one side of the hull covered with glass and peel ply. The glass was one continuous piece but I had to lay the peel ply in sections. Here is the peel ply being removed. Here is the hull after the peel ply has been removed. Here is the hull after scraping the peel ply seams. Here are my indispensable tools, my ProPrep scrapers, unfortunately no longer made. They make short work of scraping epoxy, especially when green.


-
Got lots of stuff done this week: Got the deck framing all planed to receive the decks. Put in the "epoxy tunnel" forward mast tube drain. Got the decks all glued on and trimmed. I used temporary drywall screws around the gunwales and on the king plank, lots of weights everywhere else. Then with a little help from my friends, we did the rollover today.


-
Looks really nice, Paul. I love that bright transom! Cheers, Brian
-
Tom, The suggested reefing set up would work. However, I look at friction as the enemy in running rigging and I think a Harken 233 micro cheek block or similar would work better. I don't think the suggested approach would save any weight or much cost, and you're still putting two holes in the sprit. Cheers, Brian
-
Thanks Paul. Full disclosure: that is the way I did the king plank the second time. First time I figured one long piece bridging the hatch would be best to ensure a fair deck line but I happened to have two short pieces of 1x4 at hand ... anyway despite careful clamping they were not satisfactorily aligned when the epoxy cured. So I sawed 'em out and did it again. As our shop boatwright says: "It's just a piece of wood..."
-
Got all the deck framing done, now epoxy coating various bits. Hope to get the deck on next week.


-
Progress (and learning) continues. My first attempt at making a mast tube did not result in a usable product. I used the method with the one inch wide strips of plastic arranged longitudinally underneath another wrapping of plastic. I made a few mistakes. First I figured since I needed a couple relatively short tubes I'd make one long one (about four feet long). I did not use new plastic and it was not 6 mil, more like 2- or 3 mil. I also wound my four layers of 10 oz glass tape on pretty tightly as I was wetting it out. Result: the cured fiberglass tube was not coming off my aluminum mast, no way, no how. I cut it into two pieces but no luck getting half of it off either. The one inch strips just stretched and broke. So after a phone call with Alan I cut the tubes off with a Fein tool and a chisel. Second try I first wrapped the mast with wax paper, then only five non-overlapping one inch longitudinal strips of new 6 mil plastic, then a complete wrap of new 6 mil plastic. I laid the glass tape on with only moderate tension, smoothing it out with a chip brush spirally, starting in the middle and working toward each end. The result was amazingly different. The one inch strips pulled easily out the next day and the tubes slid right off. I faired them with epoxy and micro balloons and they are nice and smooth, inside and out. Due to Graham's superior design skills, the finished tubes mic out at 2.75 inches OD, an easy match for a readily available hole saw. I also made the decision to go with the original arrangement for the main mast step and not put in a tabernacle. I think it will look better (subjective), and I really don't think I need the functionality that a tabernacle would give me. I am used to sticking masts in tubes from my Sea Pearl days and I don't plan on storing an anchor in the bow area. So here's a shot of my main mast step, using the ihandy level app on my phone to set the angle. This past week I got all my seat tops on and filleted and now I'm having a sanding party. On a sad/happy (sappy?) note, our youngest daughter Emma spent some time at the shop this week with me working on the boat. She left yesterday for Navy Officer Candidate School in Newport, RI. Hopefully she will be launching her new career at the end of June, about the same time I hope to launch the boat.


-
PAR, Thanks again. That is all great advice. I also read the "Painting" section on your website. Kudos to you for taking the time to write and share all that good info. I see you are located in Eustis, FL. We happen to have two sailboats built in Eustis here at our museum in Solomons, MD. They were built by Earnest "Dick" Hartge, a well known Chesapeake Bay designer and builder who retired to Eustis in the late 1960s. Witch of the Wave is a traditionally built plank on frame livery boat. He built five or six of them in Eustis that he kept on the shore of his property to rent out and earn a little money. He actually prefabbed a lot of the parts here in Maryland and built the boats once he got set up in Florida. He called that design the "Breadwinner" class. Spirit is a much more interesting boat to sail. He built her in his 80s by and for himself. It was essentially his last boat as he only built one more smaller boat after that. She is strip planked and weighs about what a Lightning does, ~700 lbs. Hartge was well known for designing and building several winning boats in the Chesapeake 20 class. Spirit looks a lot like one of his Chesapeake 20s except Spirit is double-ended and 2 feet longer (22 ft LOD). Our boatshop did a restoration on her a couple years ago and she has a nice new set of sails.


-
Lennie, Agree, I would disassemble / move the paint tent as required to turn the boat over.
-
PAR, Thank you for the paint tent photos and assembly tips. This looks like the way to go. I'm rethinking my "order of operations" for painting the boat. I was planning to prime and final paint the interior and deck before I flipped the boat and glassed the hull. I'm thinking now that I should just do interior primer, then flip/glass/fair/prime the outside. Then I could erect a paint tent just for the top coats on the whole boat. I would still have to flip the boat inside the tent at least once but I have lots of help and overhead hoists. Sound reasonable?

.jpg.e238ca56fe8dc9d5794fa62f00a800a5.jpg)


