IsZataRock
-
Posts
29 -
Joined
-
Last visited
Content Type
Profiles
Forums
Events
Everything posted by IsZataRock
-
Thanks for the info and advice, Chick. I'll be modifying my trailer to give better support along the keel. With any luck I'll be able to configure a nice longitudinal plank shaped to fit the keel that should double as a walking surface. Rollers only if I have to. So far my boat is very easy to launch and recover. And, of course, I'll get my zipper zipped up nice and tight before my next trip! There should be a picture or two once I get it figured out and implemented. Hal
-
Chick and Graham, Thanks for the feedback. It is all so much easier to see AFTER the failure. I'll get her straighten out and fixed up in the next few days. There still remains another question, though. The longitudinal trailer bunks are designed to carry a big motor at aft on the boat and don't provide much or any support forward. I fashioned a small support under Bulkhead 1. But I don't think I made it high enough and as a result, most of the weight of the boat was supported under Bulkhead 3 where the webs broke. How do I adjust the height of that forward support so that boat weight is properly distributed, i.e., not "high centered" like it was but not suspended between the bow and the stern either??? Hal
-
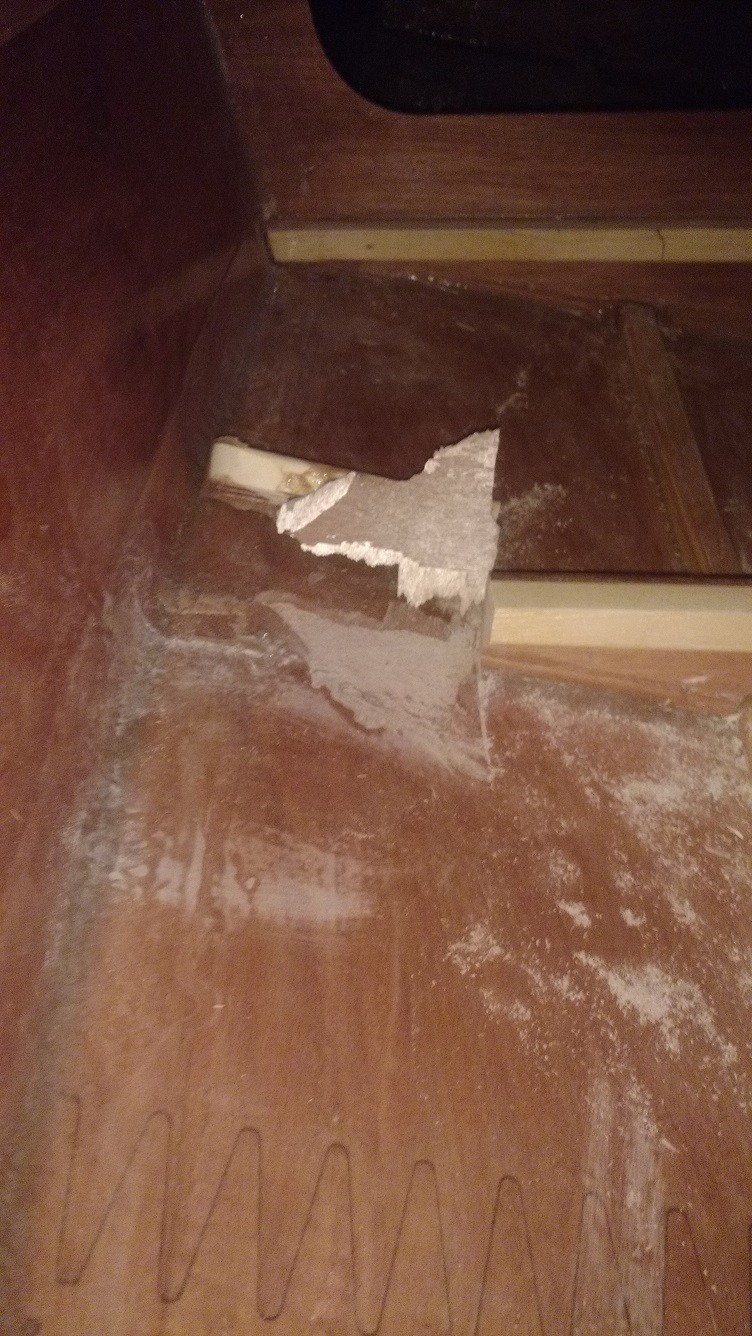
It's been an interesting little while since I posted. I could truthfully say that helping out family and friends has detracted from my focus on boats. But it'd be untruthful to blame all of my low boating energy to those activities - as important as they were. It's also been cold in my garage. And I've found that mixing epoxy requires some kind of "groove" that I seem to have fallen out of. Still, I have been making a little progress. I am finally getting around to gluing down the cabin seats in my CS17.3. So I've been going around with a final smoothing of rough spots. And I found a damaged area under the chine end of the starboard web under the aft cabin bulkhead. (The picture shows where I whacked off the loose end of the plywood web and cleat.) I have it on the port web in the same spot. I noted that 1) there is no epoxy on the hull-cleat connection, 2) the epoxy didn't hold between the plywood web and the hull at the outboard end, and 3) the epoxy at the inboard half of the failed area was strong enough to break the hull's plywood laminate. I think it is caused by my trailer bunks supporting the hulls just inboard of the chine in this area. Plus the bunks have rigid supports directly under these webs. Plus I obviously wasn't very careful about getting the end of the cleat glued to the hull. Plus, the seat ply attachment to the hull in that area would have added a lot of strength. So this probably wouldn't be a problem for most folks who follow directions better than I do. But I thought it might be useful to note that, sometimes, well, shit happens. I plan to glue the loose piece back into position on the hull. Then scarf another cleat across the cut and fill in the 1" of the cut plywood web. And, of course, glue down the seats. I'm not sure if the plans call for it, but it certainly wouldn't hurt to add some tape between the seats and the hull - especially where the webs are positioned. Any thoughts? Hal

-
Graham is definitely right about the worry versus execution time ratio in my case, anyway. The biggest problem I saw with the "roll-over by hand on pads" method was the narrow confines of my garage. But that can be worked around. I love the video of Alan flipping the CS 15. If anyone is considering a suspended loop like Pete was considering, note that the tackle won't go through the pulleys at the top. And I didn't like blocks laying on the hull which they will do when rolling the other direction. Also the top blocks don't have to line up vertically with the gunwales. The "vertical" parts of the loop won't be vertical during the whole rotation anyway. Finally, don't underestimate the load on the top blocks. It's roughly 50-60% greater than the vertical load on the loop rope due to the tension on the rope between the two top blocks in combination with the tension in the "vertical" part of the loop. I used two loops with a single piece of rope on each end of the boat: Go around the boat to one of the blocks, go around the boat a second time and go to the second block. Hope that makes sense. This reduced the load on the rope, the blocks and the tackle. I also used climbing prussiks to hold the rope after I tensioned with a three-part tackle. (I have a CS17.3) A prussik knot works almost as well and doesn't have to be padded when it contacts the boat. All that said, Alan's bow eye method sounds great. It's close to the longitudinal center of gravity so the boat shouldn't flop badly during the rotation. And one person can probably handle the weight in most cases. Just be sure you get a good grip on the hull close to the transom. Rubber-coated gloves? Bottom line is: get some help! Hal
-
Yeah, Gordy. That snotter connection isn't easy. Seems like a nicely-shaped hook (jaw?) would work for the sprit's axial load. It probably wouldn't slide down once tensioned up. But it would slip down any chance it got. There's always a good reason why experienced sailors rig their boats the way they do. Still I can live with a compromised downwind sail trim. So the sprit problem isn't a killer for me. How easy/hard was your "spanner" mast-rotation method? How far up was the top bearing from the bottom bearing? I'm hoping to get the bearings far enough apart and configured well enough to allow use of a drum for furling. My current setup has "bearings" 2.5' apart that are just fiberglass on aluminum with a liberal dose of petroleum jelly for lubricant. I can furl my 60 sq ft sail on it's 15' mast with a very light pull on my 4" dia drum. I learned this "drum" trick from an Adventure Island I sailed for a month or so. It is awesome! Hal
-
Finally got out to try my downwind rig yesterday afternoon. SO NICE to be able to sail - even if it's a little on the slow side and restricted to broad reach or lower off the wind. I still haven't built my rudder or figured out how to get both the rudder and the 6 hp on the same transom. So I used a transom oarlock and 8' oar to steer. I found it interesting that the boat seemed to have weather helm with my terribly unbalanced (toward lee helm) rig. But then figured that it's just that it was just the huge leeway (no centerboard yet either!) that pushed the oar blade to weather. Being creative, or lazy, I stopped steering and found she'd head up a bit, then fall off, until gradually coming to a happy equilibrium in a deep broad reach. HAH! that's a nice, unexpected point of sail! It was also instructive to practice ducking through my cabin to reach the forward hatch and then ducking again to get out. I chose to build the two-hatch version of the Mk3 rather than the tunnel hatch to better ensure water tightness. But it does require a bit of contortion to get forward. On the other hand, the boat was well behaved while I was dinking around forward. And standing in the cabin with a hatch around my upper body is WAY more secure than crawling up there on deck. Life is full of trade-offs, yes? Thanks for the feedback, Terry, Robert, and Steve. Terry, it's that need to secure the loose sail. I don't see any practical way to achieve that from the cockpit. Steve, thanks for the reminder of the Sea Pearl rig. That configuration is close. The bearing loads are (roughly) inversely proportional to the distance between them. And the SP's bearings look to be very close together in the hull. No wonder you have to rotate the masts by hand. With the hope of being able to back out of this experiment without having to rebuild my mast, I'm thinking of using a 2.25" od, non-rotating post that will be inside the 2.5" lower section of the standard mast. I can then use the standard mast without any significant alteration (except I won't need to mount the track). That'll give me a mast that's 18" taller than design and some bigger loads on the tabernacle then Graham calculated if I use the standard-size sail. So I'll want to be quick to reef. I'm leaning away from a boomless rig. Seems like there are some decent options for a low goosenecked boom. Though I'll miss the elegance of the sprit boom's use of the sail's foot, rather than a vang to keep horizontal off the wind. This all seems reasonable. But I have this nagging feeling I'm missing something. Especially since nobody else has done it. Hal Just In Time, a new Core Sound 17, Mk 3 and a gazillion other small boats in my back yard, shed, basement and garage
-
Great thread, guys! I've been considering alternatives to my big, heavy, NOISY 6 hp but have had trouble finding useful numbers to figure out my options. I did a few conversions and found that Tom's boat, a 1000-lb displacement hull requires about 61 lb thrust to go 5 knots in good conditions. (Did I do the numbers right? 700 W = 513 ft-lb/sec. 5 knots = 8.4 ft/sec. 513 ft-lb/sec / 8.4 ft/sec = 61 lb. Don't ya love SI units?) That's the kind of thrust we get from the larger trolling motors. And it passes my limited sanity test of what we might expect in performance. It's tricky to estimate a boat's power requirement as a function of speed. So perhaps it fits that Edward's boat (also 1000 lbs though perhaps a little longer) which got 3.5 knots with only 34 lbs of thrust (that's only 200 watts output power). I was thinking even 40 lbs of thrust would be too small for a CS17. Maybe the crux question is how much thrust is needed under ADVERSE conditions? I'm thinking narrow channel with headwind, chop, and ebb tide. ARRGH! In terms of cruising endurance, it's hard to compete with a noisy outboard if you want to be sure to get somewhere. But even on a multiday trip done mostly under sail, I wonder about how an electric would work. I haven't figured out any good way to mount solar panels on my CS17.3. I was thinking about buying a 900 watt "camping" generator. It can't be any worse than my 6 hp. Hal
-
I learned a lesson today. Don’t leave a posting long enough to go take pictures. I had a long one all set to go, shot a couple pics, came back and found it gone. Arrgh! It’ll be cut and paste from Word in the future. Well, ok, let me try again: It’s fall in Colorado and time to start work on Phase 2 of my CS17.3, Just In Time. I launched her in early September as a motorboat just so I could get on the water this year. Now it’s time to do the “sailing parts.” I’m wondering if anyone has given thought to arranging the main sail with a roller furling around the mast. It’s doable, of course. I did it for a downwind sail using an old windsurfer mast and a Polytarp sail. (see pics). I slid the hollow windsurfer mast over an aluminum tube I connected to tabernacle. It could also be done using a larger pivot tube (or better, pivot bearings) into which the 2.5” mast is inserted. I’ve thought of a few pros and cons: Pros: No more need to go forward to raise and lower the sail. Maybe there’s a way to do this from the cockpit that I haven’t figured out. Or ways to safely go forward while leaving the helm unattended in bad weather. Any help from the experienced folks in this forum would be great. Fast, infinitely adjustable reefing. Simple, clean, sleeve connection between sail and mast. Cons: Pretty tricky fitting a pivot tube in the existing tabernacle to enable use of the standard mast. Hah! Mine is only screwed in at the moment so maybe I make a bigger one? Furling loads might get pretty high if the pivot tube is too short and/or there is too much friction in the bearings. HATE not being able to furl when the wind kicks up! Sail has to be cut differently. No roach, no horizontal battens. Maybe just go a little slower or maybe use an angled, Hobie Adventure Island type batten. Boom configuration needs to be changed. Maybe a deck-mounted boom pivot or accept the compromise of a boomless rig? Bad sail shape when reefed. Not too worried about this. Slab-reefing sorta messes up sail shape too. Even a flat triangle that far forward should help balance the mizzen pretty well. What am I missing? Hal


-
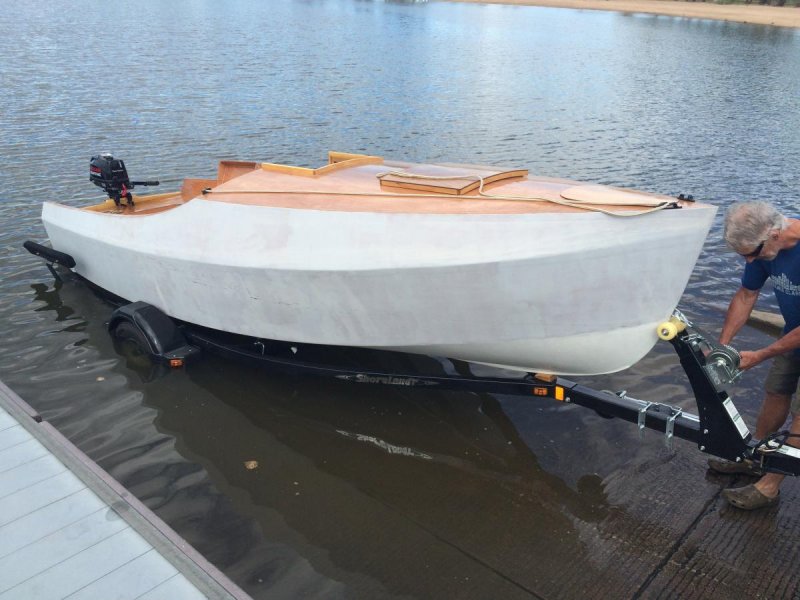
Well it's official. I splashed Just In Time last week (Sept 2nd) and verified that she floats! Unfortunately, while my motor seemed to work just fine in the garage, I couldn't get it started at the dock. After a little carburetor surgery at an adjacent beach I was able to get it running at and slightly above idle. But it needed a lot of choke to run at higher throttle. Still my daughter, Rachel, and I had a good time on our first mini-cruise. You might note that the paint is a little less than stellar and that I don't have many places to tie things. She has the bow eye, two transom tie-down eyes and one cam cleat. And my cabin hatch attachments are less than rock solid. Screwing into 1/4" plywood with the hope that the screw points won't protrude and rip something is always a bad idea. During the next few days I became much more familiar with outboard motor shops. But I finally found a good Nissan shop who confirmed that the carb has TWO overflow tubes and that the critical jet is accessable from inside the float chamber. So I was able to clean out the gunk and get it running like it should. After waiting for the Labor Day crowds to dissipate, I've gotten out another couple more times this week. Motor runs fine. Though I forgot to bring the GPS I'm pretty sure I'm pushing 9-10 mph with just me aboard. With my friend, Paul and some more supplies, we confirmed about 8 mph. Despite great performance, I've realized that I am NOT a motorboater. The noise and vibration is inconsistent with my expectations of being on the water in a beautiful boat. So I'm working on getting at least a downwind rig functional yet this Fall. All in all, the boat's performance meets all my expectations. She's solid and dry under the mild conditions I've seen so far. And seems so light compared to my my expectations that I'm blown away. I look at this enormous hull (compared to my other boats) and expect heavy and slow. But that couldn't be more wrong. Now I can't wait to get the sailing parts done and get her on a broad reach in some decent wind! Hal

-
Yes, hoping to make it to Oklahoma this year. First launch will be in Chatfield Lake, right next to the State Parks office where I'll be registering my boat and my closest lake for any boat longer than 14'. After that I hope to stretch out to Dillon, Green Mountain Res, Grandby, Torquise, and Glendo. If all goes well, Oklahoma in October, possibly Lake Powell, Tampa to Key Largo in March, Texas 200. Next summer I'd really like to get up to Idaho and Montana. It may be good to remember: "We plan, God laughs!" MM (great nickname for what we do), two of us in March would be cool. Maybe we'll get more folks. Of to the river now.
-
Hi Phil, Thanks for the positive feedback. Sometimes it's hard to see the beautiful lines of this boat. My eyes are drawn to the unfinished shortcomings. I won't be entering the EC next year. I promised myself a couple years ago that I wouldn't enter with a boat that I hadn't thoroughly checked out. Given all the work I still need to do to get her sailing, I won't have time to get familiar with her before next March. I MIGHT bring her to Florida and run along as an unofficial chase boat, however. I'm looking forward to exploring that route in a comfortable boat and with a well-rested mind. Not that sleep deprivation doesn't have it's interesting moments. But it makes it impossible to take in all the sights and sounds. I'd be interested to know if any other folks are looking to cruise it rather than race. I'm guessing you are planning to hit it hard?
-
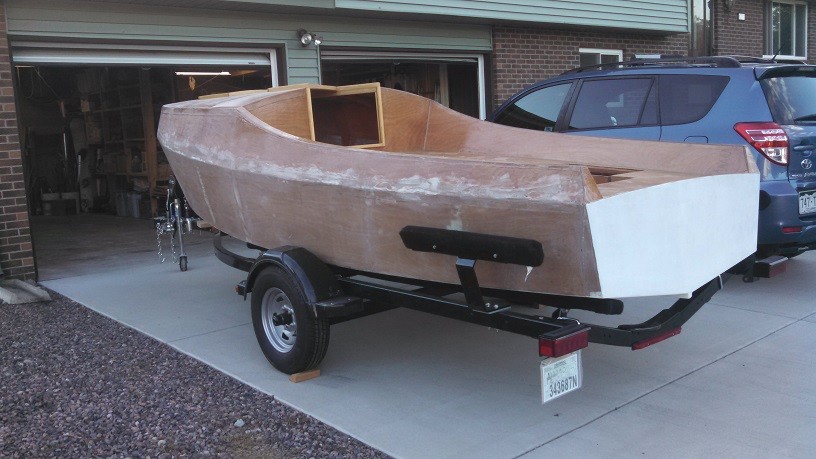
Ok, Ok! I like to see your pictures too. So, hopefully, I'll be able to figure out how to post a couple of mine: This is my baby sitting on her new trailer and enjoying the outdoors for the first time. The trailer needs some sort of hull support forward because the nice bunks are designed to balance a tail-heavy motorboat. What's one more thing to build, eh? I DO like my trailer, though. It has a fold-away tongue and can fit inside the garage. That will help keep the rain and snow off. The white transom is the result of two coats of Awlgrip Epoxy Primer 545 which came out pretty good for a primer. The bottom, which you can't see, is also done that way. Those two areas were all I could squeeze out of one quart of paint. Now that I see how awful the boat looks with white filler in various places along the sides, I guess I have to get some more primer and clean things up a bit more. After much consternation about what paint to use, I think I'll stay with two-part epoxy primer so I don't close the door on an LPU finish. But I'm shifting to System 3, water based primer. Hopefully the smell will be a little easier to take. The plan is to make the boat "presentable" for a first launch in August and then do the fine finishing this winter. This picture shows my hatches from the outside. Sorry, you can't see the bungie cords that will hold them in place. Not because they are on the inside of the cabin. But because I haven't attached them yet. There will be one, double cord over the aft part of the aft top hatch that will button things up when I am outside of the cabin. That one isn't installed yet either. I probably won't get to that part of the project until I return from a week-long raft trip on the main stem of the Salmon River starting soon. I PROMISE, I'll post some more pictures of that hatches when they're available. Holy Cow! I just previewed the post and saw that I got the pictures in ok. Amazing!


-
Frank, My memory is short on a lot of things. So this is the second or third (can't remember) time I've need help to upload pictures. An easy search for "uploading pictures" brought up this thread which looks like the cat's meow. But the link doesn't work anymore. Arrgh! Could you please update the link and any other information that would help us memory-challenged forum users? Thanks, Hal
-
Thanks for the tip, Dave! Propylene glycol is considerably less scary than Perfection's ALIPHATIC POLYISOCYNATE (whatever that is). Ventilation in my garage is ok if I open the both doors. But then the wind blows my carefully-kept sanding dust all over. Maybe someday I'll get covers for all my shelves and rid my garage of dust. I'm a fan of semigloss for a lot of things as gloss just shows off all my boats' defects. Has this forum resolved the gloss/semigloss issue?
-
Well, folks, it's been a while. Sorry. My boat is very slowly approaching launch. I thought I was pretty close in early June when I got the cockpit put together and was ready to roll it over to finish the bottom. Oh, no! It isn't that easy! I don't have a lot of room in my garage, so I rigged some pulleys that hang from my garage ceiling. And I rigged some climbing ropes around the boat. This system worked pretty well to support the boat and enable easy rotation by myself. I feel a lot better about it now that I've reinforced the ceiling with some posts and a beam across the middle over the boat. Hate to pull my house down! I have some nifty cataraft bladders that support the cockpit sides and cabin top over the floor. Very soft and squishy. Since then I've glassed the bottom, added the keel strip, and gotten most of the rough spots smoothed over. Along the way I think I've learned a little about peel ply, filling/sanding/filling/sanding/etc, and paint. I need to buy more, but I plan to coat the bottom and sides with white epoxy primer to cover the ugly patches of white filler over the brown wood substrate. Then launch and enjoy my boat for a couple months this season. This fall/winter, I'll do a lot more filling/sanding/filling/sanding/etc and apply the fancy-dan, two-part polyurethane for next year's beautiful boat. My hatch system (two top hatches and on companionway (vertical) hatch) seem to be working out well but I'll know better once I get the boat on the water. I bought a beautiful and expensive trailer from Shoreland'r that should fit the boat perfectly. We'll know in a few weeks. Wouldn't you know that, right now, in the final stages before launch, I'm taking a couple weeks off for a river rafting trip. Gotta go enjoy the water while it's still liquid. This is Colorado after all! Hal
-
I'm building a CS17, Mk 3 and struggled with the hatch question for some time before deciding to go with a forward hatch, companionway hatch, and a "companionway hatch" rather than drop boards. I think my hatches will work fine but final testing awaits getting my boat on the water. All hatches are lids with 1" edges. All are held in place with two, transverse bungie cords on the inside (except on external cord to be used on the companionway hatch to seal it when outside cabin). All will have foam seals. Presumably, if all are in place, the boat can be rolled and no water will enter the cabin. The top hatches are curved to match the cabin top with 3/4 x 1" ribs which, with the edge cleats, keeps the curve across the hatch. The "vertical" hatch fits under the back edge of the companionway top hatch. These weren't particularly difficult to build, look pretty decent, and are likely to be more waterproof than alternatives I've read about. We'll see how easy they are to use I hope to post some pictures later, if anyone is interested. By the way, I would be interested in people's experience with using the forward hatch for anchoring when single handed. I can't see running back and forth from the motor to the foredeck. I plan to deploy my anchor from the cockpit. I'll use a line to haul my anchor line aft for anchor recovery. Could be I seldom open the forward hatch unless anchored. Hal CS 17, Mk 3, Hull #5
-
Interesting to log on to this forum for a couple months and find the topic that has kept me somewhat perplexed for the recent past weeks right at the top. My two cents: Best I can tell, there is a key choice to make after you've finished glassing and smoothing the bottom: are you going to be satisfied with at somewhat rougher looking and less durable finish that is easy to apply and get you on the water quicker? Or are you willing to take the extra steps needed to achieve the better finishes afforded by two-part polyurethane? Once you apply a one-part paint, you boat's fate is decided. I chose to use a two-part epoxy primer. Expensive, yes! But after a gazillion applications of epoxy to build the boat, it wasn't that difficult to apply. And now, I can better see all the defects I can either address or ignore in the future. I plan to launch this summer with just the primer and then spend this fall and winter to try and get a really nice finish. That will include 2-part polyurethane as Graham has recommended. I'm somewhat embarrassed to launch an "unfinished boat." But I figure I'll have a lot more patience this winter than I do now. It was interesting to note that the epoxy bubbled up the paint on in my paint tray in about 30 minutes every bit as effectively as Zipstrip. I can imagine that applying a nice, 2-part epoxy or LPU over a single part paint on the bottom would be disastrous! Luckily the enamel stayed put while the epoxy was applied to the boat. Hal CS 17, Mk 3, Hull #5
-
You guys are great! Quick and helpful responses. Joe has it right: hinge down in the slot with only the round part visible when the hatch is close. Yes, locating the screws would be much harder. And, if messed up, the hatch might either bind up when opened or, worse, fit poorly. On the other side, I understand that the hinges are not terribly obtrusive. Countersinking them seems smart. Hopefully, the bright finish will keep them from getting too hot in the sun. I'll put it on the "to be considered later" list to bury the hinge plates in the slots. Meantime I'll stay with the plan. It can't be anywhere as uncomfortable as the slde rail on my Hobie 16 trampoline. Hal
-
I should know better than to question Graham's excellent design. But I wonder if it would be ok to position the cockpit locker hatch hinges to be vertical when the lid is down rather than horizontal as shown in the drawing. That would get the hinge off the top of the seat which might be as bit more comfortable, look a little better, and improve security should I ever want to lock my locker. I don't see much of a down side except the need to tweak the position of the fixed hinge block slightly and add aanother 1/8" to the back of the seat opening. Does this question make sense without a picture or drawing?
-
Ahh! Another unfolding. You guys are getting smoother every time. I also see the chine alignment trick. I meant to, but apparently did not, take pictures of similar pads I used in the same place on my boat. I put a pad on both the inside and outside with a clearance hole through the hull halfway between the wire ties. Your method is easier. And certainly for that area, the forces are small enough that double pads are not needed. I also put a block inside for the keel seam with pads outside to force alignment in the lower bow area. The inner block was a bit tricky to fit and even trickier to place by myself. But it worked nicely. Panels in that section want to overlap. I probably should have been more aggressive in preparing the edges before unfolding. It needs more of a chamfer than a rounding there, I think. Working on the cockpit lockers today. All longitudinal joints are taped on the inside forward of the BH 3. Still have to smooth and tape the outsides of those seams, fit the hanging knees, tape the forward bulkheads to the upper panels. etc, etc, etc. Can anyone point me to plans or pictures of companionway closures? I'm thinking of using a single drop board down the opening in BH3. It won't seal, but being almost vertical, I'm hoping it won't leak much either. Then use a fairly normal hatch design for both the forward and main hatches. Bungie cord closures on the inside do most of the work but the main hatch needs something to hold it down on the outside at the aft edge. Preferable something easy AND lockable. Bungie cords inside let me hold down the forward or aft edge as a poor man's pivot. Or by hooking all around, they apply nice even pressure to the seal. It's all somewhat speculative, though. I've never built a boat big enough to to get inside before! Hal
-
Ha! Several was to skin the cat. Poor kitty! Graham, perhaps the video I found (3Ding Doug's CS20Mk3) was the wrong video. There were nothing on it showing the technique you describe. Still, I get the idea and like it. I might suggest that the "gentle" pull could be improved by putting the screw hole 3/8" from the edge of the shear strake and a pilot hole 3/8" from the edge of a second piece of ply or OSB inside. Now the threads can't strip out. Hard to tell if I would have had problems with thread stripping. It was hard to pull the wires by hand. But a screw has SO much more leverage . Why didn't I think of that?? Thanks for the acknowledgement about "getting it right." It would have been easier to lose a 1/4" or so across my cabin top. Who would know? But then the hanging knees would need to be trimmed. And, yes, I would know. Steve, good luck with that competition thing! I'm retired and widowed. So I can spend way more time building my boat than folks with a life. Besides, the joy is the journey, right? Terry, 9 months seems like a short time to build a CS20 regardless of Mk number. Especially if you had other things to do with your time. Maybe it's the male version of carrying a child (less the pain at the end). I sure wouldn't want to do it again anytime soon. Besides, like you say, boats are never really "done." Ha! Neither is raising kids! Hal
-
Ahhh! Thanks, Frank! I need to use the "More Reply Options" to get to the "Attach Files" option. So, the pictures: First shows the cabin top tie-wired to the shear strakes. You can see the 1/4" ply filler in the companionway. This piece helped produce a consistent curve to the top. And will hopefully help me keep water out of the cabin. Second and third, my augmentation of tie wires. Sometimes wires can't pull the parts into alignment very well. So I added 3/8" dowels to the inside of the cabin top and plywood pads to the outside. The dowels give a better angle to the wires to pull the strakes outward. The plywood presses against the edge of the top pushing it inward. Those add-ons and robust use of my pliers to pull and twist got the job done: bottom edge of top aligned with outside edge of strake. I considered adding a cleat along the inside of the cabin top but didn't want to take the top off again and futz with fitting a cleat. Alan reports that B&B might add gear teeth to that joint. That would be WONDERFUL. It's amazing how stubborn 1/4" ply can be! Hal


-
Hi Terry, Thanks for the reminder. I'm not too good at documentation. Especially when I'm having so much fun building. Plus I can't remember how I posted pictures last time. I have asked Frank, our forum help guy, for help. For now, I'll share the progress with words. Yesterday I finally finished fitting the cabin top. I assembled and epoxy-coated the bottom of the four cabin top pieces on a table before fitting on the boat. Then had to wrestle hard to get the shear strakes to line up with the edge of the top. But I've finally got it using an augmentation of the tie wire technique I'll share later. Other than some epoxy in my hair, all is good. I should be able to snip the tie wires later today and get the tape over the joints. I've fit the hanging knees already but won't glue them in place until the longitudinal seams are done. I filled in the center of the companionway hatch with 1/4" ply. This makes going forward more athletic than I might be able to stand in the long run. But it helped control the installation, improves drip control, and can be removed easily enough later if I decide to. My friend, Paul Breeding, helped me remove the legs from the construction stand since I no longer need access to the bottom of the boat and climbing even a 3-step ladder 50 times a day gets old. If I had it to do again, I would have removed the legs quite a while ago. Now a 10" stool is all I need to make the big step into the cockpit over the transom. Last night, in an exceptional bout of extra energy (feelin' good after finally getting the cabin top tacked down, I guess), I started dinking with the cockpit seats and back rests. Holy Cow! This boat is looking good! I might get it launched this year after all.
-
Thanks for the welcome! In keeping with established practice and John's reminder, here are a few pictures of my building efforts: It may turn out twisted. But it looks ok here. A wedge under the port aft leg of the building stand was all I needed to get it as good as my eyes can see. I don’t have cool lead weights like Graham. So I used what I have for another project that waits for the day when I’m not building boats. The hull panels were pretty stubborn and didn’t want to spread out to match the cradle and this bulkhead. So wire ties to the cradle (barely visible to the left and right of the weighted bulkhead and 120 lbs of weight encourage better behavior. I went a little overboard with Alan’s suggestion of tack-welding the seams as seen on the left where the sanded tack welds can be seen as I placed them between each of the wire ties. Center and right seams are primed in preparation for goop and tape. This morning’s work was priming and gooping. Lunch now then tape this PM. I am “systematically” working around the hull so that I can straighten stubborn panels and strengthen some areas to support my weight when I goop and tape places I can’t reach from outside. Learning to post to web sites seems to be every bit as difficult as building a boat. Any tricks to facilitate that process here would be greatly appreciated!! Hal


-
Thanks, Doug. Your cantilever plug is from bicycle cantilever brake applications? 10 mm? Good idea on venting the air space. I reckon 0.5 psi / 1000 ft elevation. Doesn't sound like much but that's 72 lbs on a one square foot panel. I have 5,000 feet between my house and the Eisenhower Tunnel if I go to Lake Dillon. My cataraft bladders can get very unhappy. How about the sealed compartment under the anchor well? The cabin sole ahead of the ballast tank is a nice low spot in the hull. But also takes up valuable space in the cabin. A big hatch in the cockpit sole behind the tank is likely to leak. It's always a compromise, eh? Hal