William
-
Posts
35 -
Joined
-
Last visited
-
Days Won
4
Content Type
Profiles
Forums
Events
Gallery
Everything posted by William
-

Freely Rotating Masts within Tabernacles for CS 17 mk 3?
William replied to Dale Niemann's topic in B & B Yachts Forum
This is just a rough model to illustrate, using the forward bulkhead and mast collar of the Spindrift as an example. The assumption is that the green mast stub can rotate in the collar. The tabernacle is rigidly attached to the stub with through-bolts. Hinge bolt in red, locking pin blue. Shown here with mast 15deg from vertical and locking pin removed. My own mast is ali, 63mm diameter, 3mm wall. I will be making the tabernacle out of Bulletwood. I am sure you are right regarding the flex, but I cannot yet say if it will be a concern.
-
Freely Rotating Masts within Tabernacles for CS 17 mk 3?
William replied to Dale Niemann's topic in B & B Yachts Forum
I have recently snapped a free-standing rotating mast. In the process of fixing it I also plan on adding a hinge for ducking under bridges. The basic idea is to split the mast above the mast collar, fix the tabernacle to the bottom mast stub. Now the entire tabernacle can rotate. The rest of the mast hinges in the tabernacle as before, with the advantage that the tabernacle is always aligned to best support the direction of force on the mast. -
-
Ash gunnels, not full thickness but enough to give a fair curve to the sheer for now. Just finished laminating the carbon inside. It was difficult to tell dry areas from those already wetted out, but a good deal easier to wet out than the Vectran! I added the straps to maintain the correct beam just in case the topsides get too rigid once the carbon skin cures.

-
Chines are all taped inside. Time to flip and get the outer skin on, but first I had to clean up the chines on the outside. I used a wood file to rasp open the core cells on the edge of the bottom panel and filled them with thickened epoxy. After curing it was easy to clean it up with the same wood file, but I soon also started using a plane which worked surprisingly well. The remaining holes and hollows were filled up before adding tape to the edges. I tackled the Vectran with a brand new pair of scissors. It made it about two feet into the fabric before it started gnawing and never really recovered. Another less serrated pair worked slightly better but it was a pair of serrated tin snips that proved to be the real solution, cutting MUCH faster and giving a very clean cut. The Vectran turned out to be plain weave instead of twill, and being a very stiff fabric it was impossible to bend some of it over the chines. I had also cut out a slot where the daggerboard will protrude so that I do not have to struggle cutting through the vectran once the skin has cured. Carbon tape on the chines and then the whole lot got covered with some 5oz glass. The glass is 1m wide, just enough for one half hull at a time with a bit of overlap on the keel.


-
What are the factors that would typically swing a choice between the Core Sound 15 and 17? Space/capacity? Performance?
-
-
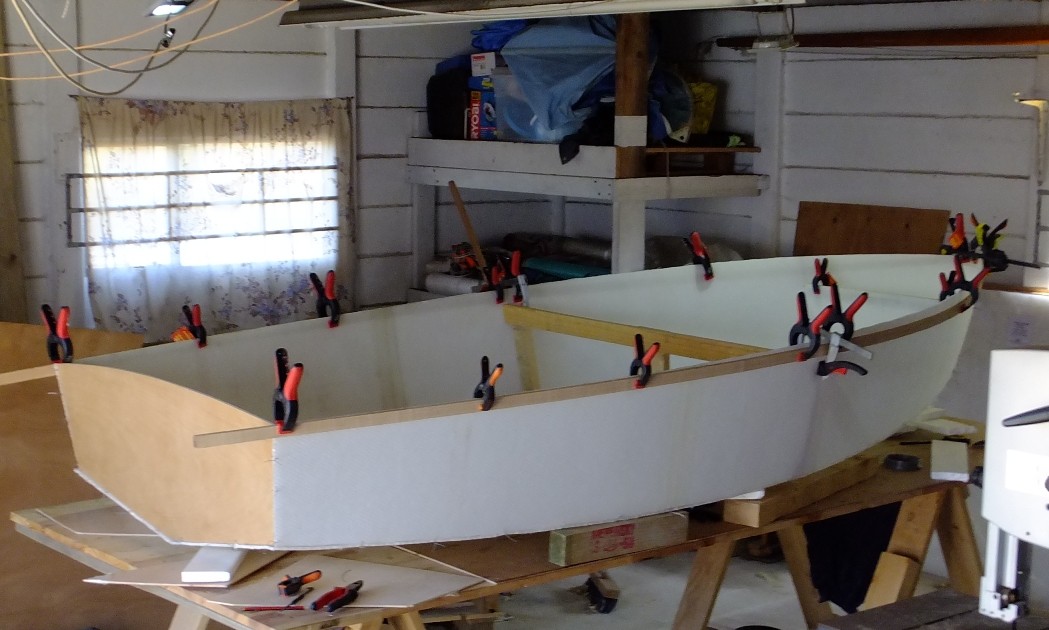
The recent supermoon gave us higher that usual tides, so this morning we explored some nooks of the estuary that are not normally accessible. The canoe is a 12ft adaptation of the B and B canoes that I recently completed. Then on to open the butterfly and go 3D. I don't plan on doing a full series of build videos like I did for the little canoe but I did take some timelapse of today's progress. The camera's battery died before I got everything fully stitched but at least it captured the essence of the whole exercise. Stitching is with thin galvanised binding wire. No drilling required to make holes but to puncture the cured layer of epoxy did require the use of a scriber. Hole placement was done such that the wire pulled up against a hex-cell wall. Working with the floppy core panels was as cumbersome as I thought it would be, ditto for getting fair chines while stitching. Having built the canoe out of 2.7mm ply at least gave me some experience in using gravity and well-placed supports to help tune the shape. Adding the ash gunnels went a long way in getting the right curve on the topsides. I was expecting some discontinuities at the bulkheads and was prepared to disassemble and add glass tape on either side of each free edge to provide more stiffness, but I am very happy with how it turned out. It still needs to be flipped (or raised) so that I can tighten the keel stitches and fair the rocker. You can tell from the photos that I have modified the sheer line.


-
Butterfly stacked.

-
Having set up a spreadsheet to calculate the wood-replacement layup schedule, I started thinking about the spars. To replace the boom would require a rather generous amount of UD carbon to match the bending strength and stiffness of solid spruce. A rough estimate indicated a weight saving of about 50%, or 1kg. Such a small saving might not seem worth all the extra work and cost as far as overall weight reduction goes, but I was surprised at the impact it has on stability. I calculated moments and center of buoyancy at 5 degrees heel and with the boom sheeted out 15deg from the centerline. The reduction of the 1kg that far to leeward adds the same amount of stability as the addition of 2kg of ballast at the tip of the centerboard. On a reach with the boom out 45deg and the board pulled up by 1ft, the equivalent tip ballast would be 6.7kg. The values a trivial and might not even be noticeable on a boat with such a stable hull-form such as the S10, but it is worth keeping in mind for those designs that never give the stomach muscles a break!
-
I have thought about it but since all the cells are technically open I dismissed the idea, reasoning that the vacuum will simply suck the resin into the cells. But now that you brought it up again I think it is worth investigating a bit further. One reference I found used a light vacuum to press down the dry core onto pre-wetted glass. Since the polyester scrim adds no strength apart from something for the epoxy to bond to on the actual cell walls, I cannot see the need for full wet-out of the entire scrim surface. As long as the glass itself is properly saturated and evenly bonded along all the cell walls. I have tried this on test pieces with wood strips, wetting out only the wood and pressing it down evenly on the dry nidacore. Another interesting test was to use thin abs sheet, dissolve its surface with a few brush strokes of nothing but acetone and press it just like that against the dry core. It gave a very nice bond. Heavy, naturally, but an interesting option if you want the impact resistance of rotomolded polyethylene without the lack of stiffness. I don't have any vacuum bagging equipment, and to use it on this particular build would not be practical for the major hull panels. It would require cutting out the fabric to the individual panel shapes and bonding them together again with tape as one would with plywood. It would require much more fabric in total to fit the parts individually. To get the most economical use of the 1m wide carbon fabric, my plan is to stitch the hull into its basic shape and lay up lengthwise with a generous overlap along the keel. It will also give me continuous fibres from the bottom panels onto the topsides, for whatever that is worth in additional stiffness.
-
Walt, just remember that your gunnel's cracks are quite likely of a different kind and orientation than those illustrated by Alan, rather running parallel to the grain and not quite as localised. Have you removed the paint in that area to get a better look at the damage yet?
-
What percentage of the sail area does the CS carry in the main? I would like to scale my drawing's sail areas to similar proportions and see what the layout options present.
-
A few more questions: How many people can comfortably sail at once in a CS-15, assuming that at some point everyone needs to sit on the same side? Does the cat-ketch rig allow more usable cockpit space than a sloop configuration? Would there be any preference between the ketch rig and a yawl in the 13-14ft range? At a glance it looks like a ketch might not leave enough room for the helmsman behind the mizzen mast while at the same time complicating tiller operation.
-
Butt-joint on the nidacore. Glassed one side first, flipped the whole thing over after about 12 hours, flexed the joint half open and filled the half-open cells with thickened epoxy and then added the last bit off glass to complete the joint. The tissue-like scrim is quite thirsty and requires about 30-50% more epoxy that plywood to wet-out. Part of the problem is that it does not allow easy re-distribution of the epoxy once it is on the surface, resulting in the inevitable over-saturated areas. That is why the peel-ply is there, helping to absorb some of the excess. Once the panels were marked I applied a layer of epoxy to what will be the inner surfaces before cutting them out. The epoxy allows a cleaner cut using a utility knife but the main reason is to add some stiffness to the scrim. Without it, curving the core results in the scrim crumpling over each cell on the compression side, giving an uneven surface. Adding stiffness to the inside also moves the neutral bending axis and increases the tension on the outer scrim for an even smoother surface to work on.


-
Just shooting from the hip here: on the outside, below the gunnel, add a filler piece of solid timber to act as a supporting gusset . Close the hole for the oar-lock with some masking tape and lay some glass tape, preferably UD tape, over the full width of the oarlock, extending down over the gunnel and filler piece onto the topsides as well as down inside the boat. If you want even better rigidity, add a 4mm or even 1/4" piece of plywood to the inside before adding the glass. Let the plywood extend all the way down from the top of the oar-lock down to the seat. Let the glass tape on the outside also extend down at least to the level of the seat. You will be creating a vertical beam to act as a load-path for the forces on the oarlock. Drill through the glass to open the hole again after curing. Fill any remaining cracks in the gunnel with epoxy as best you can. Adding an inverted-U cap of 45 deg bias glass over the gunnel that extends perhaps 6" - 8" on either side of the oarlock should allow any remaining torsional loads to get distributed into the gunnel without causing any stress concentrations.
-
I have a couple of questions relating to the interior layout (non-nesting version) - How does the boat trim while rowing two-up? With the passenger (120lbs) sitting on the lazarette it looks like the transom might be dragging too low unless I move the thwart a bit further forward. What do you typically store in the lazarette while sailing? I am a big guy so for the sake of not overloading the stern, would it be more useful to have the storage space under the thwart? Any thoughts on rather using the Spindrift 12's deck design up front, i.e. level with the gunnels?
-
An extra 1.5mm would have been perfect as it would have given me exactly the same panel stiffness as 6mm ply with only one layer of 6oz carbon outside and 6oz Vectran inside. Unfortunately the next Nidacore size up is 10mm which is overkill, unnecessary weight and cost. Larger boats (e.g. Mirror) have been built with 4mm ply although I am not prepared to go that flimsy.
-
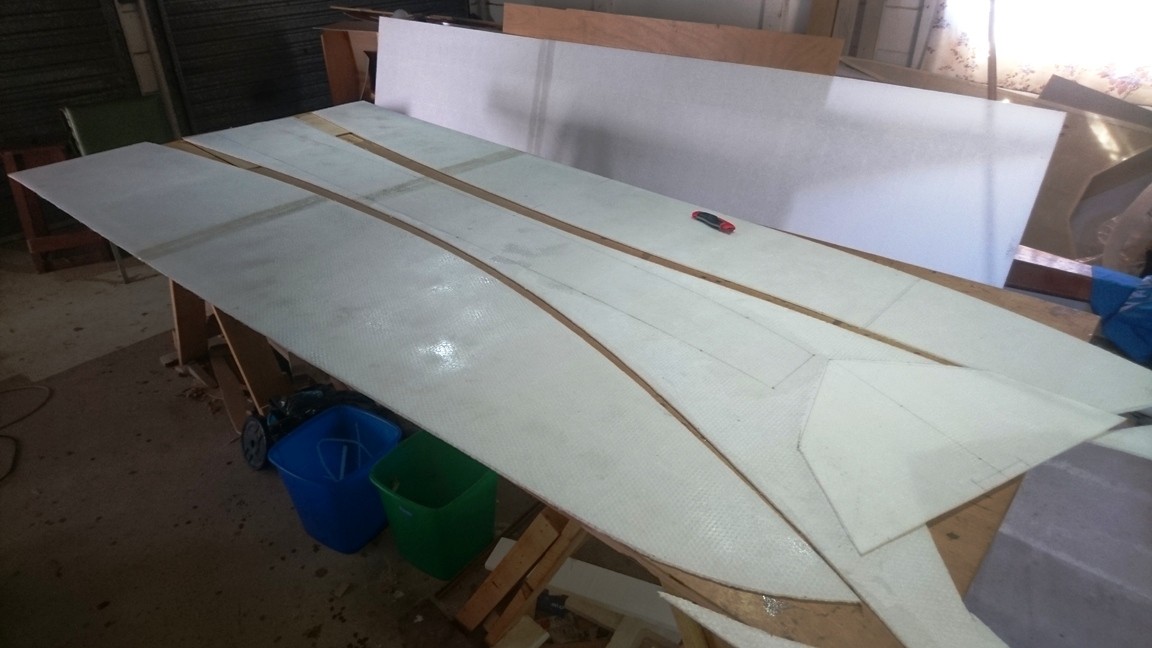
For want of a decent local plywood supplier I will be building in 5mm nidacore honeycomb sandwich, carbon outside, vectran and glass inside. If I can get my hands on some affordable basalt fabric I am sure I will find a few panels for it to feature. It is certainly not going to be as enjoyable as building in wood but at least I will get to learn a few new skills along the way. A lighter boat is almost a guarantee, but that all depends on how many laminates will give me the impact toughness I require. I do have a partial sheet of nice 6mm ply and will cut the transom, mast partners and a few other small parts from that. The nidacore sheets are 7ft x 4ft, which, as fortune would have it, is just long enough to cut the main hull panels from 3 sheets, one being halved and butt-joined to the full sheets just like the plans for plywood.
-
Nice to see another S10 taking shape, I will be following your progress with interest. What type of wood did you use for the stringers and other framing? I have just started easing into building mine after years of sitting on the plans. Better late than never!
-
Thank you Graham, I first have to build and sail my Spindrift 10 before I will know what all my needs need to be! But to get the concept ball rolling, some desirable features would include: - quick to rig - easy to get under bridges (perhaps tabernacles for the masts, which might also assist in quick rigging). - shallow water sailing - move well under oars, scull or electric trolling motor - reasonably dry in rough conditions - easy to anchor for fishing - able to punch through small surf - self draining cockpit I have been doodling away on CAD for a while, starting with a model of the Spindrift 10. It is primarily just to get an idea of proportions, and to see if if the design strikes a chord anywhere deep down. You can see some SCAMP DNA creep through in the small cuddy and extra panel on the topsides with a bit of tumblehome. I increased the flare on the original topside panel before trimming down the sheer line and then adding the top panel. The final sheer line is a good deal higher than the original and it sweeps up proportionally more towards the stem and stern. The length was scaled up to just over 13ft and the beam adjusted to give the same length/beam ratio as the CS15. It is only marginally beamier than the Spindrift 12 and a fair bit narrower than the Miracle, although the difference in waterline beam will be less noticeable. Draft was scaled in proportion to beam to leave deadrise unchanged. Total displacement, based on original waterline, scaled to 450lb. As drawn the main sail has about 65sqft and the mizzen 22. With a traveller on the cuddy roof for the mainsheet, the cockpit can be left almost completely clutter-free. A traveller on the transom should allow the mizzen to be placed well aft without the need for a boomkin. Sail sizes and placement have not been subjected to any performance, stability or balance evaluation.

-
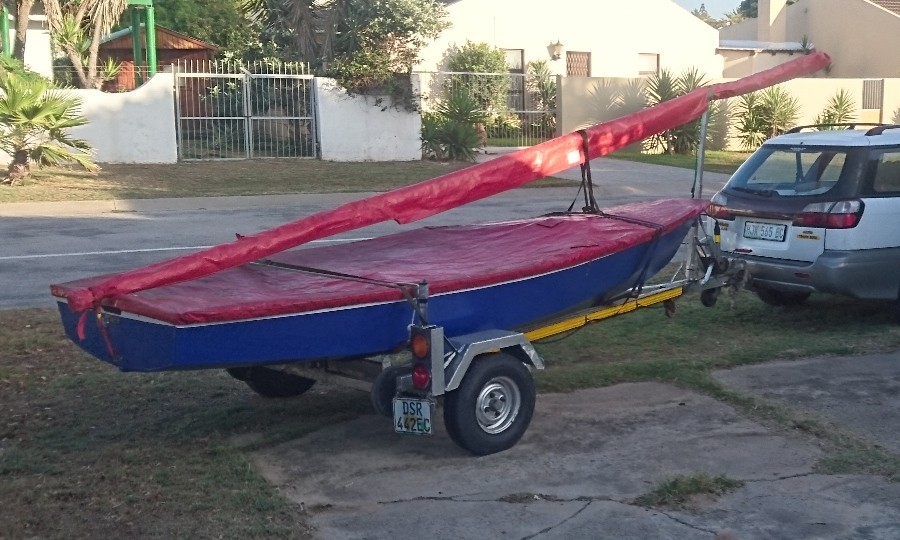
A dolly is simply an A-frame with small wheels used to move boats around on the hard or launch by hand. Many of the available launching spots around here are not suitable for launching straight off a trailer. What I should have said, and was trying to imply, was a weight limit of about 170lbs. It is precisely for convenience's sake that I have not already built a CS15 - it is simply too heavy. I currently sail a Miracle, the 13ft bigger sister of the Mirror. It is about as heavy a boat as I would consider for a quick sail and it has taken my brother and I, both big lads, on an epic weekend adventure. It was indeed a bit cramped, but that was purely because the boat was not designed with storage space in mind. Had there been hatches in the fore-deck and side tanks we would have had no problem with space. We obviously did not try to sleep aboard. We also had the "opportunity" to practice righting the boat after a capsize and turning turtle a mile from shore in very choppy conditions. I am in complete agreement on the trailer. The Miracle lives on a trailer with an integral dolly which is very convenient. You can just make out the dolly wheel behind the trailer registration plate in the pic attached. I have since built another dolly for my 13ft Gypsy to fit the same trailer. Swapping boats is a matter of wheeling one off and rolling the other one on. There is a winch to assist but I would only need it if loading on a steep ramp. Being a light boat, the trailer itself need not be all that bulky. Keeping the combined weight low is another important thing for me due to my yard layout - I need to maneuver the whole lot down an alley by hand before I can hitch it to the car.


-
Thanks for the replies. My interest is in a boat that is still light enough to launch singlehandedly with just a dolly, easy solo capsize recovery but long enough to allow for the use of a mizzen. An off-centre board to make space for solo camp-cruising. Please, Santa, I've been a good boy!
-
Any particular reason why there is no design to bridge the gap between the 12ft Spindrift and the CS 15?
-
Fresh from the loft: Now I just need to put together the woody bits that go between the sail and the water...