


Dave R1
-
Posts
1,132 -
Joined
-
Last visited
Content Type
Profiles
Forums
Events
Everything posted by Dave R1
-
Thanks Ken. Instead of removing the vertical stabs, why not wrap them in clear packing tape? The glue (plastic resin or epoxy) won't stick to the tape so you won't have to sail the boat with the trolley attached. Of course if you did, it would be amphibious. You could sail across the parking lot, down the ramp and into the water. You wouldn't need a trailer or even a tow vehicle.
-
Here's a very quick sketch to illustrate what I have in mind for the alignment jig. There is a notch on the bottom so it doesn't contact the bottom of the boat except forward of where the mastbox will be. I added a couple of "ears" to allow you to clamp the jig to the bulkhead.
-
Ken, I suspect the reason that the angle was measured at the front of the mast box has more to do with when, during the construction of the original boat, it got measured. My suggestion is to make a block that can stand in for the mast box and clamp it to the bulkhead when you are installing it. That will give you the ability to measure the angle at the proper point along the bottom panel. You might find it worthwhile to cut a scrap of plywood to act as an alignment jig. It would help orient the bulkhead while it is being installed.
-
I've talked about my steering modification and posted a drawing of it. I thought I'd post a photo of it in case there's any interest. I took this for Ken today. Sorry it doesn't show more. It's a difficult spot to photograph. The bungee cords are used to hold the hatch cover in place. I just hook them on the t-buckles when I remove the hatch so I don't have to reach way down inside to retrieve them. Here's the drawing again. It shows a modification to the stub tiller that I haven't implemented yet.
-
Good job, Ken. Keep in mind the boat won't be that heavy so you don't need to over build the dolly. You'll want to move it onto a trailer shortly after you get it upright again. Still, it sounds like you'll be in good shape.
-
Sweeeet! Looking good. I think you can do it.
-
Just a stab in the dark but I thought you might find this interesting. http://www.pbase.com/dr_dichro/electric_boat Take special note of this image: http://mishuna.image.pbase.com/u18/dr_dichro/upload/8391440.peelfilm.JPG Also look at this article. http://www.duckworksmagazine.com/03/r/articles/glass/bottom.htm
-
Glad to help. Tractor supply will probably have everything you need. If you want I'll try to take some photos in the next few days looking down into the hole.
-
Ken, the pillow blocks, and shaft came as a unit with a pulley and a left-hand threaded nut as a buffing mandrel. The sprockets and roller chain as well as the buffing mandrel all came from the local Fleet Farm, a sort of farm supply store that also sells clothes and car batteries and fishing stuff. The sprockets come as two pieces. You get the hub for the desired shaft size and the cog part. They get welded together to make a unit. I think all those parts were less than $30. I used 2" aluminum angle to support the idler sprockets. They ride on 1/2" bolts. The shaft passes through oversized holes in the aluminum. I also put a couple of collars on the steering shaft to keep it from sliding in and out. The steering wheel I used was a purchased one. It has a 3/4" bore with a keyway. I cut a keyway in the shaft with a dremel tool and a cutoff wheel. That works great. I also calculated the length of roller chain needed to turn get stop to stop on the rudder with a total of about 320
-
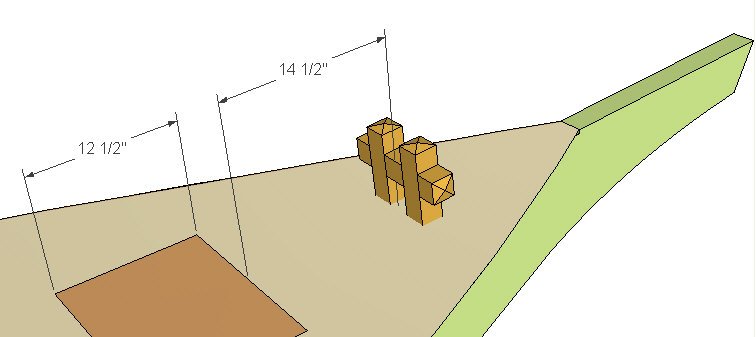
Here. This is a screenshot of the dimensions from the Weekender model I drew up from the plans.
-
Dennis, I calculated the distance from other dimensions in the plans and got about 14.25" assuming you go by the dimensions given. That seems like more space than I've got so I'll measure it. I need to wait until it quits raining though to get the cover back. I'm guessing though that I made my hatch larger than the plans say.
-
Oh boy! She looks great! Good work, DocA. 8)
-
I made a dolly for my Weekender with casters at the corners. It made life a lot easier during the build. My dolly started with 4- 8 foot 2x6s. I cut two in half and screwed the halves together. These formed the ends. Doubling the ends up gave me a large enough surface area to attach casters. Between the end pieces I put in the other 8 footers using joist hangers and a couple of long lag screws through the end pieces and into the long rails. After squaring up the frame, I screwed some scraps of plywood on at the corners as gussets to keep it from racking. Initially I had just some supports screwed in place to keep the keel vertical. To put the boat in an attitude more like it would be in sailing, I blocked the keel up at the aft end with a scrap of 2x6 on edge. After the bottom was attached, I added some supports on the sides to keep it from tipping to the side. When it got time to flip the boat for the first time to glass the hull I got the boat off the dolly and modified the dolly to fit on the top of the boat. I set it up so there was a crossbar right in front of the cabin and another at the aft end that extended to the bottom of the cockpit. I placed the dolly, inverted, on top of the boat and held it in place with a couple of ratchet straps. We rolled the boat on a blanket and over on to its wheels.
-
DocA, sounds pretty good with only a few minor njiggles to worry about. Here are a couple of ideas for you to consider. First, regarding the mainsheet. It really is distracting when the mainsheet gets wrapped around your neck. I found the mainsheet droops between the blocks on the mast in light air so I added a fairlead about midway between. I made mine out of a piece of stainless welding rod but it could be done from a piece of wood or a short length of small diameter PVC pipe (or a coupler). There's no real load on it but the line needs to slide through it without any trouble. See this photo Second, regarding the wheel, I used to do the same thing but I set one spoke of the wheel as the king spoke--it points straight up when the rudder is centered--and tied a piece of sail twine around it. You can see and feel when you have the king spoke in your hand. Traditionally there's supposed to be a turk's head knot tied around there and someday I might do that but my little piece of twine tied with a double constrictor knot has worked for a couple of years. Looking forward to those pictures. I hope you have a great sail today.
-
Congratulations! Party tonight!
-
Who knows. I tried a couple of times on Monday to get in with no luck. Now it works fine.
-
Very nice, John. Looking forward to more pictures of your new canoe.
-
I tried to get to it the other day, too. Had the same problem. Missed you last weekend John.
-
Well I got Julie K of her trailer this evening so I can work on the bottom of the keel. There's only about a 3" long portion of the keel I can't get at and it's covered with aluminum so I don't have to. This will give me an opportunity to make a modification to the trailer. I hate those rollers on there.
-
Looks good Adla. Now with your sailmaking experience, are you going to make a new suit for Morgaine?
-
Well, ok. Before launching Julie K, when people asked when she'd get wet, I told them I was going to wait until 2:00 on a night with no moon in the middle of the week. I'd quietly slip her off the trailer, let her slide into the water and I'd listen. If I heard gurgling, I'd slip the bowline off her, push her out as far as she'd go and let her settle to the bottom. The next day there'd be a boat trailer for sale in my yard. As it was, my entire family was there along with a gazillion other folks. It must have been blowing 30 kts straight in toward the ramp. Two guys held the dock lines like they were both pulling on mules while I put up the sails. I said, "let's go." They tossed the lines on deck and we shot out between the boats straining at their moorings. :shock: :shock: Everything was fine until the steering broke but we won't go there.
-
I hope you've lined up a photographer for both days. Best wishes and fair winds. Dave
-
Bill, thank you, thank you. :oops: I do agree that tanbark is the right color for a gaff rigged boat though. The lack of glare was a welcome side effect of the color, too.
-
Thank you all. Adla, the new gaff is working out fine. The span with the single block on it works out nicely because there are now the same number of blocks in the peak halard as in the throat halyard. This means if I pull them together the gaff remains at the same angle. And I don't find it to be difficult to harden the peak even with one less block. Jib is standard size but I had a luff wire sewn into it so I could put it on the roller furler. It's sure nice to tug a line at the cockpit and have the sail disappear. The foot of the main is attached with robands and I plan to try it loose footed one of these days. I ended up with some keel damage that needs to be repaired before heading back to the water, though.
-
Doc, it looks great. 8) I'll bet you're getting excited for launch day. You should be very proud of Charlie Girl II. I'm glad those sails worked out for you.
