Aphers
-
Posts
203 -
Joined
-
Last visited
-
Days Won
14
Content Type
Profiles
Forums
Events
Gallery
Everything posted by Aphers
-
Outboard motor for a Spindrift 11' non nesting
Aphers replied to Captain Tim's topic in B & B Yachts Forum
Ours lives in davits most of the time, but it's good to be able to put it on deck as well. We just crossed the Atlantic with it on deck. From memory the oars are about 7ft. A little on the line side but the boat absolutely flies if you put in a bit of effort! Just one rowing station. We've tried sitting side by side with an oar each but it tends to lead to arguments -
Outboard motor for a Spindrift 11' non nesting
Aphers replied to Captain Tim's topic in B & B Yachts Forum
Yes it's my daily driver- we live on our yacht at anchor. It's a great load carrier, much more internal space than an equivalent sized RIB, and an absolute joy to row. We used just 10l of petrol in our first year as liveaboards! For sailing, we strip everything out of the dinghy: anchor, fuel can, outboard, fenders, etc. The oars stay, obviously. We haven't really found sailing the dinghy to be a very practical way of getting about, but it's a lot of fun. I'm hoping to upgrade the mast to a lighter one, which might let me keep it rigged whilst afloat. That would make trips to the beach etc much less stressful. -
Outboard motor for a Spindrift 11' non nesting
Aphers replied to Captain Tim's topic in B & B Yachts Forum
We use a short shaft (Mercury 3.5hp 2 stroke). No real problems with the prop coming out of the water or cavitating. Surely you wouldn't be worried about the prop coming out of the water when you go forward to set sail, because you'd have already removed the motor in order to fit the rudder? Just to slightly hijack the thread, I'm tempted to try a 5hp on my S11N. 19kg, so it's a bit more weight, but I reckon when we're carrying a decent load the extra power might be useful. Or it might just make the bow point at the sky... -
When I was building my 11N, I was worried that the aft seats would stop the bow from nesting correctly. So I decided to install them after sawing the boat in half. Sure enough they needed trimming down. I don't know if that means my hull shape is slightly off, or is it quite a common occurrence?
-
I've got a small (7lb, I think) Manson Supreme as my dinghy anchor. It's a brilliant little thing. Use it all the time as a stern anchor at dinghy docks. It's broadly similar to the Mantus and Rocna, i.e. concave fluke with a roll bar. Fun story: a few years ago I was anchoring my 33ft yacht and she started dragging her 16kg anchor. With not much room left, I threw down the little Manson and it bit and held instantly. A 7lb anchor holding a 6t 33ft yacht! The reason it worked was because it bites so quickly. The bigger anchor (which was a very badly made copy of a delta) had just dragged along the bottom picking up weed until it had no chance of ever setting properly. I've also tried using a folding grapnel anchor on the dinghy, but with very poor results, even when it was plenty heavy enough. Design matters!
-
If it's good holding and a decent anchor it should reset without any drama. I've heard that Danforth or Fortress types are less good for this, as the chain can foul the anchor when it is resetting. However a Bahamian moor is the way to go if you're in any doubt.
-
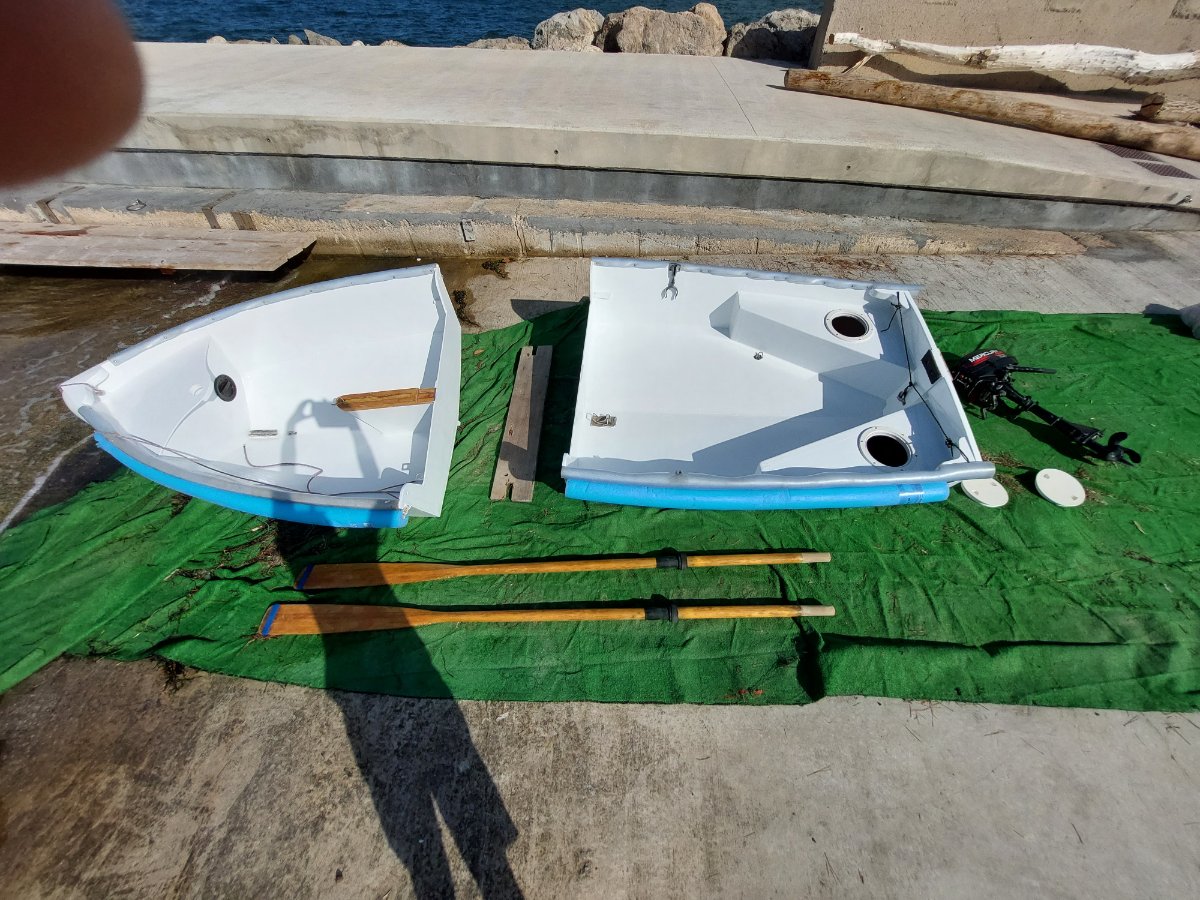
Whilst I was repairing my Spindrift, I had the loan of a little grp tender. It was terrible! Cramped, slow, wet, exceptionally heavy. My wife and I could only just drag it up a slipway, even though it was less than 9ft long. It was also impossible to row, because the flimsy rowlocks would just bend and allow the oars to pop out. We've used as much petrol in the last two weeks as we have in the preceding twelve months, simply because the outboard was the only option, even on flat calm days. But the loaned dinghy had one redeeming feature: under motor it was lovely and quiet. In contrast, the Spindrift reverberates like the soundbox of a guitar. Not really surprising given the construction. My motor is a little single cylinder 2 stroke, not known for smooth or quiet running. Has anybody used a different type of motor and found the noise to be reduced? I'm wondering if a twin cylinder or a 4 stroke would be an improvement?
-
Worse things happen at sea :( Repair advice needed.
Aphers replied to Aphers's topic in B & B Yachts Forum
Obviously we had to go for a quick sail at the first opportunity. 6yr old on the tiller. Start them young! And sorry for topless look but it's 32C/90F and pretty humid here
-
Worse things happen at sea :( Repair advice needed.
Aphers replied to Aphers's topic in B & B Yachts Forum
There's around 40 litres of buoyancy in the noodles (they're extra wide ones, 4"), so about enough to float the dinghy even with the three buoyancy chambers flooded. Which is very comforting! I haven't actually capsized the boat yet, but I can stand on the gunwale with my full weight and the noodle starts to dip in to the water. I'm sure it's adding a useful amount of extra stability. The other benefit is as a spray deflector, and if course it has saved the paintwork countless times. If only it was a bit less cheap looking! -
Worse things happen at sea :( Repair advice needed.
Aphers replied to Aphers's topic in B & B Yachts Forum
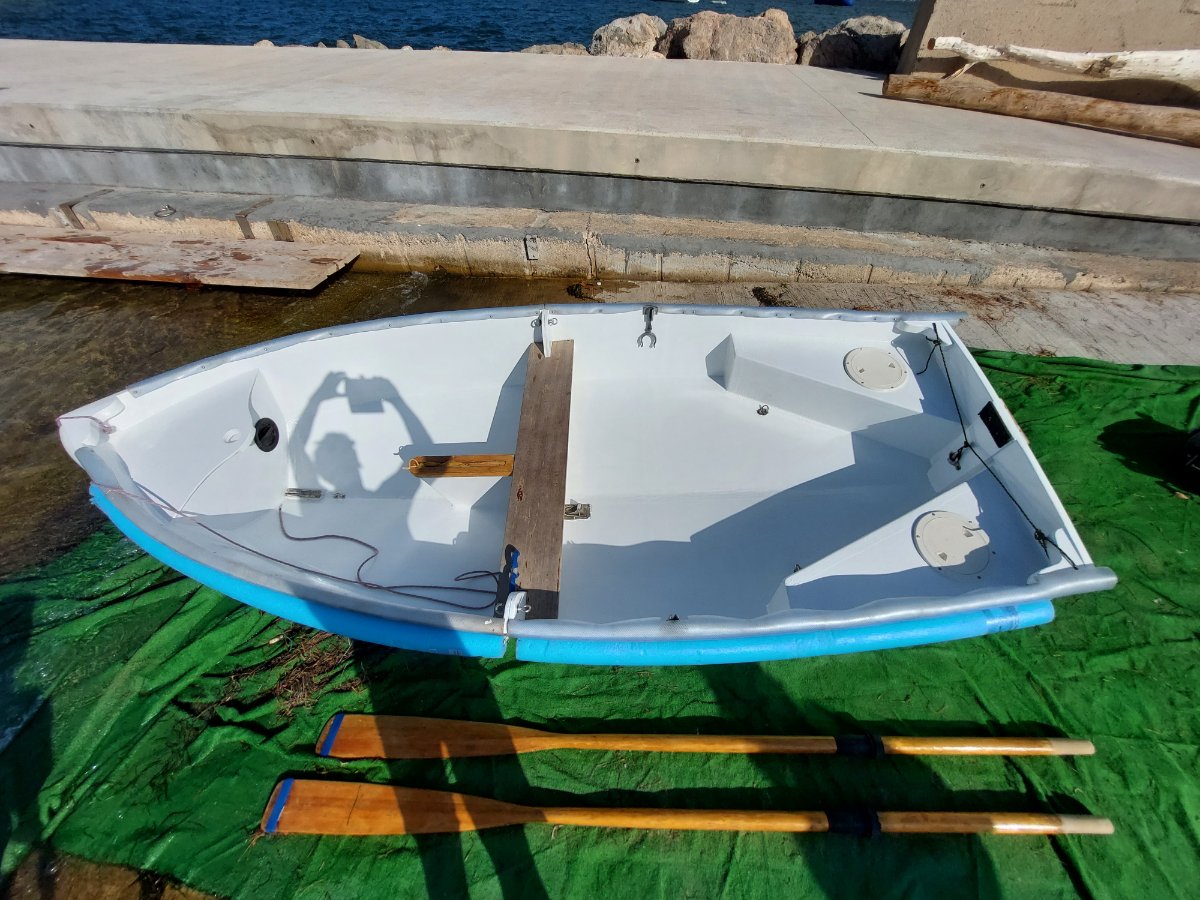
Launch day! The boat is looking better than she did before the accident. I gave her an all over re-paint and came up with a better way of attaching the pool noodle fendering, so that they no longer sag. One of the rowlocks had a lot of play so that got a few blows from a hammer whilst it was off, much better now. Thanks to everybody for the encouragement and advice- especially Alan and Graham. You really cannot see the repair unless you know exactly where to look, and it pretty much blends in with the general level of finish that I aimed for originally. Great to have the boat back. I was loaned another dinghy for the duration of the repair, and it really made me appreciate how good the Spindrift is!

-
Happy anniversary @PadrePoint
-
I used plastic for my keel strip. Cheap, light, doesn't do any damage to anything. I don't expect it to last forever but then again I don't drag the boat around on its keel. I just fixed it with sealant so it'll be easy enough to replace when the time comes. We're one year in, full time use as a tender to a liveaboard yacht, and only showing light wear.
-
Worse things happen at sea :( Repair advice needed.
Aphers replied to Aphers's topic in B & B Yachts Forum
First full coat of paint on today. It's not perfect but you'd be hard pressed to spot the repair, I think.

-
Worse things happen at sea :( Repair advice needed.
Aphers replied to Aphers's topic in B & B Yachts Forum
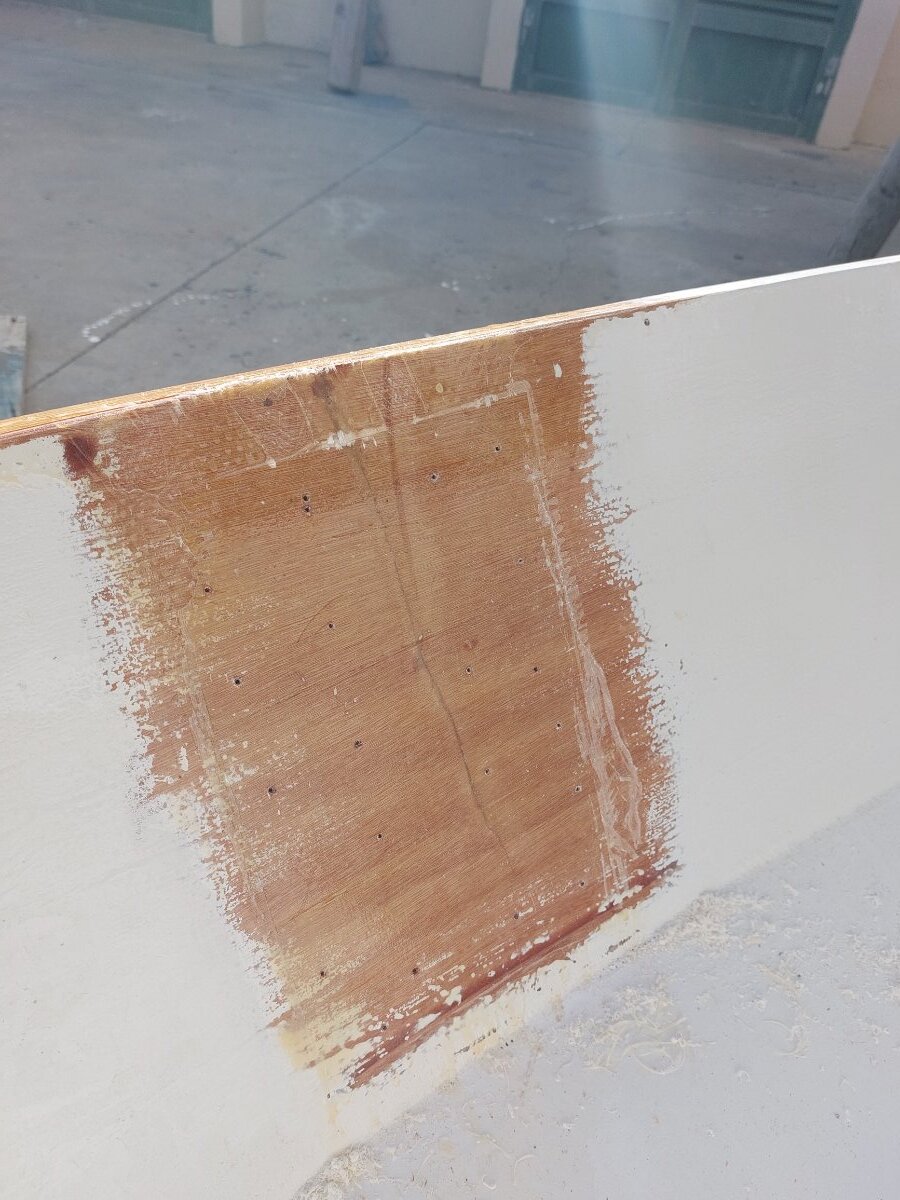
I was using an old tub of West 407 for fairing, and found it very lumpy and gritty. Ok to just build up a big volume and sand back, but very frustrating if you tried to smooth down taped edges etc. Anyway the guy who is paying for the repair got me a new tub, because he couldn't get the microballoons I wanted, and wow what a difference. Clearly my old tub has got damp, or contaminated with dirt, or something. So I think the lesson is to keep your powder dry! Anyway, today I made the decision that fairing and sanding had to stop, and I moved on to the painting. There are still some low spots and slightly rough patches here and there but I can't keep throwing ever more time at this. The standard I had originally aimed for wasn't exactly perfection. Got the bare areas painted today, tomorrow I'll aim for a full coat, and probably do a second one, then it's just a case of re-fitting the fendering, rowlocks, etc, and we go back in to the water -
Worse things happen at sea :( Repair advice needed.
Aphers replied to Aphers's topic in B & B Yachts Forum
Got a couple of days of unsettled weather coming up, which will delay things. But I got the gunwale reattached today, which is the last structural repair. Next up I need to tidy up around some of the glass work- probably shave down any rough edges and runs with a sharp chisel, before fairing. Wish I could get proper microballoons! I've been touching up minor scrapes pretty much since launching the boat, and have had to use a standard shade of International Perfection, which doesn't exactly match the boat's original colour. So I'm going to take this opportunity to do an all over coat and she should look brand new again. -
Worse things happen at sea :( Repair advice needed.
Aphers replied to Aphers's topic in B & B Yachts Forum
Removed the temporary ply shutter from the outside today, and filled the gaps that were left. Let it harden up a bit and then glassed over it. Just the gunwale to do now.

-
Worse things happen at sea :( Repair advice needed.
Aphers replied to Aphers's topic in B & B Yachts Forum
Oh yes I know all about 'boat time'! It's been a week since I put the boat in the yard. Total number of hours work so far is not actually that much- but there's always a lot of thinking time involved. I'm really pleased that I've been able to get everything back in line, and won't have any ugly steps to try to hide. Hardest thing from here with be down to my working conditions and materials. I wasn't able to source microballoons, which I find the best for fairing the edges of the glass, so I'm using West 407 low density filler which has silica mixed in. It will do but I seem to spend ages getting it to a smooth enough consistency. Also, working outside in a windy and dusty boatyard will certainly make painting interesting... -
Worse things happen at sea :( Repair advice needed.
Aphers replied to Aphers's topic in B & B Yachts Forum
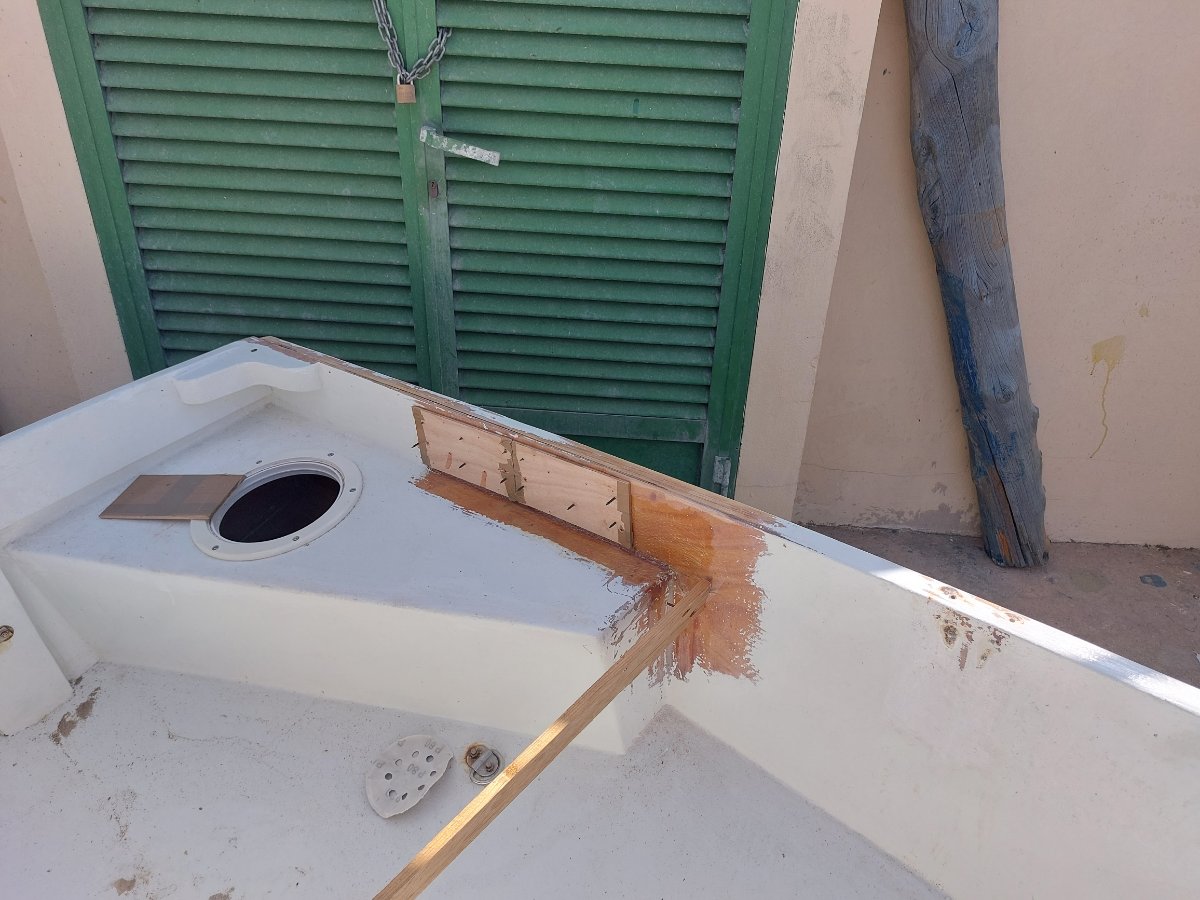
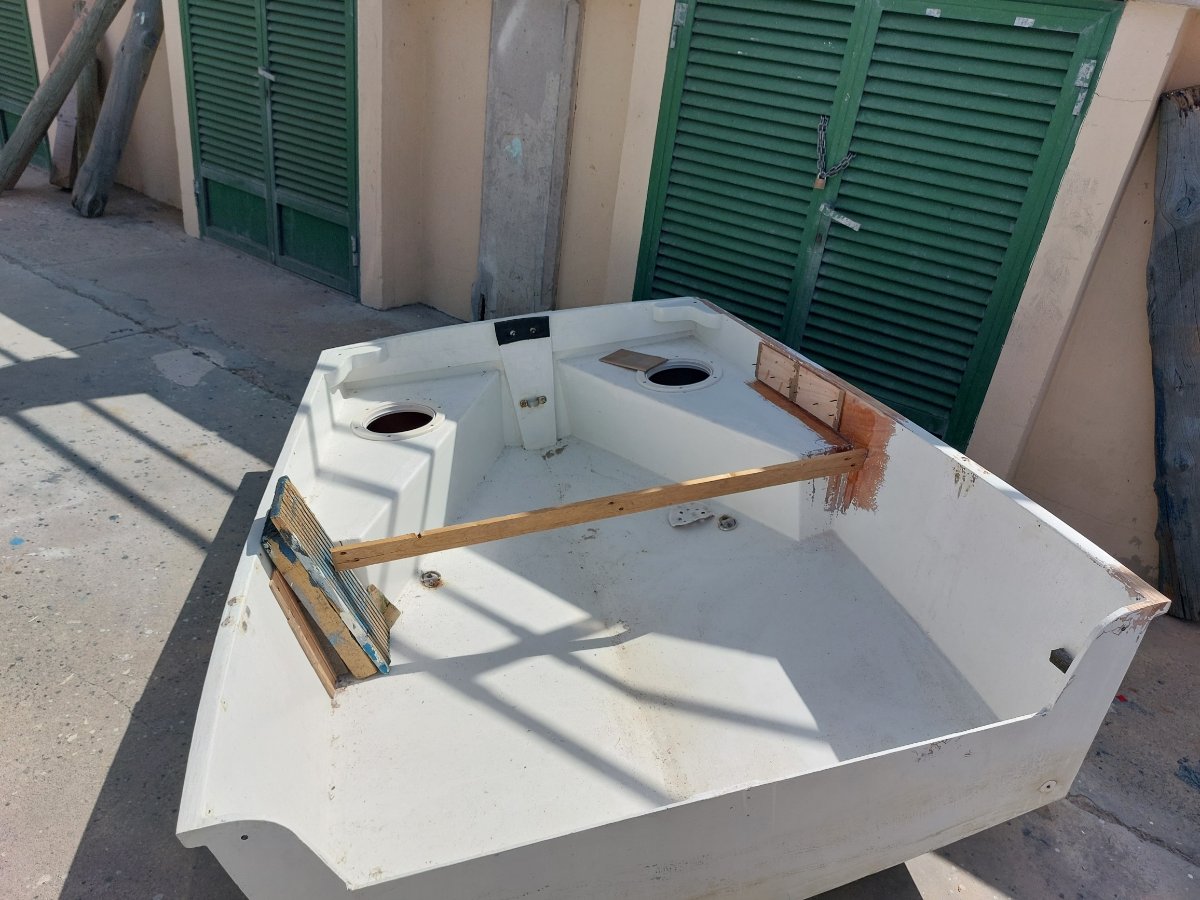
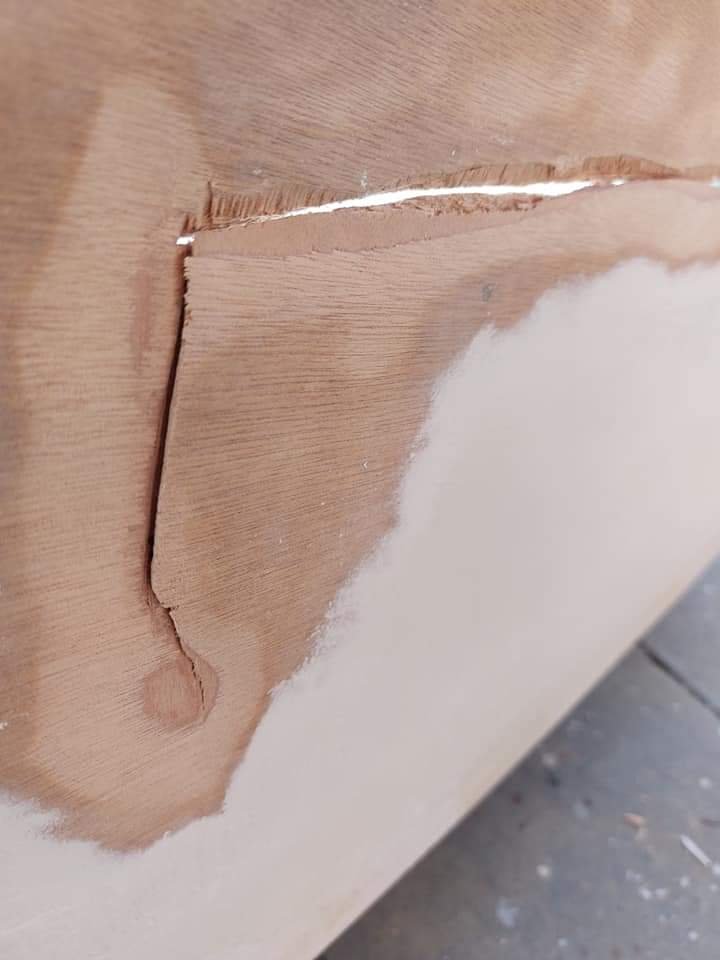
Started on the stern repair. There was quite a big gap here, where I'd had to remove loose and damaged splinters of ply. Because of the amount of filling required I didn't want to attempt doing both sides at the same time and risk leaving voids. I wedged a stick in place to do the bulk of the work, getting the panel to push out to where it needs to go. Then on the outside I screwed on a temporary ply shutter, covering the crack and pulling both sides in to line. I've now glassed up the inside, with another piece of ply to help get the shape right. Tomorrow I'll remove the ply and glass the outside. And after that it's just reattaching the gunwale and the structural repairs will be finished!


-
Worse things happen at sea :( Repair advice needed.
Aphers replied to Aphers's topic in B & B Yachts Forum
Moment of truth today, peeled back the plywood. Looking pretty good I would say. A little messy around the edges in places but that will tidy up ok. There was one slight void left- that's the problem working blind- but I've filled that now. Very happy that the hull is level on either side of where it cracked. The crack at the foredeck was just a hairline on the outside, so I glassed that, and then decided to throw a bit of glass on the inside too. Not very proud of that particular bit, I should have sanded back a bigger area, but it hadn't actually cracked on the inside so in not too bothered. Next job is the stern, but it's blowing half a gale here and the boatyard is very dusty, so I'm going to take the test of today off...


-
Worse things happen at sea :( Repair advice needed.
Aphers replied to Aphers's topic in B & B Yachts Forum
Today's progress: I've glassed both sides of the bow crack and screwed it all together with pieces of ply either side. It does mean working blind to some extent but I think it'll be ok. At the same time I injected the gunwale with firstly neat, then thickened, epoxy, and clamped it all together. There was another damaged area up by the foredeck, where a crack had appeared. Nothing had gone out of line so here I just glassed over the area inside and out.

-
On the dipping lugs that I learnt to sail on, we had an iron strap forming an eye on either side of the mast, with a big wooden pin that you hammered in to place. One side would be a smaller eye than the other, so once the pin was carved to a slight taper you could get a really snug fit. But a wee bit chunky for a boat like the spindrift, I think.
-
That looks very smart. And not too tricky to fabricate. Thanks
-
Just returning to this topic. The boat is in a yard for repairs (see other thread) and it will be the ideal opportunity to modify the mast partners. I'm considering cutting a slot leading aft from the existing hole in the foredeck, to allow the mast to be pivoted in to place. I would then install a cleat on the foredeck, and use a webbing strap to lash the mast in place. Not quite as neat as a proper mast gate but much easier to make with limited resources. Assuming this would not compromise the strength of the foredeck and partners, the only real downside I can see is that the foredeck would be left with sharp edges which could snag on ropes etc. I'm really reluctant to get the saw out... the poor boat has suffered enough... but I will regret missing this opportunity to make the modification and not being able to safely rig/derig on choppy days is preventing me from actually going sailing...
-
Worse things happen at sea :( Repair advice needed.
Aphers replied to Aphers's topic in B & B Yachts Forum
Thanks once again. All looking quite promising from here. I can't get good enough quality ply for the butt blocks so I'm going to use glass cloth instead. I be won't shy about wrapping glass cloth around the gunwales which should help too. I've been provided with 300gsm cloth and it looks very heavy... I think I'll see if I can get something lighter for the outside. -
Worse things happen at sea :( Repair advice needed.
Aphers replied to Aphers's topic in B & B Yachts Forum
I've started off by parting the gunwale from the ply at the stern section. For a good long length here I was able to split this really cleanly through the glue line, so that was just a case of working along carefully with chisels. It gets a bit uglier where it meets the crack that had already opened up, as that had veered in to the ply. At the forward end, I've used a handsaw and there is no further propagation of the split. On the hull side, I ended up using a combination of craft knife and chisel to clean up the break. This has left something of a gap but should be fixable with thickened epoxy (microfibres a good choice?). My only concern at this stage is the lower end of the side crack, which ends about half way down the front of the seat box. Here, I cannot easily get the ply to go back in line and it may leave me with a small lump in the side. There is very little flex here, probably due to the build up of epoxy and tape joining the box to the hull side. Should I try extending the gunwale separation further forward? Or maybe grind back the epoxy/tape on the inside? Just looking for the option that leaves me with the least work, as this is all cutting away sound material. Maybe I should just get it strong and fair it with microballoons?