


Ken_StJohn
-
Posts
96 -
Joined
-
Last visited
Never
Content Type
Profiles
Forums
Events
Everything posted by Ken_StJohn
-
I have to get rid of my started Weekender and its trolly. Bottom, deck, and bulkheads are in. It's in Denver. Send me an email and it's yours! Gotta hurry though I need the space before Christmas!
-
Adla - Hmmm - remember our conversation regarding my deadwood separation from the keel and how to fix it? Looks like this is a trend. My original glue up was tight to the keel and screwed with 1-1/2 to 3 inch screws. The assembly sat dormant for nearly a year and the huge gap which opened over that time was greater than 3/32 all the way along the keel between it and the deadwood. I caught it just before attaching the bottom panels so I was able to tape off one side, lay the keel over and fill the gap with epoxy. Obviously yours was a lot tougher to fix. Maybe we should all check this joint periodically for "issues".
-
All: At Adla's suggestion I went to Chuck at Duckworks to see if we could come up with some rudder attachment options. Here's what seems like a great opportunity to get some parts that might work better for us.... Chuck is going to order pinless pintles in all of the sizes he now carries along with a clevis pin that will fit between the two. We can then use them together as a kind of gudgeon and pintle substitute. In sizing the pin, I've suggested a length suitable to accept a flat washer on either end of the pin plus one between the two pintles. We can then use either a cotter pin or clevis ring to secure the pin. I've already ordered a 1-7/8" and a 2-1/4" pair for each of the two rudder attach points. I suggested Chuck put together a kit with four pintles, flat washers, clevis pins, etc. to make it easy for us to get what we need and be assured the pin length will always be correct. Chuck has asked how many of us would want to purchase the pintles so he can lay in some inventory for us. If you're interested, please respond with pintle sizes and I'll keep a tally for him.
-
Seems as though any 1x12 poplar board from the big box that is under 6-feet has been assembled using 1x6's and glue. I found the 6-foot and longer boards to be solid pieces. I bought a 6-footer and, following Ray's advice, cut out one rudder blank and used it as a template for a second spare rudder with the other half of the board.
-
Our news channels said the problem began when it started taking on water and began to list.
-
Isn't so much trying to use cheap materials as it is finding all the woods mentioned continuously. For a first time boat builder it's a maze of suggestions and opinions coming down on either side of center - all of which are extremely useful and appreciated. Trips to the local lumber yards (not the big boxes) are fruitless when trying to find fir or yellow pine or marine plywood or , or, or. Colorado is a no-man's land being between the great supplies of the Northwest and North Central U.S. Ordering everything we need and having it shipped into the state is akin to life in Hawaii. Taking responsibility for the materials is the builder's ultimate challenge but, a good compromise between availability, high shipping costs, and performance makes Colorado projects a constant trade off. We do the best we can with materials we can get and hope for the best.
-
Thanks, Dave, I'll have a look at them... BTW-take a look at the bad vs good Resin Glue pix I just put up under the *ALERT* Watch for glue post.... k
-
Sorry, Dave, we were out to dinner late and I didn't check the Forum until this morning. BTW send me a couple snaps of the rubrail samples....
-
*ALERT* Watch For Really Old Resin Glue Date Codes!
Ken_StJohn replied to Ken_StJohn's topic in Main Forum
The new batch is May 2006 and what a difference! Here's a couple of shots to illustrate what I'm talking about. I always leave the mixing stick in the leftovers which helps clean out the tub for re-use after is goes off. This also allows me to see what happened to the batch on the boat. One thing though, a thin coating almost always goes to a dark brown when cured. However, with a thick plug you can really see the difference between a fresh batch and an old one. The one on the left is the fresh batch and the one on the right is an old expired one - pretty dramatic!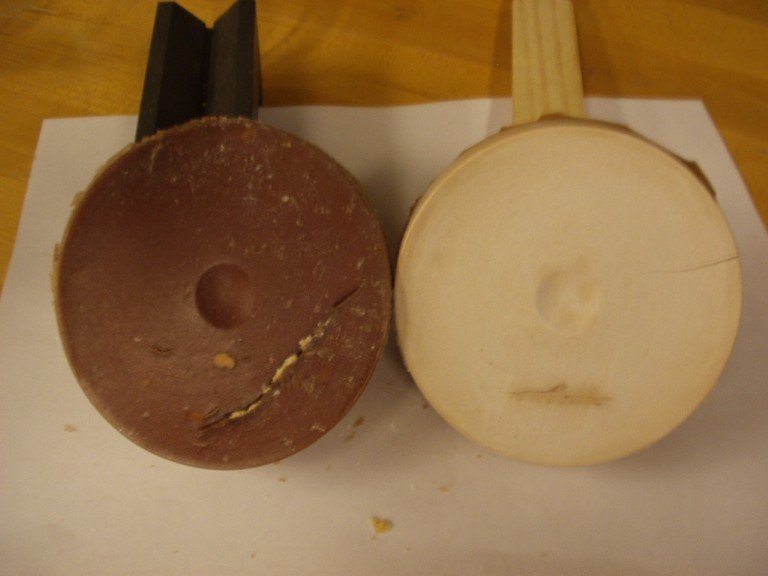
-
*ALERT* Watch For Really Old Resin Glue Date Codes!
Ken_StJohn replied to Ken_StJohn's topic in Main Forum
Just an Update! With regard to the Resin Glue, I have followed through with DAP engineering and complained to corporate folks at A-- hardware stores who were unaware of the local issues. Within a week and a half they were nice enough to correct the situation at the warehouse and had fresh stock put into my local store. I mentioned how a lot of folks were using this stuff to build boats and the obvious connection to human safety. They were also nice enough to ship me two cases of 1-lb tubs free. Can't beat that customer service! -
I second that, Ray. There's a few of us who have learned the hard way about the heat of the catalytic reaction too! With regard to the Resin Glue, I have followed through with DAP engineering and complained to corporate folks at A-- hardware stores who were unaware of the local issues. Within a week and a half they were nice enough to correct the situation at the warehouse and had fresh stock put into my local store. I mentioned how a lot of folks were using this stuff to build boats and the obvious connection to human safety. They were also nice enough to ship me two cases of 1-lb tubs free. Can't beat that customer service!
-
Dave: Yes I have a router that I could use and I think somewhere a jiggy atachment thingy for the table saw that I used one time to true up warped lumber. Good idea on the straight edge - you're becoming Mr. Router!
-
I originally went to Home Depot but, as luck would have it, they had that gate thingy across the aisles so they weren't accessable. We ended up going to Lowes. The boards were so closely matched in grain and color that I didn't realize they were edge glued until it split. I will go up to HD tomorrow and see what their stock is. I have glued up butcher blocks before so I know that process. It just seemed like the straight, poplar board was a pretty easy way to go. Like Dave says, glad this happened in the shop at this early stage. However, I was surprised that without any stress at all it split. Never had that happen with shelves, bookcases, and other stuff. I'm claiming factory defect when I take it back. It cost me $5 per foot for a worthless piece of firewood. Oh well, this stuff happens. I get my enjoyment from the process anyway and you have to look at this as part of the education!
-
Hey Dave! Yeah, you're right but tough to find 12" boards here except pine. I thought about laminating them but I don't have a joiner planer. I do have a hardwood shop (closed weekends of course) but I doubt if I can get only three feet. Uggghh.
-
I just took a 1x12 poplar board, 4-feet long, and cut off 12" from the end. The board was laminated together at the factory using two 4-foot long pieces to make the 12" width. The board de-laminated along the seam without any stress other than sawing off the 12" end. I have never had this happen in my lifetime of using this type of board for general construction - have you? I'm kind of glad it happened now before I had a lot of sweat and tears in the shaping but, is this just a fluke or is using this type of stock for the rudder not a good thing???
-
Thanks, guys! I just got back from a shopping safari with some really good looking straight grained poplar. I will have to use ACX for the box but, I intend to treat it first with wetting/penetrating epoxy. Thanks for your suggestions and advice!
-
I'm about to start the rudder and rudder box and am looking for some recommends for its wood(s). I have a hardwood specialist supplier in town so I've got some pretty good access. Any thoughts??
-
Having just completed installation of all the bulkheads and the lazarette, I'm ready to move on to more fun stuff. Seems to me with the side panels not on yet it's a perfect access to a lot of the interior work. There's some obvious things you can't do like installing shelves or seats But, I'm tempted to take advantage of the open sides and do everything I can that doesn't involve side panels. Is there anything I'm missing here? Can anyone think of something I shouldn't do because it may be affected when the sides are added??
-
Andrew: You know, the more Dave and I discussed it, the more we thought it might make more sense to have the stringer on the other side anyway. I thought it felt right from a mechanical standpoint to have the inclining bulkhead resting against the stringer instead of hanging from it. Discussing finishing off the cockpit created a tricky business curving the stringer on the cockpit side so it doesn't extend past the deck edge. By the time you leave room for the deck to side panel stringer and curve enough of the stringer away so you don't see it, it becomes rather small. I understand it's purpose is only to anchor the deck and not necessarily support it so, it may make more sense to put it inside like yours. It'll be hidden anyway behind the cabin stringer and finish molding like you said. Anyway, that's the new plan. Now maybe I can get all the bulkheads and lazaret on tomorrow and start the fun stuff - like the steering!
-
I'm sure it's to keep the cabin bulkhead "clean" on the inside. Shouldn't affect anything mechanical. I still want to put mine on the cockpit side though so, I'm still open to input from other Weekenders.......
-
Not sure I follow that - the top stringers go on the cockpit side of the cabin bulkhead if I read the plans correctly..so I'm not sure I follow your description of being covered by the cabin trunk sides....(?)
-
Once again I thought I was ready to proceed only to find a less than adequate step explanation (at least to me!). Operations grind to a screeching halt and progress is halted! Ready to attach the cabin bulkhead to the underside of the deck with "...short stringers". As I test fitted the bulkhead and the stringers it was obvious that their length might make a difference to the interior edge of the cockpit. If I made them the same length as the bulkhead edge that supports the deck, they will stick out past the cockpit deck edge. I can trim them off but then I have an exposed end grain that looks, shall we say, yuckey. I also think it might interfere with the seat construction as well but, I'm not far enough along to knowq for sure. So, how short to cut them? The one end will be against the deck to side panel stringer but the other end will extend across the cockpit side of the bulkhead but, how far?? I can't seem to find how this corner where the deck edge curves and meets the cabin bulkhead gets finished. If I knew that I could figure out how long to make them. But, can't seem to find any closeup/detail photos. Can anyone shed some light or better yet shed a picture???
-
Very Cool! Thanks Adla!!
-
Great ideas-thanks! Adla - by having to bend the pintle I am assuming you bent the straps to fit along the sides of the stern block - kind of the same shape as the gudgeon, correct?
-
I believe I am going to take the advice of some and use Gudgeons and Pintles for the rudder. Anyone have any suggestions for size?
