


Pilotlon
-
Posts
64 -
Joined
-
Last visited
-
Days Won
1
Content Type
Profiles
Forums
Events
Everything posted by Pilotlon
-
I'm pretty sure FROR was one of the waypoints when vectored out of LA Center.. ...you know...the rivers here are drier than I ever remember in the past.....just sayin....


-
Farmboy.....excellent. I'm just up in Bella Vista, and plan to be out on our local lakes by the end of July. Here's my FROA. Have a rocked yard, so no FRame On Grass. Have to settle for a FRame On Asphalt, instead. Off of the strongback this morning, for the next steps of outfitting.


-
That stern treatment of the bottom two stringers. And, since a neighbor stopped by to see what all the hubbub was about, I took advantage of his help to carry the frame outside for a first "coming out" photo.


-
Way nice! congrats to both of you!
-
Gorgeous pair.
-
About half of the lashing is done, and I hope to finish up this week. I'll also be starting on the laminated coaming, perhaps as early as tomorrow.


-
Here's how I handled those bottom two stringers at the bow. I'll do the same at the stern tomorrow.


-
Welcome bylawren. Glad I asked the question. It does make sense, but it pays to ask. The price for going ahead without being certain, can involve a few hours of work. Post a pic of yours, when you get a chance.
-
Thanks, Jeff. Now I know how to proceed. The last four stringers are ready to go in tomorrow, and then I can concentrate on final lashing. Got my supplies delivered...skin, needles, bungee, footrests, etc. I'm hoping to be ready to skin in two weeks, max...maybe a bit sooner. Today, I worked on the bow area, and will lash in the bow tomorrow.


-
Thanks, Jeff. I sure wouldn't have thought that this section applied to the Short Shot, since it reads "applies to Long Shot and Firefly only". I'm assuming that I should trim those bottom stringers 2 1/2" in front of frame # 1; 0" But this is the stern. My question refers to the bow stringers.....and, the only picture I can find in the manual (p 36...illustration 108) shows a gunwale and a stringer meeting with the bow plate. But, this is also not a picture of the Short Shot. So, I'm still not sure what to do with those bottom two stringers between frame 12' 9" and the bow. EDIT: Or, are you saying that the bottom two stringers near the bow, are treated in the same way as they are treated at the stern?
-
I'm just putting on the last four stringers. At the Short Shot frame 12' 9" there are two stringer notches along the bottom part of the frame....but no matching notches for them at frame 14' 9" (the bow). Do they simply come on forward to fair into the bow like the other stringers? Or, do they get trimmed, and end, at frame 12' 9". I can't find a picture of this area of the bow in the book, since it's just general construction instructions. EDIT: Added picture to better explain question.

-
Jeff, I cut my stringer notches very precisely...per the diagram/plans, and the 3/4" figure that Hbrew mentions is just about right. Thank goodness I measured everything before cutting stringers, as the instruction manual still mentions 5/8 by 5/8 inches. A 5/8" depth will work OK, and clear the sides of the notches. However, when I cut a sample stringer at 5/8" wide, it rattled around in the notch. At first, I thought I had mis-cut that one. However, they were all right around the 3/4'' width, and I finished cutting the stringers today at that width, and they fit nice and snug now.
-
That's really good to hear. Put in the last stringers and started lashing the frame today, and beginning to fair in the stringers at the bow. Foot rests arrived yesterday, and skin, etc, should arrive by Saturday. I hope to have some better pics next week.
-
Just ordered remainder of supplies to complete the Short Shot.
-
Lovely boats. I'm also going to try my hand at a laminate coaming on my Short Shot. Just finished cutting the blanks today. Excellent, excellent job. Lon
-
Finally got started on the Short Shot, after much delay for eye surgery, etc. I hope to be on one of the many lakes here by the end of next month. Ordering skin, foot rests, etc this coming week. Even "naked" in the garage, it looks so sleek, low, lean....can't wait to get the skin on. Planning a flag motif (red-white-blue), but I won't be ready in time for July 4th, unfortunately. Lon

-
Pretty certain this is the same cutter, under another name, at Carolina Knife Co, in Ashville. https://www.carolinaknife.com/catalog/product/hot_cut_knife This particular kit doesn't include the cutter foot, but otherwise includes knife, R-blade, brush, hex tool, case....all for $100.
-
Thanks, Jeff. They also sell the HSGM model for a bit more, but the R-blade is another $40, as at HSGMUSA. Just now got an email response from Sailrite, and the tip of this Edge model gets to around 1000 degrees. The nice feature is that it's a package...R-blade included, and case, and 9.5 feet of cord. Looks to be the "little brother" of the Engel model, and will probably do what I want. Lon
-
After eye surgery, and finally deciding to retire-retire, I'm coming back around to getting my Short Shot project underway. I'm looking at the Sailrite fabric cutters. The Edge (package deal) is a bit cheaper, but I can find no information on how hot the tip gets. The Engel is about $40 more, but specifies a heat range up to 1100 degrees. Anyone have any experience iwth the Edge package? As expensive as these darned things are, I only want to buy once, and it needs to get hot enough to do the job. Any input?
-
Welcome, Todd.
-
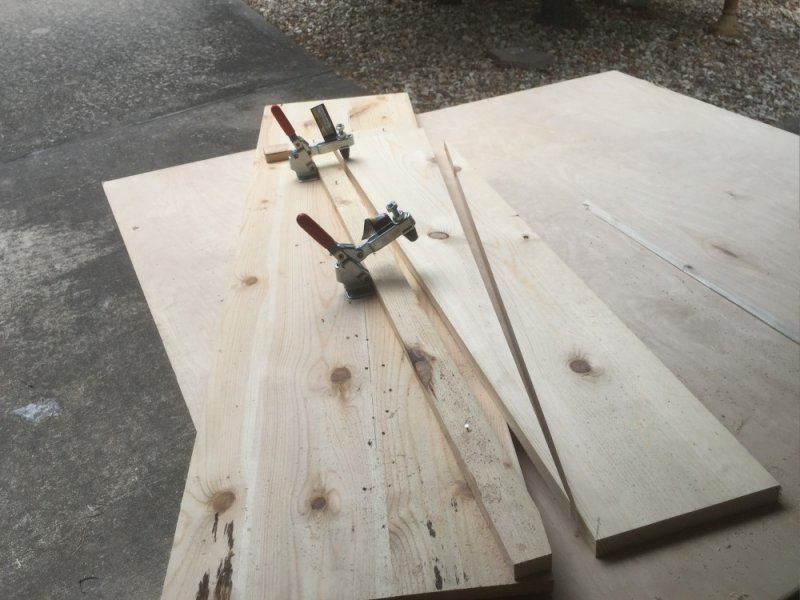
It finally cooled off enough (at least for today) to get back in the garage again. I had some scrap material around, and made two, narrow, light duty saw horses, with supports on each. The opening where the support is located, is 16", to accomodate a couple of 1x boards, or plywood (as in the picture). The strongback will obviously sit on top of the two horses, allowing for a shelf to be placed below, for tools and supplies. Nothing fancy. Ten degree angles everywhere, to keep the legs from reaching out and tripping me. These are not for heavy duty work, but really meant for something light duty - like a kayak fuselage. I can store them in the attic space above the garage when done...or just throw them out By the way, I made an adaptation of the scarfing jig, in order to cut the legs for the saw horses. I'm throwing the picture in here, just in case someone wants to see how this was done. I'm lucky enough to have a table saw, and a double bevel miter saw. But much of this could be done with a jig saw, or with a circular saw and some clamps to hold everything.

-
Been there, done that one, Jeff...while half way between NWA and Memphis. Not too many good choices when you are on the road. Too bad about the unexpected repair costs, but better now than when you are stranded on the freeway. Lon "Cha-Ching" in NW Arkansas
-
Looks like a nice design, Jeff.
-
Robert, That gives me a very good idea. I was going to make a couple of new sawhorses, anyway. I'll just make "short shot" horses...less width than I normally would....add an additional support below the top....and, then use some OSB or Ply, or even a 2x between the two of them for shelf space below. If we get down to anything less than 100 degrees here soon, I'll build those first, and post pictures. Thanks!
-
Jeff, In your construction plans book, you have two pictures of your support stands. However, in B&W, the contrast is just not good enough to determine exactly how you put these together. Your narrative is good, and gives me a pretty good idea of what you did. However, a picture is always worth a thousand words. Would it be too much trouble to post the color version of those pictures here, for a better look-see? I agree that a similar stand, with shelf, will be so much more practical than sawhorses. Or, perhaps someone has duplicated these stands, and would kindly post images here. TIA Lon "glaucoma challenged" in NWArkansas


