GaryMinor
-
Posts
30 -
Joined
-
Last visited
Content Type
Profiles
Forums
Events
Everything posted by GaryMinor
-
I have looked at kayak paddles at West Marine and Dick's Sporting Goods. Both look the same, but neither have the diamond shape mentioned by Jeff in a recent post. I really don't want to build my own paddles. Are the commercial ones any good. This kayak will be used for casual "Messing About" Gary in Wake Forest.
-
I've just finished painting my Mess About 15, and am ready to apply the brass strip over the stem and stern. I now realize that the roll stitching will be a problem. At first I thought that I could flatten the fabric and lay the strip over the seam. Now that it is painted, that doesn't look like that will work. I can either leave the roll stitching exposed and start the brass strip below it, or I could remove the roll stitching and do some different (flatter) stitching. If I keep just the first pass flat stitching, and trim the excess to just 1/4 ", I could lay the fabric back on itself and use staples to help hold the fabric to the wood. A bit of paint may seal it. Then the brass strip would lay flat against the stapled fabric. Is this reasonable or is there a better way? Gary in Wake Forest
-
I had an adjustable footrest bolted to pieces of wood tied between stringers. I didn't notice that a bolt was loose until after I skinned it. This was before it was shrunk and painted. I was able to open the weave of the 8 oz. polyester just enough to make a hole for a screwdriver to tighten the bolt. I was able to push the weave back in place and the hole was never there! This may be helpful. Gary in Wake Forest
-
Where should I start the brass strip? Jeff, I notice that you started the strip at the deck in the above posting. Did you use a stitch different than the roll stitch? I considered starting mine at the bottom of the roll stitching. I figure that the roll stitching would interfere with the brass strip. Gary in Wake Forest.
-
Jeff, Thanks. Sometimes I'm reading challenged. Gary
-
I am ready to paint my Mess About 15. It's covered with 8oz Polyester. I'm using Rust-oleum professional. What thinner should I use for the first coat? I've seen where Jeff uses acetone. It seems that this may dry faster than I want. Mineral spirits may be another good choice. Gary in Wake Forest
-
I'm building a Mess About 15, and have started with the covering. I'm using 8 oz. Polyester Fabric.. I used pushpins down the keel, turned it over am ready to sew. I had a hard time handling the fabric, so I used pushpins on the gunnels to make the fabric cover the bottom smoothly. That seems to work well. However, the fabric between the gunnel and the center of the deck doesn't want to lay flat. I realize that the boat is not flat, and something has to give. To help figure where to place the fabric, I used pushpins along the center stringer of the deck. I'm working with only the aft deck. There is some bunching up of the fabric along the center stringer, but I think it will tighten up when I apply heat. Now the chore is to sew the fabric and have it stay in place where it is pinned. As I sew, the fabric wants to slide aft, where the boat is narrower. This of course makes it bunch up. I've only sewed about 30% of the way from the cockpit toward the stern, but I don't expect to be able to continue. Having covered many model airplanes over the years, I would love to try using dope and staples, at least to attach the fabric to the frame. Then I could use heat to shrink the fabric, and enamel to make it waterproof. Frustrated in Wake Forest
-
Since it is suggested that the corners of the stringers are rounded, I don't see the need of square inside corners on the frames. I did learn that it's worth the effort to cut as near to the line as possible. Sanding to shape is a lot more effort. Sanding to a somewhat near shape may be acceptable. Gary
-
Watch out! 8-4/16 feet is 8'3" not 8'4"
-
Has anybody used aircraft dope? I'm talking about the stuff that is used on fabric covered light planes. If it doesn't work, why.
-
Jeff, I am ready to cover my Mess About 15. Can I add the float bags after covering or should I postpone the covering until the bags are available? Gary in Wake Forest
-

Some advice on a slightly crooked bow assembly
GaryMinor replied to Jon Richer's topic in Kudzu Craft Forum
Jon, I would try to shift the position where the stringers attach to the bow assembly. That is, the frame and bow piece. You will have to undo the lashings that hold the stringers to the assembly. Straighten the stringers on one side, and add curve to stringers on the other side. This will shift the stringers, fore and aft, along the edge of the frame and the surface of the bow piece. Then lash them securely in place. To illustrate this, hold your arms extended straight in front of you, with palms together. As you move both arms together from left to right, the palms will shift from front to back. Disclaimer----- I am more of an engineer than I am a boat builder. This "seems to me" to be a workable idea. I lack the experience that the professionals like Jeff have to offer. Gary in Wake Forest -
Jeff, I've viewed the three part videos Skinning Polyester and the video on the double cord stitching. I noticed that the double cord method is demonstrated with heavy fabric, but you mention that it will work well with lighter fabric also. Is this restricted to nylon or will it work well with 8 oz. polyester? Gary in Wake Forest
-
I am installing the adjustable footrest from Kudzucraft. My initial placement is too close. It seems that the knee is bent up more than I think is optimal. I need to know how much the leg is bent for the proper placement. I would guess that a slight knee bend is preferred. I don't think that the leg should be straight. After the footrest is in place, the next step is skinning. I'm looking forward to that. Gary in Wake Forest
-
Thanks to all responders. I'll see what the local mill outlet has in stock. Jeff, you may be getting an order from me.
-
I am almost ready to cover my Mess About, and I plan to use the 2 cord stitching method. I would think that the cording is available locally, but I don't know if is known by some other name. The word "welting" or something similar comes to mind, but I really don't know. What size is best. I guess that 1/8" to 1/4" would work. I think polyester or nylon would work. Certainly not a cotton blend. This is my first kayak. I need all the help I can get. Thanks, Gary in Wake Forest
-
Folks, I have a new pair of standard adjustable foot rest from KudzuCraft. They are well done and I'm looking forward to using them. How far from the back of the seat do I place them? The tallest person using my Mess About is 6'1". The foot rest will be placed so that the extreme furthest adjustment will fit him. Since the range of adjustment is about 10", the extreme closest adjustment would fit a 4'6" person. Anyone shorter than that would have to have the seat position adjusted. How far from the bottom should they be placed? Thanks, Gary in Wake forest
-
My Mess About is all lashed up, and off of the strongback. It looks as straight as I would ever want it to be. I never did securely fasten the brackets to the frame. I tried some hot glue as a temporary fix, but the frames were already oiled so it wouldn't stick. I could have used screws, but I didn't like the idea of holes to be patched later, so the brackets simply held the keel and the bottom of the frames in place, but the frames were free to rotate. Like I said before, I think that the equal tension and equal stiffness of the stringers is the primary factor. Gary in Wake Forest
-
Need help with a seat and foot rest for a Mess About
GaryMinor replied to GaryMinor's topic in Kudzu Craft Forum
Jeff, Thanks for your prompt reply. It seems that I have a reading disorder. I dug out the notes from the plans, and there is a note describing the floors. Also, I found the footrests described in the manual, but it's not clear how to position them. I guess a little experimenting is in order. Edit .... I've ordered mounting brackets and footrest. Thanks, Gary in Wake Forest -
I've just finished lashing up my Mess About. This is my first boat build. I've never been in a kayak before. I can lash a couple of short stringers on top of the cockpit frames, and then top them off with a platform or some battens. Would some padding be necessary? What about some back padding? Where should the foot rests be? Can I put in two foot rests, one for adults, and one for kids. Any help and advice would be welcome. Gary in Wake Forest
-
Jeff, I am building a Mess About 15. I have the frames and stringers assembled, held together with bungee cords. I have done the following lashing. Some of the frames (those without a bracket) to the keel. The gunwale to the forward frames. From the one just aft of the stem (11-9) to the frame in the middle of the cockpit (6-8), on both sides. About this time, I realize that I haven't been following instructions very well. I haven't leveled the frames. I haven't securely fastened the frames to the brackets. I've only clamped them. Things seem to be going well. The frames are in the right position fore and aft. Straight things seem straight and curved things seem to be evenly curved and symmetrical. It seems to me (potentially a very dangerous statement) that the final shape of a kayak is strongly determined by the shape and position of the frames and the tension of the stringers. That is, even if the frames are held perfectly in place during construction, as soon as the kayak is removed fron the brackets, it will take the shape of least tension. The questions are: I understand that the position of the lashing to the frames are important to keep the frames square to the centerline, but does that determine the shape of the hull? Should I go back and level the frames and securely fasten them to the brackets? Should I remove and redo any of the lashings? Gary in Wake Forest
-
Jeff, Here is a small detail tha you may want to correct. On your "Corrections and Revisions" page you state: The line that converts 8-4/16 feet to 8'4" should be 8'3" Gary in Raleigh, NC
-
M, I had the same concern. I simply said "What the heck, it can't hurt". I cut a notch. Jeff, Should these joints be glued?
-
I can't speak for Jeff, but since he is a logical person, and generally keeps things simple, I would expect that the measurement associated with a frame is the centerline of that frame, not the bracket. I would expect that the bracket would be labeled with the same measurement as the frame. That way, it's up to the builder to position the bracket on either side, and offset it the proper amount. Keep in mind that Jeff doesn't know how thick your bracket is, or how wide the piece at the bottom of the bracket is. That said, I am building a Mess About from plans and find that some of the bracket measurements fit the above scheme of things, and some don't. One of the bracket full size drawings are labeled FRAME 13' 3" and another is labeled FRAME 10". These match the labels on the full size frame drawings. All is good! However, one of the bracket full size drawings is labeled FRAME 5' 7" and another is labeled FRAME 10' 4", whereas the frame drawings and all other references to the frames are 5' 6" and 10' 3". I simply took this to be a mistake. Jeff, if I'm wrong about the measurements, I'd like to know. Gary in Wake Forest
-
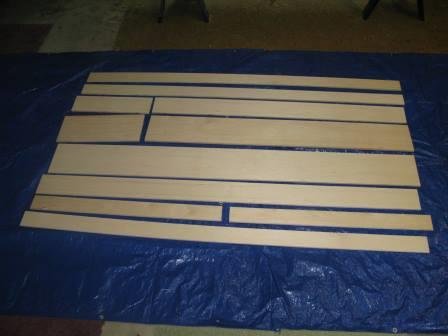
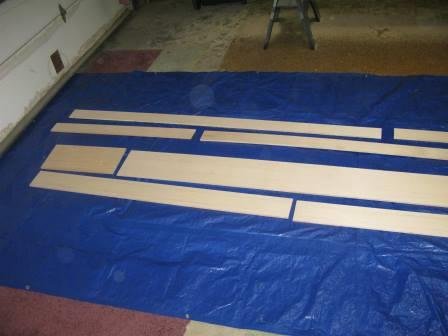
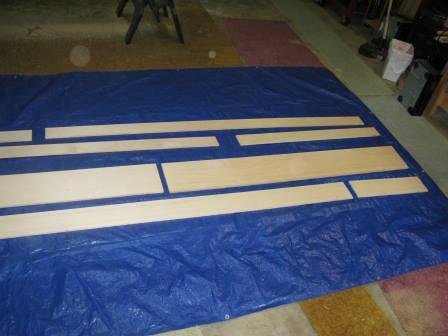
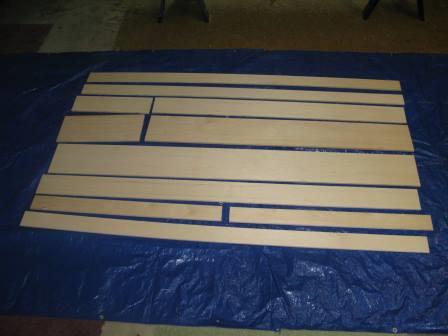
Here are some pictures of my strong back in process. I haven't assembled it yet, so I can't say for sure that it is going to work like I expect. I am building my strongback out of one piece of 4'x8' 1/2" birch ply. Not Baltic Birch. It is a box beam. The bottom is 6", The sides are 4" , and the top is whatever is left (approx 10") after saw kerfs. The top and bottom have shallow groves to help with alignment.The completed beam will be 16' long. The whole assembly is held together with screws. This shows the pieces of a 4x8 sheet of 1/2" ply, arranged in the original order. The shortest pieces are 2' long. http:controlware.netMessaboutone.jpg This is the pieces rearranged to show how they are assembled to build the left end of the box beam. http:controlware.netMessaboutleft.jpg This is the pieces rearranged to show how they are assembled to build the right end of the box beam. http:controlware.netMessaboutright.jpg Note that the topmost pieces are 8' each, and that there is only one joint between them. That joint is shown in both the left and right pictures. I am fortunate that I have a tablesaw that can handle a full 4x8 sheer of plywood, and keep the edges straight. Straight edges for the side pieces are important. The other pieces... not so much. The groves for the sides to fit into the top and bottom are not necessary, but they help with the assembly process. I cut them with a router and a guide fence. A dado blade on a table saw should work. Other designs will work, and may be better in some ways. I wanted something that I was sure was straight. I wasn't comfortable with lumber yard boards. Also, I wanted something that could be taken apart and stored easily.