Aaron_G
-
Posts
35 -
Joined
-
Last visited
Never
Content Type
Profiles
Forums
Events
Everything posted by Aaron_G
-
What are the rules for camping in the San Juans? Can you pull up your boat and pitch a tent on any beach, or are you restricted to parks and other public property? I hope you plan on taking some pictures and posting them to the forum.
-
Cleat location aft for Stays'l CS20
Aaron_G replied to Joe Nelson CS#35's topic in B & B Yachts Forum
Joe, where are you going to exhibit your boat on April 22-23? I would love to see your boat in person. -
Joe, I've been wondering how I was going to do this. Thanks for posting the picture and procedure. So much simpler and better than what I was picturing in my head.
-
So, how does that self bailer work anyway?
-
I screwed and glued the keel after fiberglassing the entire bottom of the boat. I needed to screw it down in order to epoxy to the boat. I counter sunk each screw, then filled in the holes. I figured between 1/4" - 1/2" of thickened epoxy between the keel batten and the bottom of the hull for calculating how deep the drill bit should go. I marked the depth for each hole on the drill bit using a sharpie so I was sure that I didn't go to far. As a back up, I would pull the bit out frequenty to check the color of the chips: brown, still in Okume; white, now in the thickened epoxy; brown again, into the keel batten and time to stop. I'll know how well I did when I flip the boat over. BTW, online metals doesn't seem to sell the brass half rounds. Anyone know of a place online to get this?
-
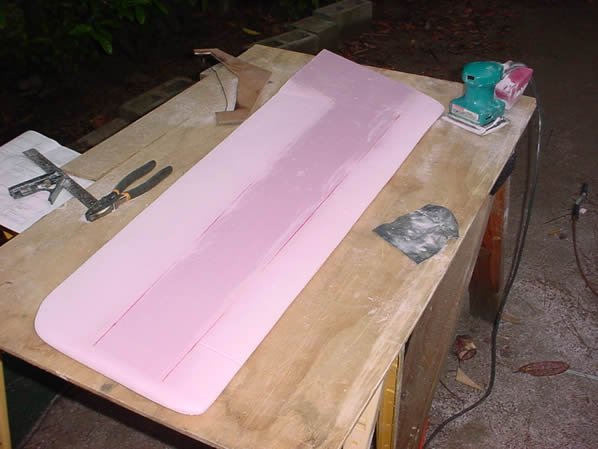
Thanks for the feedback. I roughed up the foam for better adhesion--in as-bought condition it has a smooth, shiny surface. The shiny surface didn't absorb any epoxy, the roughed up did. A test piece pulled a fairly significant divit out of the foam. However, the foam doesn't have much strength, so it didn't take too much force to pull out that divit. The cloth I used is 7 or 8 oz (can't remember exactly). There seems to be sufficient stiffness to limit strain at the cloth/foam interface. Still, I fully expect to build a second centerboard out of wood (now that I have a table saw) as this was more of a temporary solution.
-
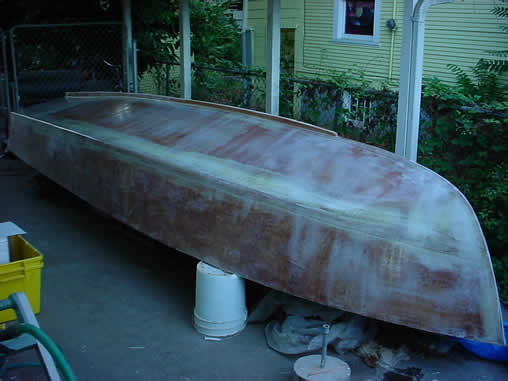
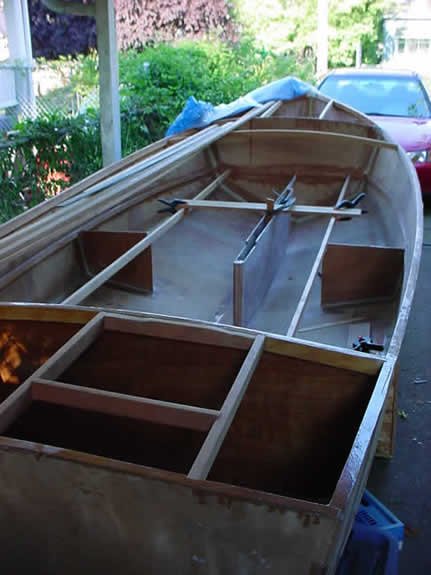
Hi everybody, I think its been a year since I posted anything so I thought I'd stop lurking and share the progress I've made over the summer. I am currently in the process of epoxying, fairing, etc. the bottom. I followed the example of somebody else on this forum and made the centerboard from foam (insulating foam from home depot--$8 for 4'x8' sheet) and fiberglass. I did this because at the time I didn't own a tablesaw and didn''t think I could rip boards true enough to glue together for a centerboard. CB turned out OK and is strong and light. There are three layers of fiberglass staggered: one layer at tip, two midway, three near top. (Also, a layer of fiberglass tape on leading edge for extra bump protection. I made the wood part wider so that the pivot is surrounded by wood, not foam. Turned out to be a bit more work than I expected. Note: I have since purchased a tablesaw and don't know how I lived without it. I'll have to stop at the end of September (school) and I hope to have the boat painted and flipped back over by then. I noticed people have posted their pics of flipping the boat. I wish I'd taken some because it was quite a sketchy operation. Eyebolts drilled into the carport, ropes, pulleys, a come-along, etc. and I still feel like I hurt my back. Next time I am going to use the most effective boat flipping tool known to man: a case of beer to lure friends.


-
I second Toms advise for using a spacer. My CB trunk had a bit of a warp when I put it in too. I solved this problem (I think) by screwing the side of the trunk closest to the center line to that piece of wood on the center that runs the length of the boat (is this called the "keelson"?). i.e. I screwed from the bottom up through the slot. I then used spacers to keep the other side parallel to the screwed side. After the glass dried, i took the screws out. Seems to be straight and the CB fits inside. On a semi related note: 70% through my filleting of trunk to boat, I ran out of my silica thickener. In a panic I decided to use the graphite powder (West Systems stuff, contains both graphite and silica) I bought for coating the centerboard. Seemed to work great, but I'm wondering what the adhesion qualities of graphite to figerglass are. I applied the fiberglass while the fillet was still tacky. Also, thanks to the graphite, I will have to do some sanding and painting because it looks like someone lost a fight with a bucket of tar on the inside of my boat.
-
Congratulations. Are you going to sail it to the wooden boat festival in Port Townsend this year? Would love to see the boat. I always thought it would be fun to camp at Fort Flagler and sail across each day for the festival. For me, maybe next year...
-
I asked the dark hull question to the tech-sales guys at System Three. Here was their response: "You won't degrade the epoxy. However, Lopez Blue is dark enough so that the decks are going to get up to 170-180F on a hot July day at noon.This is above the Tg of the Epoxy. So the epoxy will be rubbery. The wood will try to lose moisture and shrink. The weave pattern of the fiberglass will print through along with the grain pattern of the wood. The deck will be too hot to touch. After a few weeks of this your boat will look very ratty. If you can live with the snickers of those who see it in this condition then paint the exposed deck and horizontal surfaces Lopez Blue..." Of course, I only want to paint the hull sides and bottom dark, not the deck. Maybe I will just go for it and paint it blue anyway. If it looks bad...well, then I guess I will be doing a lot of sanding...
-
Hi Everybody, I've read a lot of discussion here about how a hull painted with a dark color can heat up to the point that the epoxy begins to break down. Yet I see a lot of pictures of CS 17/20s with dark hulls--anyone know how are they holding up? Has anyone actually seen a boat with a dark hull have problems? I intend to fiberglass the outer hull of the boat and would like to paint it dark blue. I figure that here in Oregon, it seldom gets hot enough to worry about the Tg of epoxy. However, I also have visions of trailering my boat down to baja someday and don't want to look in the rear view mirror to see my hull peel off in big goopy mess.
-
Great pics Tom. Thanks for posting them. I think I'm going to try that shortened front deck like you did. Out of curiosity, why did you choose to do it that way? I read your thread from last January regarding paint and was wondering: did you wind up going with the Rustoleum for the interior and enclosed areas? I'm restarting my CS17 project after an 8 month hiatus (school) and am enjoying catching up on the forum. I'm about to frame the interior for the seats.
-
Hey Rob, the picture of the brown box with the drawers that food is being prepared on...was that made to fit into a compartment or something on your boat? Seems like a great idea.
-
As far as learning the human based rules of sailing/boating, I like the book Chapman Piloting: Seamanship and Boat Handling. I picked up a copy when I bought my first biggish boat (36') and felt like it gave me the basics as far as rules of the road, aids to navigation, etc. I did all of my sailing with that boat on the Columbia river--busy, narrow and lots of commmercial traffic--and no one ever blew their horn at me or called me names over the radio, so it must have worked. As far as camping and launching, the state boating authority usually has good stuff that. Oregon has an online guide to camping and launching areas, but I guess that probably wouldn't help you much in Connecticut...
-
I had a similar question about making 17' inwales from shorter pieces of wood. After consulting the forum, I wound up scarfing them together. Below is the link to the topic where I first asked about this. People posted some links to good articles about scarfing. http://www.messing-about.com/forum/viewtopic.php?t=2607
-
Website for marine metals and aluminum tubing
Aaron_G replied to Travis Votaw's topic in B & B Yachts Forum
thanks for the link--online metals was cheaper than the local metalsupermarkets, even with shipping. Does anyone use 1 piece masts for their Core Sounds? I was wondering how one would make a mast with sail tracks if the mast were in sections with different ODs. I'm still trying to figure out which configuration I want. I like the simple sleeve version of the sails, but wonder how one would reef a sail like that. -
Website for marine metals and aluminum tubing
Aaron_G replied to Travis Votaw's topic in B & B Yachts Forum
I'm looking at Metal Supermarkets (http://www.metalsupermarkets.com) for my masts. They have locations across the country and in canada (see the store finder on their website). I'm looking at them because they have a store here in portland. Here is what I was quoted (for my CS 17): 2 1/4" x .065" Drawn, Seamless aluminum 6061-T6 $8.71/ft 2 1/2" x .083" Drawn, seamless alumimun 6061-T6 $10.43/ft 2 1/2 x .125" extruded seamless aluminum 6061-6511 $7.18/ft Do these prices sound about right (considering I won't have to pay shipping)? -
Looks great. What is the purpose of the graphite epoxy? I've noticed other posts where people apply it to center boards.
-
Based on the ratios of the moments of inertia for the 2mm and 3mm tubes: the 3 mm walled tube will have about 2/3 of the stress due to bending than the 2 mm tube (so it will handle 1.5 times the bending moment). This is a rough estimate since the mast will likely fail due to local buckling and not yeilding due to bending stress. This is all based on the simple tube w/out your 63 mm insert.
-
Thanks! Whew, glad you reminded me of the keel batten. I would have gotten so enthusiastic filletting and taping that I probably would have forgotten. My back is hurting today...
-
So--ta da--here is my boat project that now looks like a boat. BTW, I was right in choosing the 17 over the 20 due to my work space constraint. As I was unfolding the butterfly, the (delecately attached) sides of the boat were flopping all over the place, banging against the side of the house, the carport and carport roof. It was a little stressfull. In hindsight I should have enlisted some help. [attachment over 4 years old deleted by admin]
-
Thanks Graham. I did screw up from the bottom into the temporary frame, but the screws pulled out as I tightened the wires on the hull. Probably due more to the cheap chip-board I was using for the center frame than any extreme force. I am going to follow your advice and leave it be....I think more screws would make a flat spot...
-
Just finished wiring my cs17 hull together. Everything fits great. No twist in the hull. Everything seems level. However, I have about 1/2" to 3/4" space underneath the temporary center frame, just at the centerline and +- 6 inches to either side . All other bulkheads (front, aft and transom) fit perfectly and the fore and aft curve of the centerline seems good too. Should I worry about the space under the center frame? I'll post more pictures when my camera charges back up... [attachment over 4 years old deleted by admin]
-
For me it was the perfect design. I wanted a boat I could go camping in, but was also fun to sail. A boat that could handle rougher conditions. I was also really intrigued by the cat ketch sail plan. In fact, I looked at a lot of designs, but the Core Sounds were the only ones that really jumped out at me for no other reason than I just liked the look. I choose the 17 because I am building in a confined area. I would have preferred the 20. Still, the 17 seems big enough for camping gear, dog, girlfriend and a cooler full of beer. Also, the design is very straightforward and doable for an amateur like me. So far the build has been very straight forward. Finally, the forum is really great. My build has gone very smoothly because of it. (I also recommend ordering the optional CD-ROM with the plans...good pics there).
-
Finished the cradle. I just rechecked my 2" inch number that I mentioned above and discovered that 1 1/2" would have been better. Looks like I'll be shimming the center. Per Ray's suggesting, the supports go out to the chines, which means that the cradle is 60" wide. I was a little worried about torsional and longitudinal stiffness, but I put most of my weight on it and it seems to hold fine. All thats missing now is a boat to go on it.