Tom Gomm
-
Posts
19 -
Joined
-
Last visited
Never
Tom Gomm's Achievements
")


-
Latest update: I've primed and painted the hull. I scrubbed down the epoxy on the hull with water (to remove the amine blush) and then dried it. I then sanded the hull with 120 grit sand paper. After sanding, I wiped the hull down with a damp cloth and then waited for it to dry. Once it was dry, I taped the gunwale off with 2 inch blue painter's tape and then applied the first coat of primer (sea gloss) with a 4 inch foam roller. I tried to 'tip' it with a paint brush, but I found that the primer was too thick so I just rolled it. I waited over night then sanded the primer with 120 grit paper, wiped it down and applied the second coat. For these two coats, I used almost an entire quart of primer. After about 6 hours, I sanded the hull with 220 grit sand paper and applied the first coat of paint (Interlux Dark Blue Topside paint). I did used the roll and tip method for this because the paint bubbled exceedingly, but the tipping seemed to eliminate all of the bubbles. I again waited over night and sanded the hull again with 220 grit and applied the second coat of paint. It looks pretty good, but on my next boat, I'll make sure to spend more time fairing the hull (I can see areas where the epoxy 'sagged'). Unfortunately, I didn't have time to spend fairing and sanding and fairing and sanding etc. because I will be moving to Idaho (from Florida) in a week. Overall though, I am pleased with the outcome. The hull will need to withstand the 2200 mile trip across country on the top of my truck.


-
I plan to begin painting this weekend. Any suggestions or pointers from anyone?
-
OK next question.... How long must you allow the epoxy to cure before you can paint? I am using a slow curing hardener, but I live in Florida and it has been between 80 and 90 degrees. Is 24 hours enough or should the epoxy cure for a week?
-
Time for another update. Before I talk about my progress on this project, I want to thank everyone who has answered my questions and so willingly shared information with me as I have worked on this boat. It has certainly made this project easier having so much help from everyone. ;D This weekend I sanded the inside of the boat and then re-filletted around the doubler. This time, however, I brushed some unthickened epoxy over it and it made the fillet nice and smooth. I then epoxied the entire inside.....twice. After this hardened, I flipped the boat over and sanded the outside. I spent about an hour and a half on that. I then cut the keel and beveled the ends. I chose to make the keel only 8 ft long. If I had made it longer, it would not have seated flat on the boat (the 'V' starts right where the seam is). I installed the keel using 3/4 in screws (drilling pilots and countersinking). To do this, I wetted down the boat where the keel would be installed and the underside of the keel. Then I had my son put pressure on the keel while I put the screws in from underneath (the boat was upside down). Once this was complete, I put another layer of fiberglass tape on both ends of the boat and epoxied the entire hull once more. I have not had much problem with the epoxy rash/itchiness since donning the 'epoxy suit' while working on the boat. I purchased paint and primer from West Marine (sea gloss primer and interlux paint). I also bought some varnish for the gunwales and spreader. Both the varnish and the paint say to wask the epoxy down with an ammonia and watter solution then sand before applying the finish. - Can anyone tell me why they say to clean the epoxy with an ammonia soution? ???


-
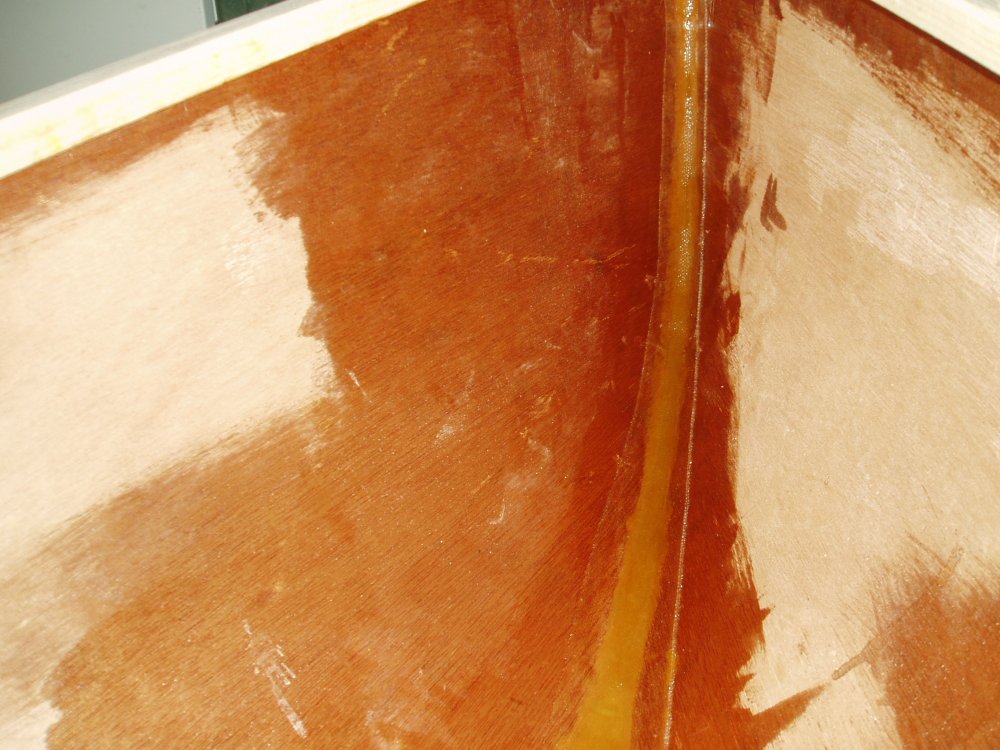
OK...time for an update. On Saturday, I sanded down the outside of the hull. I had filled in all of the stitch holes with thickened epoxy. I then fiberglassed all four seams. I was on such a good roll that I went ahead and covered the entire outside of the hull with epoxy (using the plastic spreader method). After a few hours, I mixed up some more epoxy and filled in the taped seams and then applied a second coat of epoxy to the outside of the boat. It looked great, but the next morning I woke up with puffy, itchy eyelids and an itchy rash all over especially on my inner elbow, my neck and chest, both eyelids and inbetween my knuckles. I had no idea what was going on until I researched epoxy sensitivity online. I went to the doctor and he put me on a steroid and antihistimine to help while I recover. Monday I temporarily installed the spreader using carriage bolts and self locking nuts. Today, I was not too itchy so I donned my respirator, goggles, heavy duty rubber gloves and my old Eddie Bauer rain jacket. I made some thickened epoxy and filleted the edges of the doubler (and sanded for 15 minutes). The epoxy suit seemed to do the trick....I'll know more tommorrow how well it worked. When I took it all off though, the inside of the repirator was full of water from perspiration and respiration and I had to turn my rainjacket inside out to dry.....then I drank a lot of water. I can see that this will make boat building more uncomfortable, but it's better than an itchy rash.


-
Anybody ever suffer from epoxy sensitivity? I epoxied the out side of the boat this Saturday and on Sunday I developed a rather painful (itchy) rash . I still need to complete this boat, but I need to find a way to eliminate the exposure to the epoxy. Can anyone provide hints or 'best practices' in this area?
-
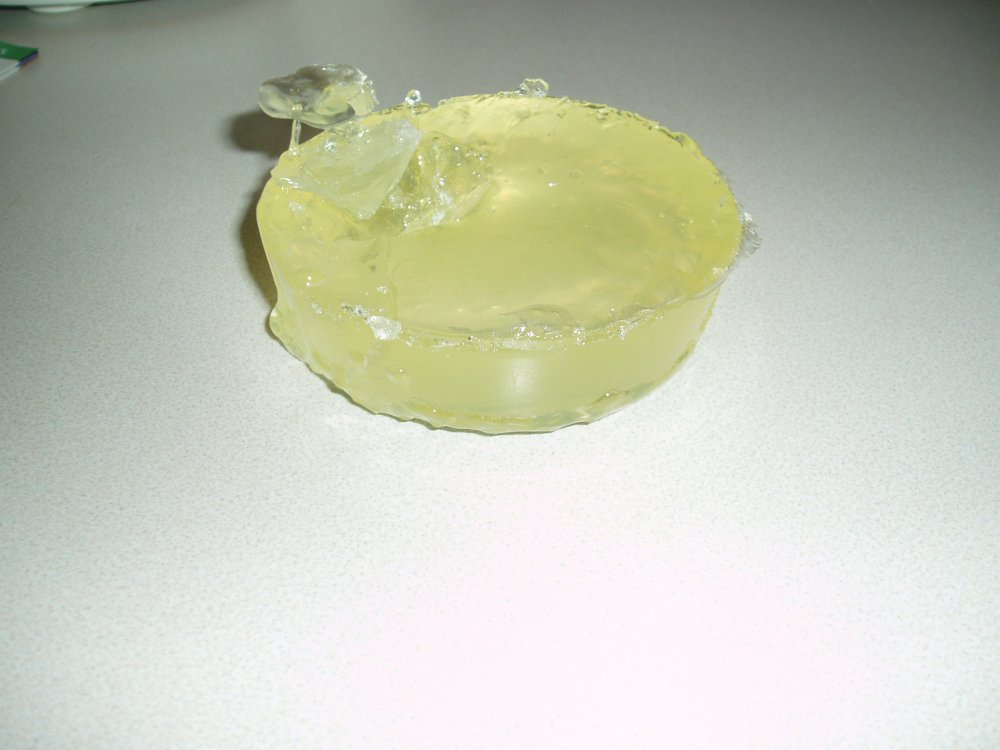
Today, I removed the weights from the doubler and filletted and taped the inside seams. I thought through the steps I'd need to take to do the first seam so I could prep everything necessary before mixing the epoxy. I cut the fiberglass tape to length and then mixed 6 oz of thickened epoxy. I then mixed another 6 oz of non-thickened epoxy....I figured I could wet down the wood then fillet the seam and if I didn't have enough thickened epoxy, I could quickly make some more. What I didn't realize is how fast that much epoxy will begin to cure. I used the thickened epoxy and made the fillet then went to dip my brush into the epoxy and got a big surprise! It was solid on top! So I picked it up...which was a mistake...it was almost too hot to handle...I had to hold the cup up by the rim to not burn my fingers. I quickly dumped it out onto a piece of plastic, but by then it was too late....I made my first epoxy popsicle! After this learning experience, I continued with the other seams and didn't have any other major problems. Now that the seams are hardening, I do have one question though. --What is the best way to remove the zip ties? ??? I tried to remove a few tonight but they just broke off and would not slide out of the fillet now that it's hardened. Is there a trick to this or should I just cut them off and epoxy and tape over them?


-
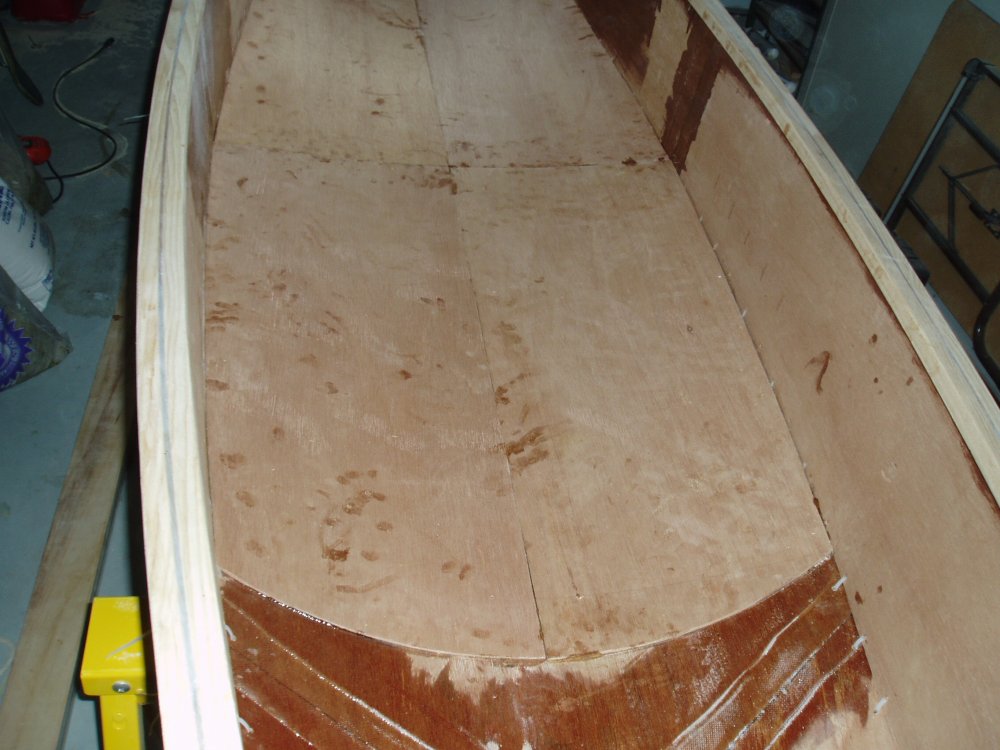
OK....I've completed a number of steps this week. Starting with installing the doubler. I marked the doubler on one of the remnants of plywood then stacked the other three under it and put some wood screws through the plys to hold them together. I then cut the doubler(s) out with a jigsaw and cleaned the edges up with a small belt sander. I then 'dry fitted' all four pieces and found that I had to modify them by just a little more than the side wall thickness. I did this on the table saw using an auxillary fence and cut the long straight edge (middle of the boat) of each doubler. Once I got all four to fit snugly, I ripped down a 2x4 to 1 1/4 width and cut two 6 in pieces to act as the packing blocks. I screwed these to the two 2x4s I had supporting the boat on my saw horses. Once I put the board in the center and put weights in the boat, I found that the two side 2x4s were bending in the middle so I cut two braces the same height as the saw horses and slid these into place under the center of the 2x4s. It turns out that the 2x4s were bending about 3/8 inch in the middle, but the center was not bending at all since it was not a green as the other two. I then mixed some thickened epoxy (using wood flour) and 'pasted' the doublers in. I was surprised at how much 'glue' I used. I think I mixed 4 or 5 six ounce batches. I then put the weights in....I used two bags of water softener salt, two bags of play sand, some weights, and anything else I could find to ensure that entire surface area of the doubler was touching the bottom of the boat.


-
I hope that you post some photos of this boat 'in action' when it's complete. It makes me consider this as my next project. Thanks!
-
That's looking good! What kind of primer/paint do you use? Do you spray it on?
-
Once the gunwales were on, I began work on the inwales. I cut the ends at a 45 degree angle for a perfect fit into the breasthook. I found that I had to use my sander to adjust the ends of the inwale to get it to fit just right into the breasthook. I then dry fitted the inwale by clamping it, working from one side to the other. once it was clamped, I marked the exact length then took the inwale back off to miter that end. Once again, I had to adjust the other end to get it to fit properly. I had to clamp and unclamp it (and sand the ends) many times to get the fit just right. I then epoxied it and clamped it in place. Once this was cured (24 hours) I repeated this process on the other side. Once cured, I cut the excess stock from the gunwales and rounded the point at each end. I then removed the clamps and began to sand the breasthooks and the tops of the gunwales/inwales to 'blend' the surfaces together. The random orbit sander made this a slow process, but with a small belt sander, I was able to make quick work of this. There were still some small gaps where the plywood was slightly below the gunwales and inwales. so I filled these in with some wood flour thickened epoxy. It's starting to look like a real boat!


-
Once I spliced the solid stock for the gunwales and inwales, I rounded two corners each using a 1/8 inch round-over bit. I then fit each gunwale by counter sinking two holes in each end where it attaches to the breasthook. I used a larger bit to drill throught he gunwale and a smaller bit to drill the pilot hole through the outside of the boat and into the breasthook. This allowed me to cinch the gunwale tight against the outside of the boat (the threads of the screw did not get hung up in the gunwale but pulled it tight to the boat....like it was a washer). I then attached the clamps working from the anchored side of the gunwale toward the other side. I used the cut PVC pipe method. I cut the 'slices' with my miter saw and then cut each piece with my jigsaw. They worked very well for clamping purposes. Once I had the gunwale dry-fitted, I removed it to apply epoxy to the boat and the gunwale then re-attached and clamped it. Then procedded to do the same thing with the other side. Once both sides were 'glued' I tied a rope (tautline hitch...I'm a scoutmaster so I use the basic boy scout knots) around the center of the boat and tightened it to make the beam exactly 33 inches while the epoxy cured. Once the epoxy was cured (24 hours), I found that one of the splices had popped loose, so I re-epoxied it and clamped it back together.


-
That looks great! Did you fiberglass the entire hull?
-
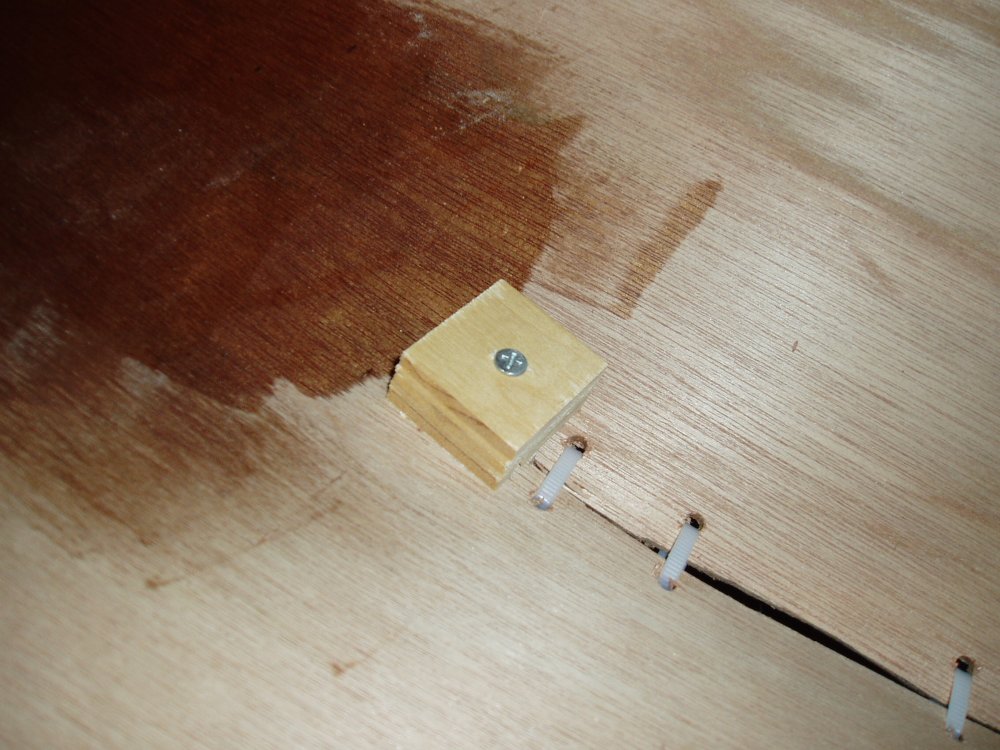
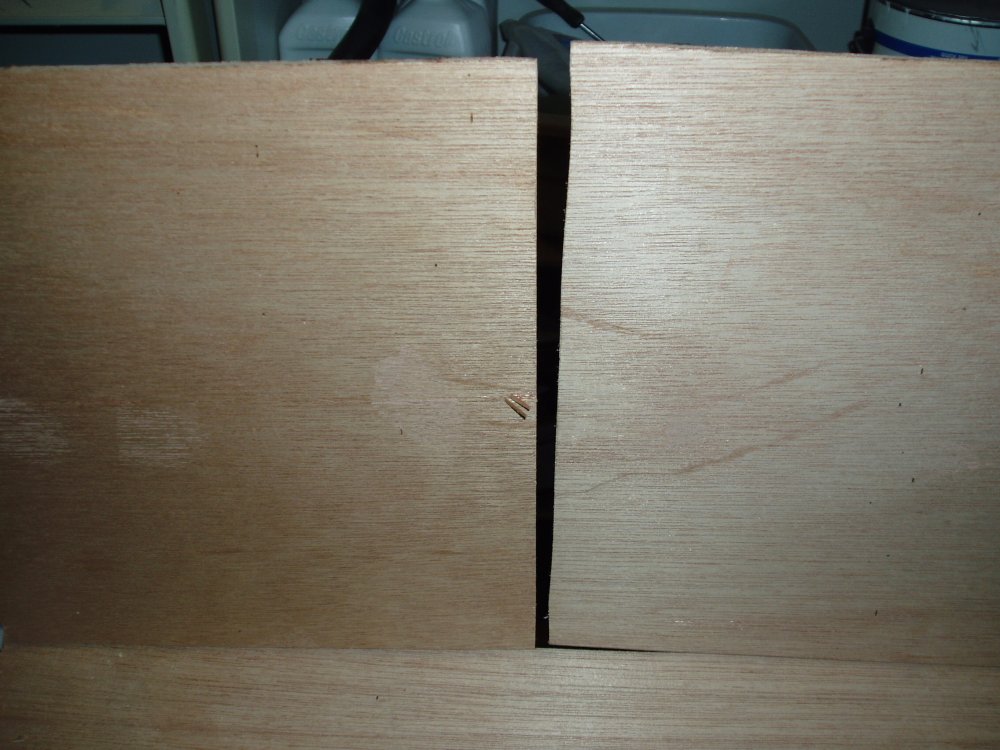
I've made some progress. I've installed the breasthooks and epoxied and taped the butt joints. I solved the crack problem by drilling a hole through a one and a half inch square block (3/4 thick) and a hole at the end of the chine where the crack occurred. I screwed a wood screw throught he two holes and into another block on the outside. The block with the hole in it acted as a washer and tightened the other block against the outside of the hull very nicely. Per Graham's instructions, I fabricated and installed the breasthooks. I was surprised at how much this tightened the angle of the bow/stern. As a result, the gap at the butt joint was narrowed greatly and the top of the joints touched but the bottom of the joints still had a quarter inch gap. I first wet down the outside of the butt joint with epoxy and placed the fiberglass tape on the outside (and wetted it down). Then I filled the gap from the inside with thickened epoxy (I used wood flour). Finally, I epoxied and taped the inside of the joint over the filled gap. I clamped two plastic covered blocks to the joint. I lowered the outside block slightly to ensure that the outside seam and the bottom of the boat were in perfect alignment. I also ripped down the ash and began to splice the pieces together for the gunwales, inwales, and keel. I marked the angle on each piece (6 inches long....8/1 rule=6/.75) and used my disc sander to sand down to the marks. This worked rather well and saved me from having to create a special jig to cut these. I'm now at a point where I'm not sure what to do next, do I install the gunwales and then inwales then fillet and tape then install the doubler ???? I've also read that you fillet and tape the inside and outside before attaching the gunwales and inwales. I'm hoping someone can help me with the correct order of these steps.


-
Help! Today I stitched the sides, but I ran into two problems. First, I discovered a crack at the end of one of the cuts in the butterfly. What can be done to correct this? Second, once the sides were stitched, the ends did not quite meet in the middle. One side has about a 1/4 gap and the other has a 1/8 gap. I can get the tops to touch, by lifting one side of the boat, but there is still a gap at the bottom. What can I do about this?