jan nicolaisen
-
Posts
43 -
Joined
-
Last visited
Never
Content Type
Profiles
Forums
Events
Everything posted by jan nicolaisen
-
Hi all, Here's a pic of my shop, on this lovely morning of Dec 18, 2007. Just a reminder to those numerous unlucky souls of this forum residing in perpetual sunshine: Winter Solstice celebrations, about to happen in a couple of days, are not the same when the winter element is removed! That said, I did turn back to the blazing hearth for another round of coffee before braving the 50' slog out to the shop. Happy holidays, Jan
-
in defense of water based paint
jan nicolaisen replied to jan nicolaisen's topic in B & B Yachts Forum
paul stewart, for the core sound i called S3 and ordered paint directly, as usual, and the friendly lady there mentioned that the names of the products had changed slightly as you guys have discovered. the result is a slightly altered primer, and basically the same topcoat. i ordered the primer and paint with the new names, and after using it i certainly does not detect any difference from the old products, besides the primer now only available in gray. especially the topcoat behaves exactly like it used to. hope this helps mick, thanks for the praise. i replied to your mail a while ago. the bench tops are laid with solid wood, cut thin, about 3/16", and glued down with epoxy. the grooves are filled with epoxy/graphite mix to simulate the typical caulking used. jan -
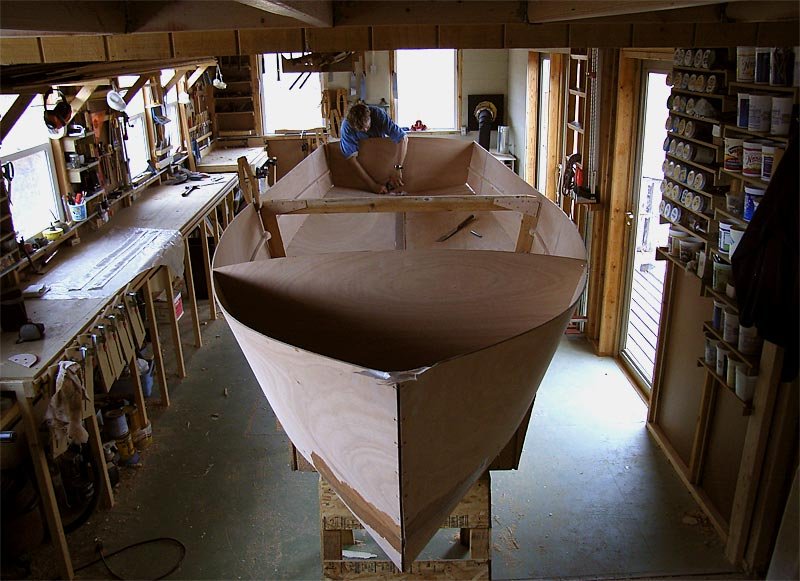
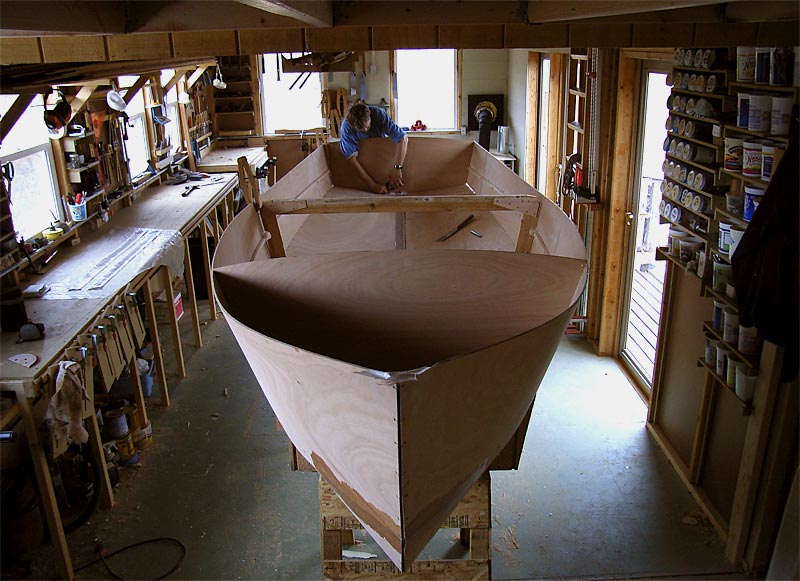
So, that can of worms... I'm currently painting the cockpit well of my CS17 with System Three's water reducible paint. This is boat #4 I use this stuff on, and again I have to conclude how pleasant the process is. It is winter here, not a notch over 20 degrees for weeks. The shop is sealed tight to keep the temp at 55, yet I sit there in the boat, spreading high tech marine paint without respirator or running eyes or pounding headache. Besides that aspect, there's numerous other advantages, as I see it. The paint can be recoated in, in..minutes, as a matter of fact. I once put 8 coats on a double paddle canoe before lunch, then sanded lightly and finished the chore off with one flawless coat after the siesta. Done deal. Recoating without sanding can take place in 24 hours if crosslinking the paint or 3 weeks if not. I don't use spray equipment. Foam brushes are the preferred method of application on lapstrake hulls and complicated interiors, and foam rollers on big flat expanses of less shapely hulls, such as these Core Sounds. I like the looks of handpainted boats. Some minor brushmarks are no problem, yet this paint flows out pretty nice and looks real good in a semi high gloss kind of way. System Three alludes to its uses on bare wood, as opposed to epoxy surfaces, but I have not had great luck with that. Being a linear poly/epoxy type of coating it just dries too hard and inflexible not to show minor cracking on real, live wood. This translates into an extremely durable surface, though. Compared to Kirby's marine enamel (some of the finest trad paint) I see the System Three stuff as tougher and longer lasting, for sure. Repainting, like always, require a major sanding job. What else? Drawbacks? Nothing is perfect. The fast drying takes a little getting used to. Rethinning with water as you go helps, as does a swift, effective technique. Here in the semi arid part of the country this all gets more difficult, but not impossible. I've never used this stuff in a moist coastal environment, but would assume it is a lot easier to work with over there. Also, it takes at least five coats to get good coverage when hand brushing. With Kirby three seems to do it. System Three also supplies the primer, again water based and easy to work with. Sands really nice, but takes several days to dry. BTW, the lights that illuminate the boat on the pic are these screw-in super LED's, which at less than 1 watt a piece can be left on for the whole winter without affecting the bill, or in my case the batteries. They are so bright that all imperfections, of which there are too many, shows up mercilessly!
-
hi boat nuts, have not been posting progress reports on my cs17 for a few months, because we got this other job that had to be done. picture shows other job on launching day, june 4. it's a 13' cedar on oak skiff designed by eric hvalsoe. the rig, which appear a little undersized, is indeed that. the real sail is not done yet, so we stuck a nutshell rig in there for the occasion... in the boat sits the owner, forward contemplating his investment, and my building partner dave at the helm grinning. jan
-
michel, nice documentation of the process. looks like things worked out really well. yes, there's arguments for and against making your own sails. but so is the case with the boat itself! the math worked out for me. graham wants upward of $600 for finished sails, while the materials i bought was hardly $250. in other words i'm paying myself hundreds of dollars to learn an exciting new craft that will make me wiser, more self reliant and is worthy of infinite bragging rights. that said, the sails are far from finished, and who knows how they will set! jan
-
While giving my CS 17 project a little rest, we have been busy over at Dave's shop making sails for the boat. This has been a humbling experience in terms of day to day progress for a couple of crusty carpenters! Armed with Mr Marino's monumental tome on the subject, we have been lofting sail shapes, rolling out and sticky taping fabric, sewing miles of zig-zag stitches with my old handcrank machine, and finally have two beautiful, yet far from finished sails sitting rolled up in the corner. Things previously shrouded in mystery, such as broadseaming and tablings, are now part of our vocabulary. It has been fun so far, a process highly recommended if you want to learn the craft and save a couple hundred dollars along the way. Jan


-
CS 17 hull #172, Just getting started
jan nicolaisen replied to James Bandle's topic in B & B Yachts Forum
You're right about that one! Very unsettling for me too when I was at that point a few weeks ago. The plans are unusually vague regarding this. In fact the precise angle of the bottoms in relation to the sides can be arranged within several degrees of variation. Rather scary, since the consequences of a misalignment are impossible to foresee! Since there was nothing further to do, I just glassed them together where it seemed like the chines had the most contact. This screwed up the stem profile quite considerably, so after curing I had to refair it. I believe the most important aspect of this step is to ensure symmetry between port and starb'd sides, above all else. The boat went together well in the end with no known bugs, so far. Good luck, Jan -
Frank, We are completely independent. Our system is very small by all standards. This is not an issue from march thru october, but in the wintertime we have come to accept some compromises, such as LED lighting, limited computer time, etc. If the sun doesn't shine for days on end, we run a small generator 10-15 min/day. We have powerlines marching across our property, some 200 yds from the cabin. Back when I was building the place, we got a quote from the power company of almost $4500 to hook up. That proved to be about the same as a micro solar set-up, with no monthly bills. The choice was clear. I think the sell back option you're talking about would take a lifetime to return your investment. Off course, there's an immidiate karmic, feel good bonus, which cannot be measured in cool cash.

-
We live off the grid with power from solar panels. All our juice are stored in a 12v battery bank, just like a larger cruising boat. Since it is far more efficient to use the uninverted 12v power as is, most of our appliances are DC direct. To do this with the laptop, and echewing the odd 12v>110v>12v deal that was mentioned earlier, we use an adapter from these guys: http://www.lindelectronics.com/ It is super high quality, and has been in constant use for 3 years now. Off course it will work with any 12v system in your vehicle or boat. jan
-
I hope so, Jeff. It probably will require more dexterity than diving into the deck hatch, but it is also bigger at 24" x 12". Thanks for the many kind comments. Jan
-
Hi, Now that the tumult associated with the typical american holiday is a few hours behind me, it is time to talk boats (and digest). After reading about the rear hatch issues when trailering etc from the many experienced CS sailors here (especially JeffM and Joe), I decided to forego the deck mounted version. Instead I layed out an elliptical opening in the aft bulkhead for access. I was intimidated by the execution. The trick would be a smooth and fair hairline cut that would allow use of the cutout part as the hatch. My jigsaw skills are sketchy at best, and tearouts and splintering seems the rule. And how to start the cut without widening the proposed 1/16" kerf? At the Wooden Boat Festival in Port Townsend I talked to Tom Regan, a skilled builder from South Puget Sound. He had access ports on his amazing Oughtred double enders with the cutout as the hatch, and gave me the idea to use a special japanese saw called an Azebiki to carefully plunge cut thru the ply (the funny stubby one on the pic). Not one to pass up an opportunity to aquire new tools, I promptly ordered a specimen from Lee Valley/Veritas. It worked very well, and has the potential for many other weird tasks too. A japanese holesaw (which I already owned) replaced the jigsaw part for the bulk of the operation. It produced a clean and tiny kerf, tracing the line perfectly without wandering. Still this is a job requiring outmost concentration. Next I glued up the rim out of three pieces of scrap and stuck that to the inside of the bulkhead. To hold the hatch in place I decided on 4 locations along the periphery for toggles. Also from Tom came the idea of using bits of brass half round leftover from keel rubrails. By raising the toggles on disks of 3/16" marine ply, I hope to provide a better grip when fingers are wet and cold and also avoid scratching the paint by repeated use. They are low profile to avoid snagging various parts of the running rigging. The seal is a line of 1/8" sticky back weatherstripping from Ace. For a handle I used a scrap piece of walnut, and the back of the hatch has some reinforcing to prevent warping. All in all it is almost certainly faster to do this bulkhead hatch as opposed to the framed, raised job up on deck. Cheaper too, not requiring hinges or other store bought hardware (besides the Azebiki). Happy Thanksgiving, Jan


-
Charlie, Tracy's excellent plans and instruction sheets taught me how to do stitch and glue. The boat came out well too, mostly thanks to Tracy and a good portion of luck from my side. How long have you been tinkering with boats? Seems like it must have been a long time. Off go to 'work' now... Jan
-
Dave, I'm glad you might find this useful. The six degrees should yield the 8:1 scarf that seems to be what most experts in the field recommends for plywood. I have used down to 6:1 with no apparent problems... You're right though, with such a shallow angle it just takes a slight error in setting up the tablesaw for the bevel cut, for example, to change things. This would mean that different versions of the jig may not come out at precisely 8:1. On the other hand it has shown consistency in replicating whatever scarf size it makes over and over, with minimal clean-up. Don't you all love talking boats and boatbuilding? I will have to pry myself away from the screen soon, and actually head out in the shop on this gray sunday morning. Later, Jan
-
yep, great idea about the housed blade, charlie. might make the next OSHA inspection less stressful? jan
-
Hi, Being a mere amateur, I'm on shaky ground teaching anybody about boatbuilding. Nevertheless, here's something I picked up some years in the past, relating to a subject frequently discussed on various boatbuilding fora: Scarfs are superior to butt-joints, right? For me it's more work, but the results are mostly fair, smooth and invisible on painted surfaces. Doing them with a block plane is the time tested, fool proof method. It is almost like woodworking, too, except off course the medium is not wood. So, to me the charm wears off quick. A while ago I built a river dory to the design of Tracy O'Brien. Not my type of boat, but a friend wanted me to do it for him. The good thing about that project was the scarfing jig concept that O'Brien included with the plans: Simple, inexpensive, effective. Home made in less than 30 min. Fits any circular saw. Does up to 9mm ply. So perfect for our boats. I've used the old Version 1.0 for almost a decade now, and it works really well. With a steady hand there's no clean up needed, and the leading edge of the scarf is feathered to nothing. Unfortunately I don't have the original building instructions any more, so these pictures and a short description is all I can offer. Proceed with caution! Go ahead and remove the blade guard completely from your saw. Actually make sure it is unplugged first, then the guard business. Get a carbide tipped 8" blade from the hardware store to replace the standard 7 1/4" blade, or else the jig won't do 9mm ply. Most saws have room for this conversion. Now make the screwed together fence shown in the pics. The angle in relation to the blade is 6 degrees. Rip a 32" long scrap of 'two by fir' on the tablesaw with the blade set at 6 degrees. Cut the piece in half and assemble it like shown with a row of screws, neatly predrilled and countersunk. You now have a 16" long fence, with a tall bevel on the front face. Clamp it to the baseplate of the saw, with the outside corner of the fence just shy of the blade where it meets the baseplate, and bore a couple of holes for #10 machine screws to hold it in place. Done. Use as shown. Go slow and steady with firm downward pressure on the fence. Do only one layer of plywood at a time. Towards the end of the cut with less fence on the plywood there is a chance of skewing the jig, so be even steadier here. Remember that the guard has been removed when handling the saw. Good luck! Jan


-
hi p doug, sorry, didn't notice your question until today. we're in the north cascades, near a town called winthrop. where are you? hopefully closer to navigable water! jan
-
the picture of my shop seems to have had an unsettling effect on certain forum members. how about this picture of an earlier incarnation. it worked well for several years... jan
-
hi, i'm sure you've all seen this stage depicted ad nauseum... just another cs 17 on the way. thanks for a great forum, overflowing with advice and inspiration. later, jan