PadrePoint
-
Posts
809 -
Joined
-
Last visited
-
Days Won
64
Content Type
Profiles
Forums
Events
Gallery
Everything posted by PadrePoint
-

Request for Advice, Coastal Camp Cruising
PadrePoint replied to Don Silsbe's topic in B & B Yachts Forum
Don, Between your plans to sail-cruise with your open boat and both my sons’ interests in camping in a boat, I’ve developed an interest in trying to make my CS15 (Norma T) capable of supporting a small tent, likely in the back of the boat at seat height. My sense on my boat is that, when camping, the mizzen mast could be moved to the forward thwart position to get it out of the way (and both sprits could be raised up out of the way with my extra halyards) and some kind of raising floorboards or system can be devised to “fill” the cockpit area... making a large flat area from the transom to the forward edge of the mid-boat thwart (making a platform about six and a half feet long.) That’s what it sounds like what you are planning to do. I’d like to avoid a permanent rail-support along the longitudinal bulkheads to hold raised floorboards (though that might actually be the best solution.) I’m at least thinking about some alternative approaches. My boat’s in storage right now so I can’t really devise a good plan yet (plus I’m working on my 15’ ski-boat build) but I’ll be reunited with the Norma T in about a month. I’m very interested to see what you finally devise with your Local Honey for your sail-camping adventures. -
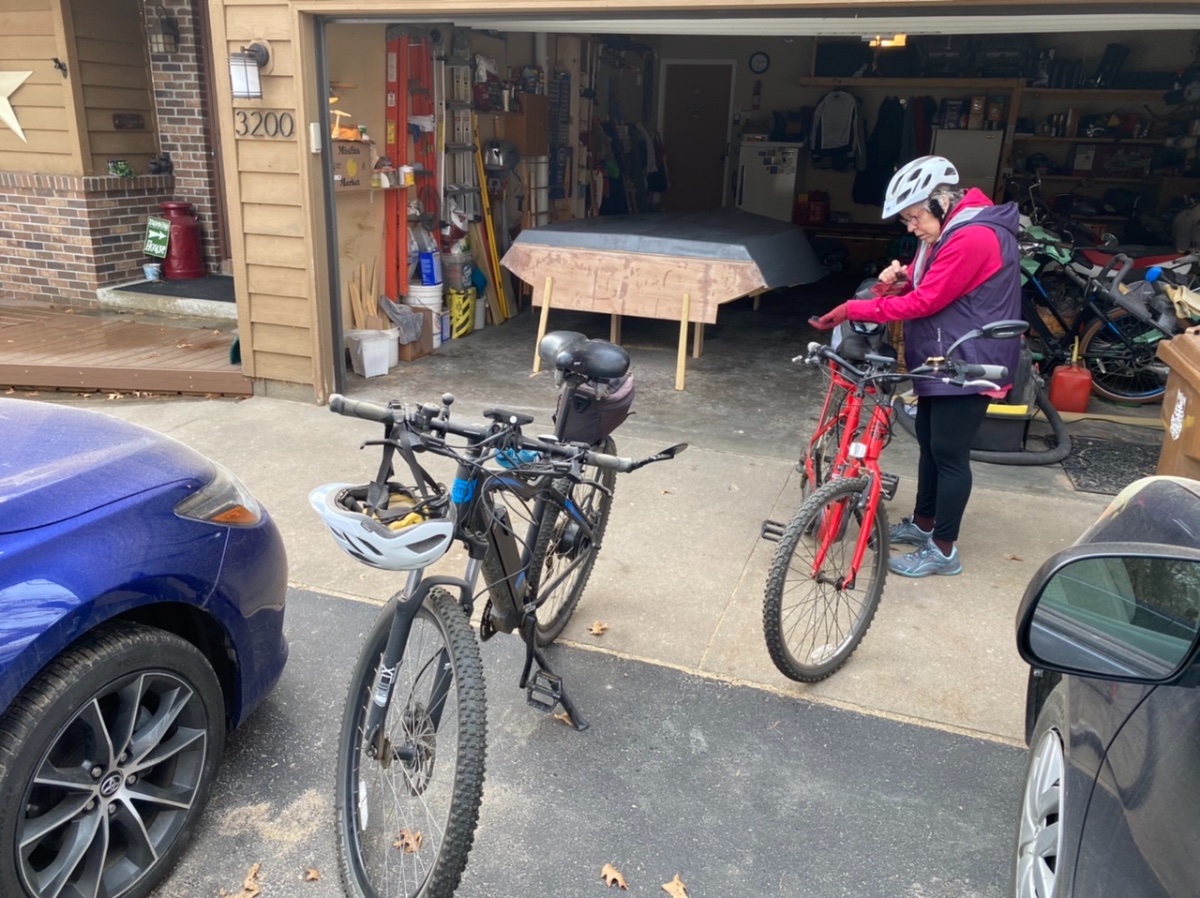
Starting the “Coloring” Process When is the prep “enough”? I decided, when sanding yesterday, that adding another epoxy coat wasn’t going to improve things much for priming... and that the few spots that are a little rough still can be managed with a few coats of primer. SO... the first coat of primer is on. Now it’s a matter of working only a couple hours a day and then just waiting for at least another day. ? So... Sixty plus degrees out today... a new record... a good chance for us to get our bike batteries out of their winter storage place and use them for a little ebike-ride in this afternoon’s sunshine. (Tomorrow is rain.)


-
There is some thinking going on behind those eyes. (My wife loves the photos!)
-
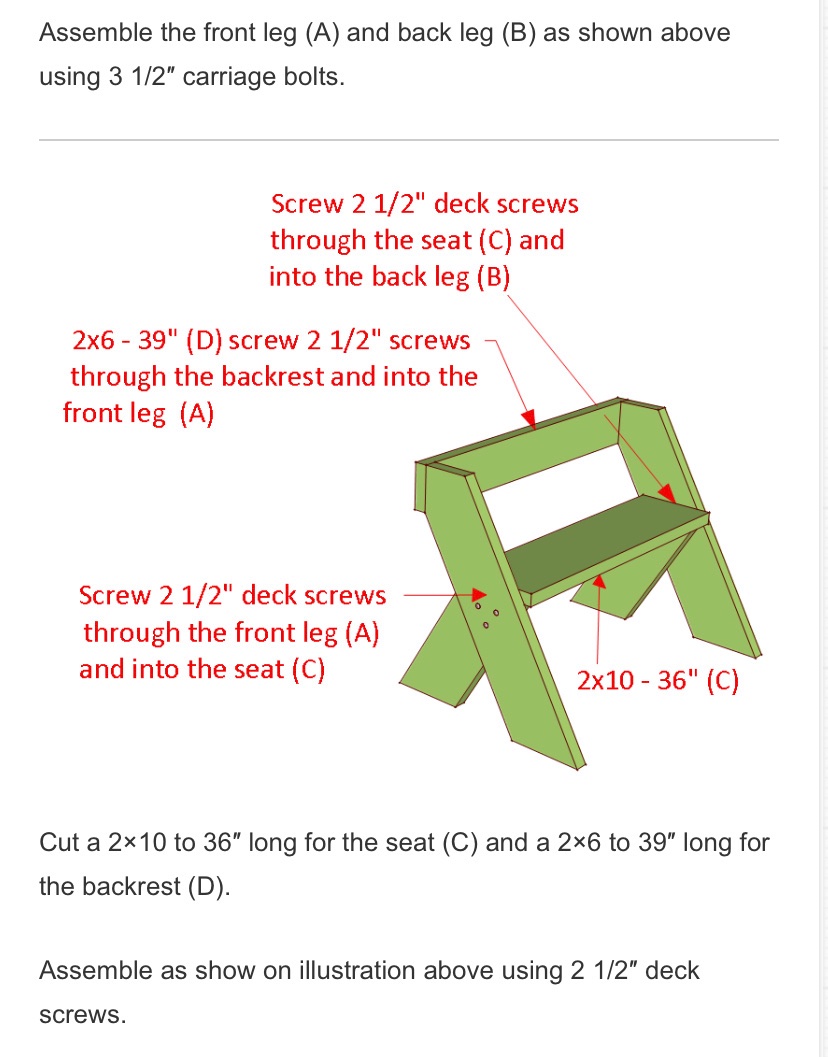
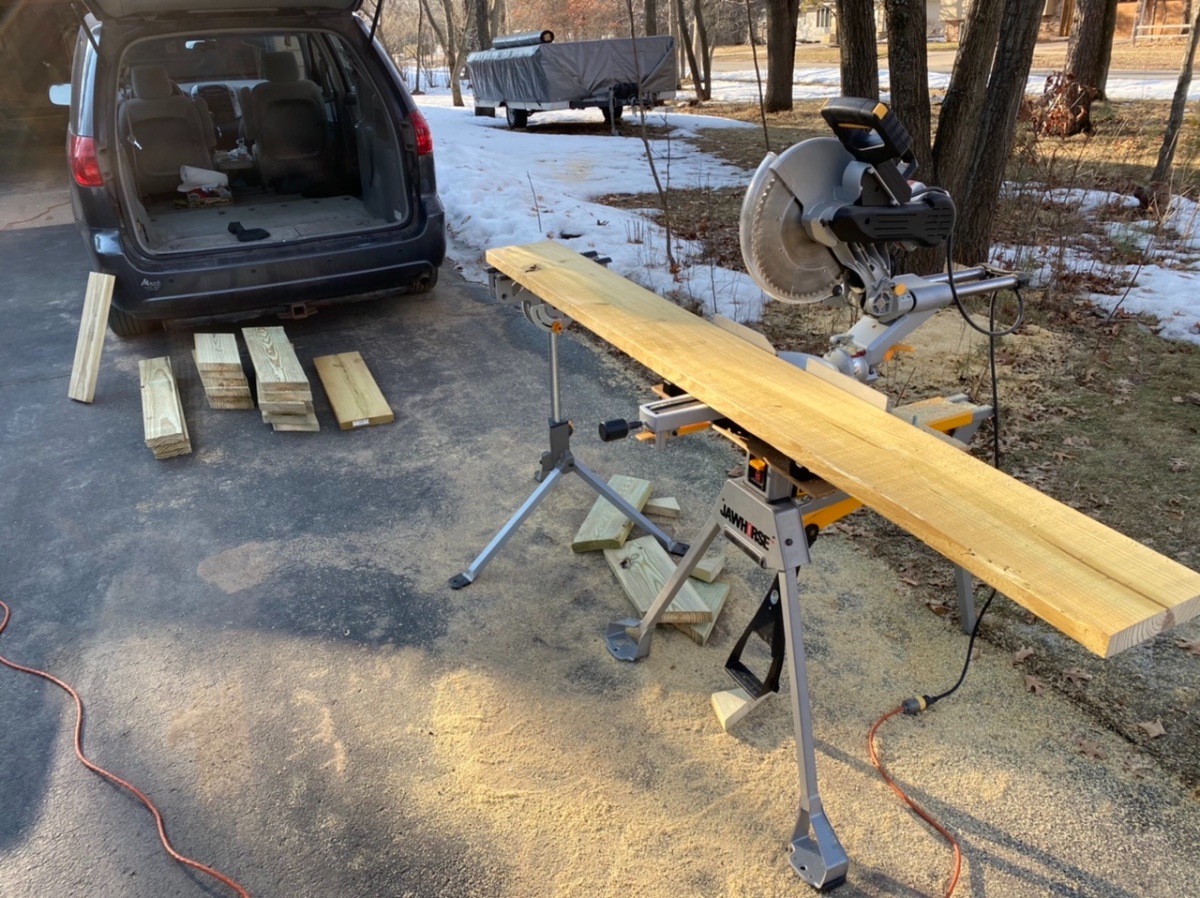
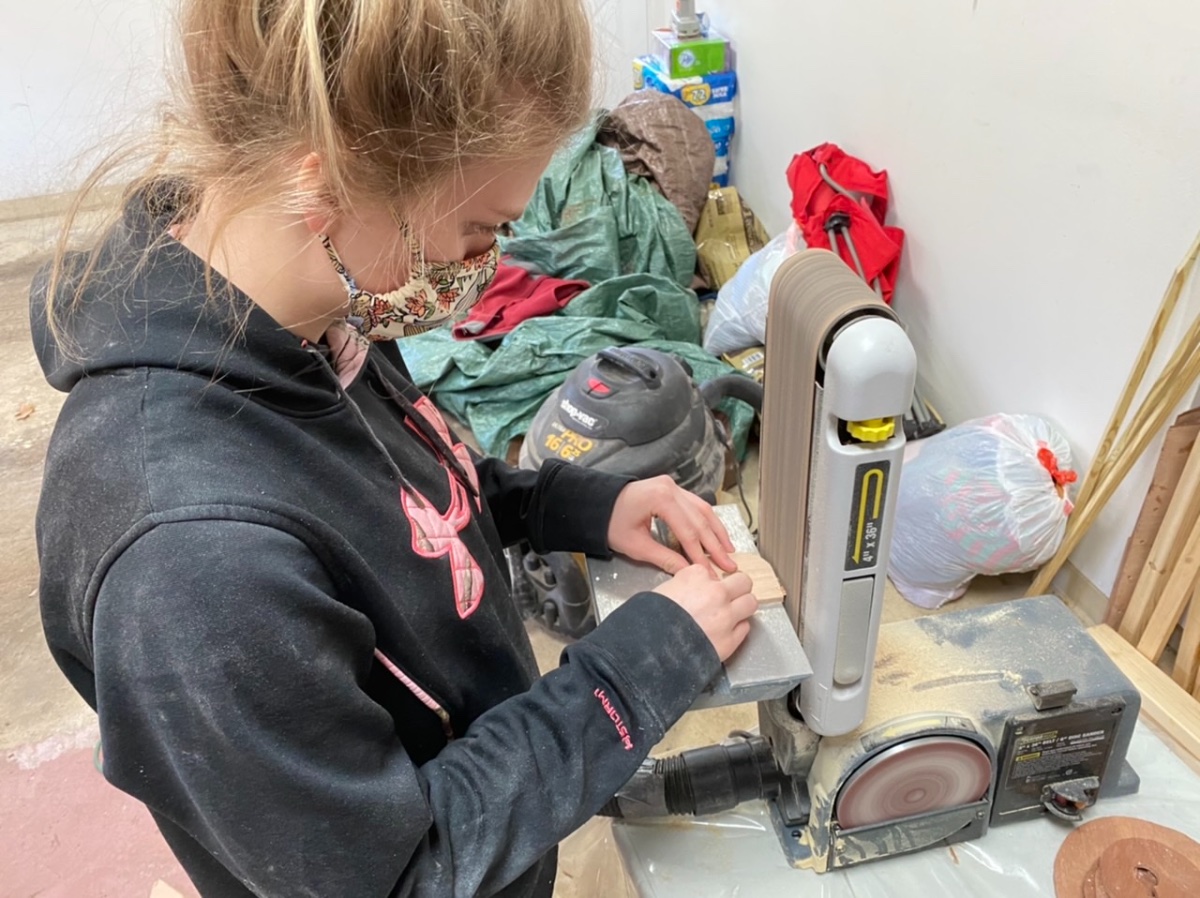
The epoxy is a bit gummy when sanding so I will give it another day or so. Time for a little side project. When I visited my daughter yesterday she expressed interest in having a few Leopold benches to put around her new fire pit. I found a plan on line: Having nothing to do do on the boat today, I went out and bought five 10 foot pressure treated boards to cut the bench parts. I also got the needed hardware. Unfortunately, the 2”x10” board for the three seats was the best of the two dozen boards in a very picked-over pile (kinda rough, but at least straight and not too knotty)... I had to belt-sand the rough seat boards (I’m about to cut the 2nd and 3rd board below.) The other boards looked good. On a whim I had picked up a Lowe’s router and router table set when I began working on my boat. I’ve used it for a number of boat-build tasks... and today, I used it to put nice 1/2” round-overs on all the edges of the pieces that I cut for my daughter’s benches (the edges for the joint areas and the “feet” were left square.) Yes, I’m glad I bought the tool... (it’s good to have projects that “justify” buying tools. ?) And, for your entertainment:


-
That is wonderful, Taylor and Alan. I’m happy to hear this. You guys are great parents and your family is truly blessed.
-
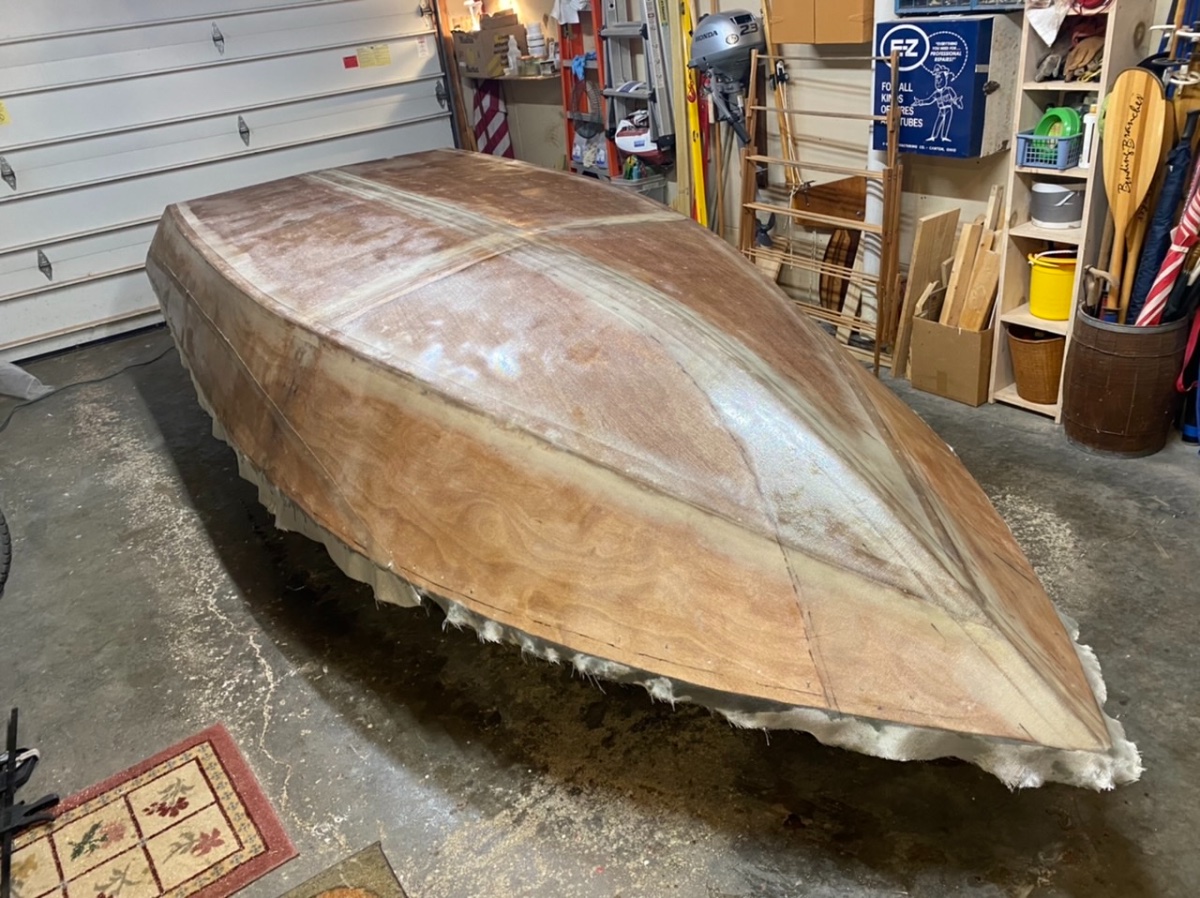
The paint was delivered today. ? I sanded the first fill coat and then applied thickened epoxy to just the glass-cloth overlap areas to even out the cloth edges. Once hardened enough, I will sand everything again and apply another fill coat... then we’ll see if things are ready for primer. The next day: The cloth overlap areas are getting there. (I need to see my centerline — plywood seam — to mark/drill holes to eventually install the skid fin... I put clear epoxy on the spots that let me see it again after the sanding obscured it.) Since I’m waiting for epoxy to harden, my wife and I took a venture downstate to visit three of our kids plus the three grandkids. There was a lot more snow downstate Wisconsin this year than we received 150 miles further north. Even with quite a few warm “melting” days the piles are good sized. Some sidewalk art in the 50 degree sunshine ?:


-
Spindrift 10 Build (by a 9th Grade Girl)
PadrePoint replied to PadrePoint's topic in B & B Yachts Forum
Still prepping the inside of the hull to install the seats. The Wheezer has used my sanding machine a few times and today used a small router for the first time to cut out holes for the five deck plates.

-
I got a first epoxy fill-coat on the glassed hull yesterday, using microbeads to slightly thicken it. I will let the coat cure for another day or so before sanding it and applying another fill coat. The ski slopes will be great today ⛷ and I have some family things the next day. BUT, I got an email this morning about my paint order... it was shipped already (instead of in a couple weeks) and should arrive in three days. That might be a way the company enhances its “legacy” with customers, “ We were able to fulfill your order 10 days early!” ? YES! Onward ho! ?
-
My “ To Glass, or Not to Glass” soliloquy gave me whatever was needed for me to JUST DO IT today. Two shifts of about 2 1/2 hours was what was needed... about 20 minutes per foot. My wife poked in to check progress and snap a shot as I’m progressing to the bow: (I tried sitting on the bucket a couple times to ease the bend-over stress on the back... not really helpful.) Half done... short break for a little lunch: Done: Next will be a couple fill-coats, sanding and paint. I just got an email (while writing this) indicating that my paint order won’t ship until March 12... I was hoping for a bit sooner but I will rearrange to do some other things over the next couple weeks. ? And, at the end of my day I spotted this:


-
To Glass... or Not To Glass (solo) That is the question. I’m ready to glass the hull. I have four pieces cut out that will cover the bottom and sides, with an overlap along the keel and an overlap along about 75% of the side panels. What is on the roll above is what is now left from what my dad brought home for me in 1968 to glass my little 11 foot ski boat. (I only needed less than 25 feet... I had no idea what was still in the roll.) I’ve since carried that roll of fiberglass cloth around around with me through maybe a dozen moves and kept it in various garages and little storage spaces, waiting until I could built this Stiletto. Today , after cutting out the last of what I need for this build, this is what is left of that roll. I wrapped it back onto the cardboard tube. There is less than 4 feet of full-width glass. Doing this big fiberglassing job by myself feels intimidating. My two sons have both glassed several of their canoe builds and my oldest son did the lion’s share of glassing the Core Sound 15 that I built last year. Their time is limited with work and family realities, and I need to decide whether to just do it, or to wait until I can get their assistance (which usually means that THEY do it and I mix the epoxy ?.) SO, ONTO MY DILEMMA: To glass, or not to glass: that is the question: Whether 'tis nobler in the mind to suffer The slings and arrows of outrageous (and messy) boat-building endeavors. Or to take arms against a sea of troubles by getting my sons to help And by opposing solo fiberglassing of the hull to end them? To die: to sleep; No more; and by a sleep to say we end The heart-ache and the thousand natural shocks That fiberglass and epoxy are heir to, 'tis a consummation Devoutly to be wish'd. To die, to sleep; To sleep: perchance to dream: ay, there's the rub (or at least there is no sanding)... That patient merit of the unworthy takes, When he himself might his quietus make With a bare bodkin? who would fardels bear, (I’ll have to look up these words. ?) To grunt and sweat under a weary life of solo fiberglassing in the garage, But that the dread of something... not finishing the boat, The undiscover'd country from whose bourn No traveller (or finished boat) returns, It puzzles the will And makes us rather bear those ills (and tasks) we have Than fly to others that we know not of? Thus conscience (and trepidation about solo fiberglassing such a large area) does make cowards of us all; And thus the native hue of resolution Is sicklied o'er with the pale cast of thought, And enterprises of great pith and moment With this regard their currents turn awry, And lose the name of action.--Soft you now! The fair Ophelia! Nymph, in thy orisons Be all my sins remember'd! (Hmmm... ? not sure how to turn these words for my little soliloquy... I’ll just leave ‘em. ?) Ok, ENOUGH. Either fiberglass the hull this weekend, now that everything is set, or wait until your one or both of your sons comes up to help. We shall see what the WILL ends up doing.


-
Ready to Glass the Bottom Not a lot was done in the past couple days but I did sand everything sufficiently and cut two large pieces of cloth from the roll of fiberglass cloth that my dad brought home for me in 1968. From that roll I glassed the bottom and sides of my high school build, an 11 foot Glen-L TNT. By the way... as of March 1 (2021) the Glen L business owners are retired and Duckworks has been selected as the company to receive the Glen L plans and parts business. (Announced just this week.) I don’t know HOW MANY hours I spent over my life looking through their catalogues and boat descriptions... but it was always fun to do. I have carried that roll of fiberglass cloth ever since my TNT build in 1968, always expecting that I’d use it SOMEDAY on a Stiletto build. I guess, as I’ve said before, if I have a life bucket-list, this build is it. I believe the roll will have just enough cloth to glass everything I want to glass on this build. It has been a 53 year wait... but at last it’s happening. ? First piece is cut: Oh, and I also ordered paint for the boat. I might go ahead and paint the outside of the hull before flipping it over.


-
I put “wide” tape onto the two butt joints and two scarfs. Just waiting for the epoxy to harden a little more before sanding everything for the fiberglass.

-
Spindrift 10 Build (by a 9th Grade Girl)
PadrePoint replied to PadrePoint's topic in B & B Yachts Forum
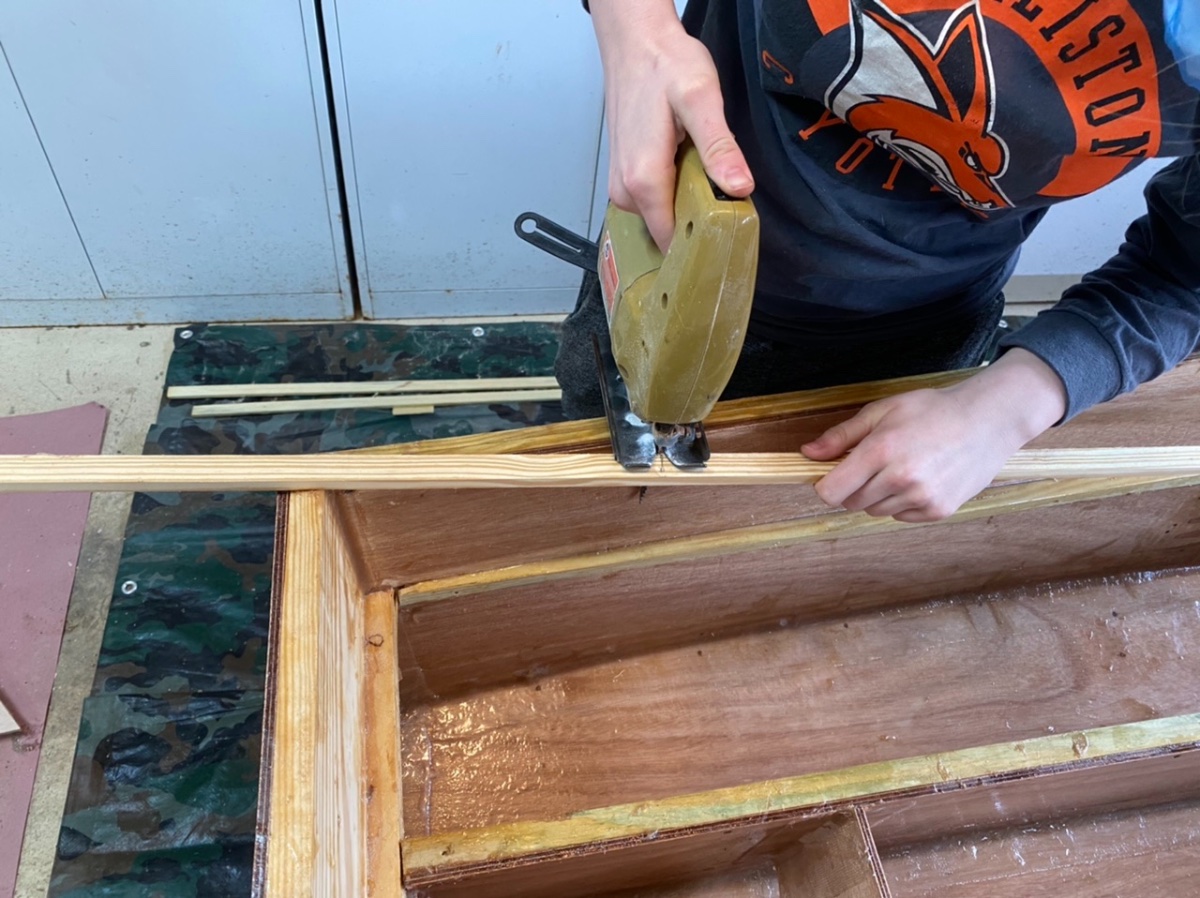
The Wheezer’s ankle sprain is doing better. She told me last night that, after her practice at school, she could work anytime after 8:15 am. In my retired days, that’s barely into my first cup of coffee. ? So, I “punched in” this morning for a couple/few hours of mostly watchin’ the kid do some work on her boat, pitching in as needed on occasion. First order of business was to make three more backing rings for the deck plates going into the sides of the flotation tanks (I made the first two.) The task gave The Wheezer a chance to cut circles on my band saw, kinda tricky to stay on the line... ...and, using my drill press with a drum sander, to ream out the flat spots on the inside cut of the ring to better the fit: She is not hesitant to use machines. (Yep, she is thinking about hair and clothing and moving machine parts.) We installed the backing rings into the sides of the tanks and will cut the openings with a router after the glue hardens. We turned attention to the seat tops, sanding off a few areas to make them fit better. The kit is coming together nicely. But, remember a while back when we tapered the wrong end of the seat stringer and put the mistake to the aft end instead of making an entirely new piece? Well, it is time to fix it, using a couple pieces from the scrap we had cutting the stringers. (You can see he taper mistake on the aft end of the stringer.) That thinned section of the seat stringer is now reinforced with a couple glued in strips. The Wheezer’s ankle began bothering her, so it’s time for me to “punch out.” ? I’d work on my ski boat today but I need to let epoxy harden before sanding and preparing the hull for fiberglass. So, my day is kinda empty now. Maybe some reading?? Edit: This afternoon I skimmed through Roger Barnes’ book The Dinghy Cruising Companion that came yesterday AND I watched his 2 hour presentation at Off Center Harbor’s Worldwide Classic Boat Show (virtual) going on right now ($5 entrance... quite a lot of show for very few dollars. ?) Link to Boat Show: https://www.offcenterharbor.com/2020/09/18/worldwide-classic-boat-show-announcement/


-
Spindrift 12 #1275 - out haul line anchor to boom
PadrePoint replied to J. Cote's topic in B & B Yachts Forum
Graham, I always find your explanations helpful and interesting. As I encounter them in the forum I try to keep track for future reference when I can actually get back into my CS15 (when the white and ice goes away). In this case, I’ll be sure to pass the info along to the kid-across-the-street who’s building herself a Spindrift 10. Thanks. -
Spindrift 12 #1275 - out haul line anchor to boom
PadrePoint replied to J. Cote's topic in B & B Yachts Forum
From Spindrift 10 plans... it looks like an eye strap could anchor the blue out haul line on the port side. The red line is an extra loop to pull straight down on the clew. Does this help?
-
Chick, I had just decided to delay glassing the hull for a week or two. I noticed today a slight dip in a section of bottom planking (about 5 feet in front of the transom) that I’d like to fill in. I had a similar spot in the hull of my CS15 that I was able to fill in and fair to true. And, I guess that I’d like to do a number of other “finesse” things. My son (who will help me with fiberglassing the hull) only has a few days available in the next weeks and I was shooting for the day-after-tomorrow option... I’ll now go for the next one down the road. So, with that delay, and your advice about the joints, I will place a layer of tape over each joint before I cover everything with glass. I’ll now have time to get things to a better place before fiberglassing the entire hull.
-
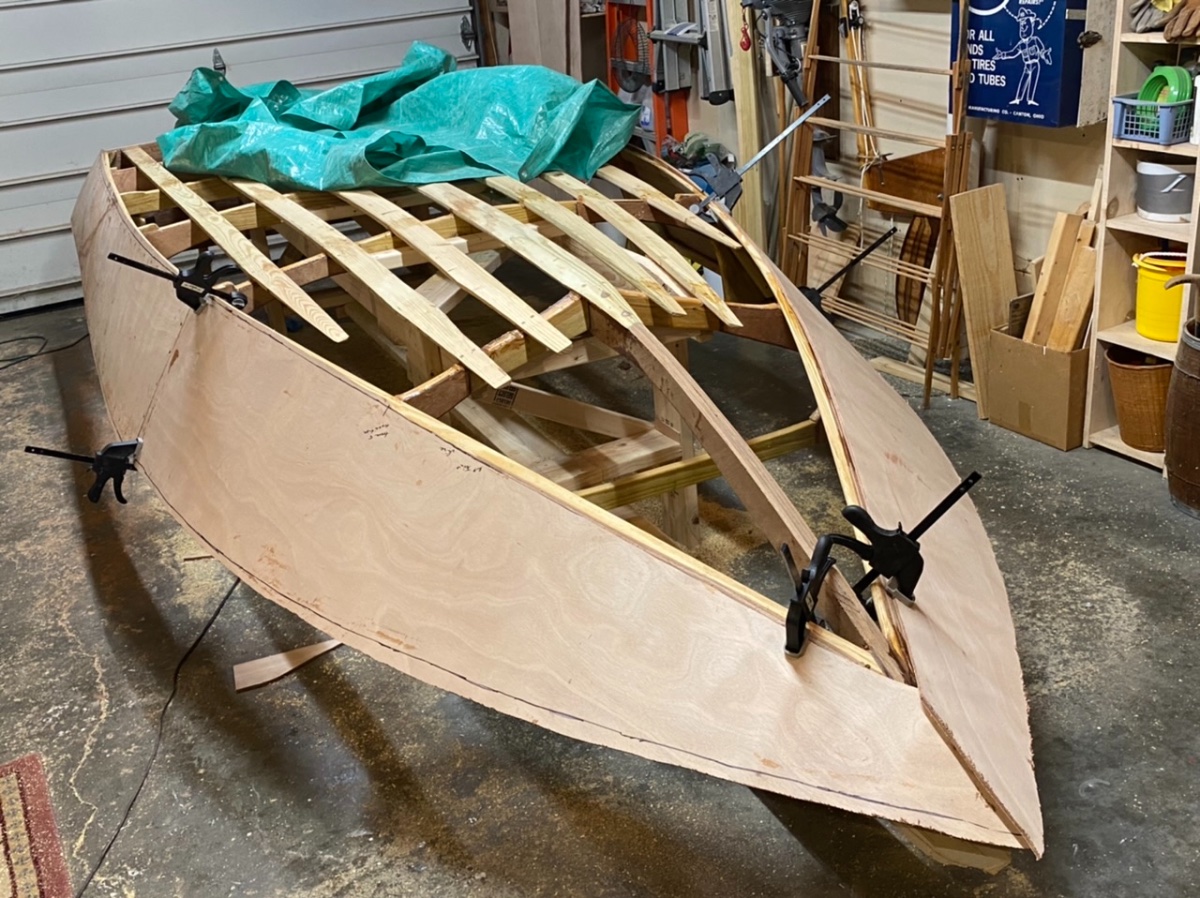
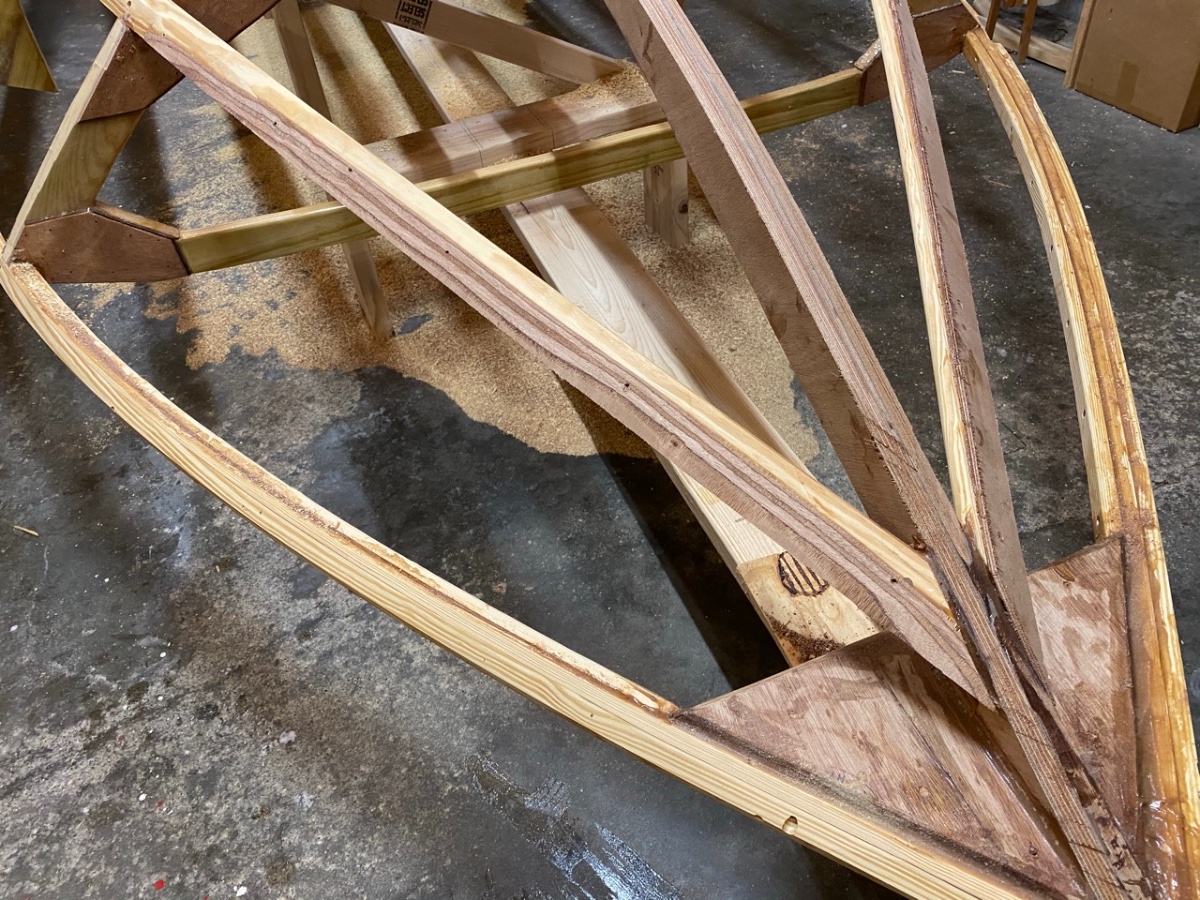
Ready for fiberglass - after some sanding I lost some days this week with back spasms (from bending over so much installing the plywood?). Man, those are so debilitating. I looked ridiculously pathetic hobbling around a short walking-circuit in the house to try to keep the back muscles from seizing. (I know... too much information.) But, I’m back at it. I sanded my scarf error and added some filler in the “low spot”. The joint is now smooth and the lines flow well. I decided to not glass-tape the scarf and butt joints. I’ll reinforce them from the inside. When I put in the 700+ screws installing the plywood (yes, I decided to count them ?) I sunk the screws a little into the ply, meaning that I needed to fill all the holes: My 38,000 btu Mr. Heater (above photo) has done a nice job bringing my garage to 50 or 60 degrees for epoxy work (and comfort) even with the sub-zero temps. A look at the fixed scarf joint: Tonight, I put fiberglass tape over the three longitudinal seams, with two layers on the keel. Here are the seams now taped: I’ll let the epoxy cure for a few days, then sand everything so that my son and I can glass the hull on Sunday. Yup, he’s gotten to be effective at glassing large areas.


-
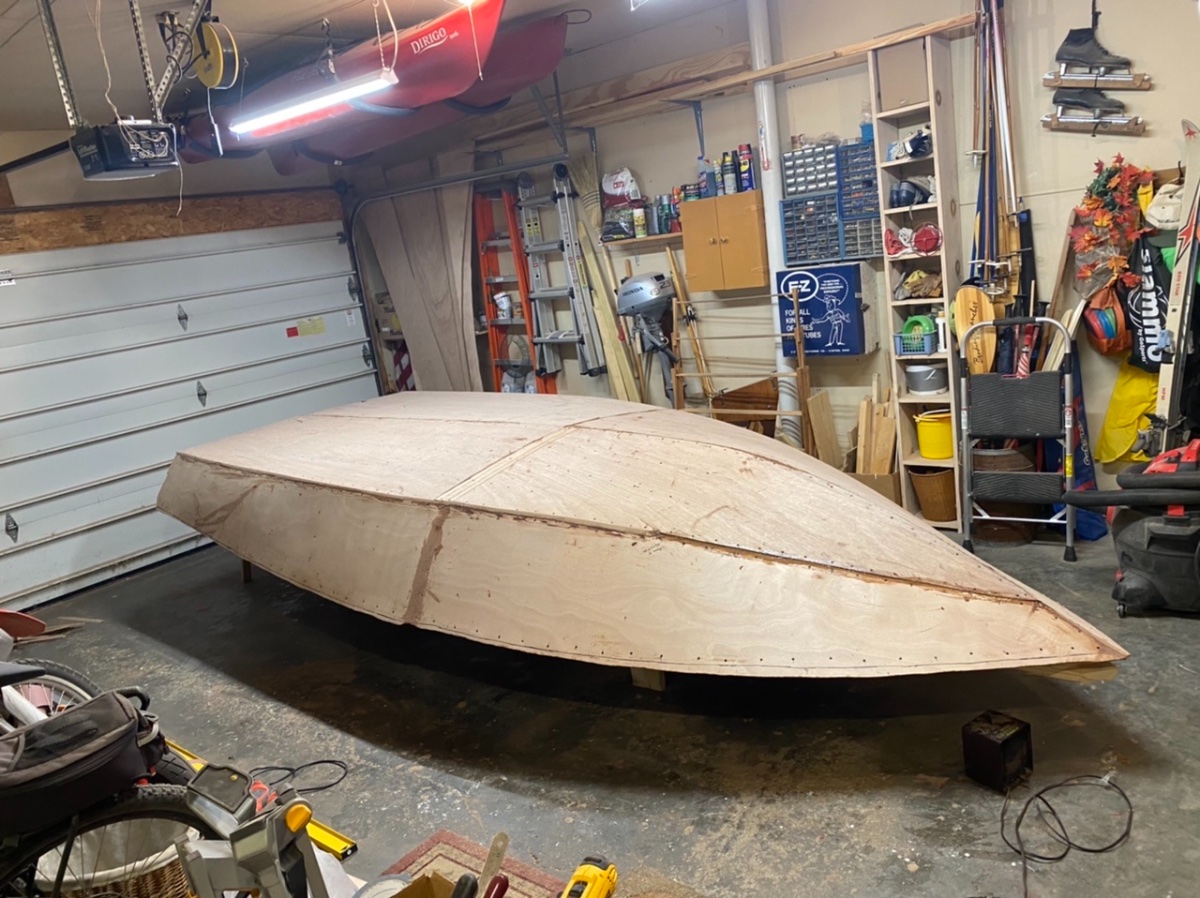
I Have a Hull!! Another sub zero day out there... but one in which I cut, fit, and installed the two bottom pieces into the bow. So... I have a hull. ? Ok, one goofy error... I cut out the second bow piece and checked the fit. I suddenly realized I had cut it with the scarf DOWNSIDE UP... aaaurgh! ? Well, I’ve always enjoyed working with wood because it can be very forgiving and “full of grace.” I decided that I could go ahead and install the section it as is, mistake and all, and that I would be able to plane down a hump and fill in a low spot that might develop from the slightly mismatched scarf joint. I’m confident I can make the hull-lines true and fair. I planned to put fiberglass tape on all of the joints before fiberglassing the hull, and also tape the inside of the scarf joints. (I will reinforce the “mistake” scarf on the inside if I think it needs it.) Ah well, this is the biggest error I’ve made and I don’t really rank it as a significant mistake to the Stiletto build. I’m happy to have reached this point a couple weeks before I had even planned to begin working in my garage. ? Now, I’ll take a day or two off to let the epoxy harden before preparing the hull for fiberglassing. (And, I’ll be out of town a few days next week.)


-
Spindrift 10 Build (by a 9th Grade Girl)
PadrePoint replied to PadrePoint's topic in B & B Yachts Forum
A little setback. The Wheezer sprained her ankle and needs to stay off it for a while. ? Bummer. We’ll pick things up when we can. ? -
Side Planking is In / Now for the Bottom Planking I missed working yesterday... two of three cars gave a bit of grief and we went for COVID injections. But today is productive. Outside temps aren’t getting above zero so far. I installed the front two pieces of the side planking this morning, making sure one side overlaps the other in the bow. The butt joints in the middle of the side planking worked well on each side: And now I begin fitting and installing the bottom planking. I asked B&B Yachts to put scarfs onto four ends of three sheets of 9mm plywood that I bought from them. I REALLY did not want to make them. (One scarf cut is visible in the photo.) I knew I would need a little patch for a notch needed to get the plywood into my van (for the 1,200 mile trip home from B&B Yachts. No problem since it is right on the transom. The piece of plywood leaning on the wall will provide the two front pieces for bottom planking. It is scarfed on both ends to provide good joints. ? I got to use my chalk line (not a frequent thing) to mark the battens for screws. (A bit faint... need to find my chalk bottle sometime. ?) Installing the two 8 foot bottom pieces is the biggest single use of thickened epoxy (glue) in this build project... 40 pumps each of resin and hardener (LOTS of wood dust thickener.) And at least 300 screws. While driving screws, I was recalling my high school boat build. I had my dad’s 1/4” one-speed drill but it could only start screws... sort of. I needed to finish driving them by hand (I developed impressive forearms). My dad had an old shoulder drill the I sometimes used to drive screws into the boat... but my screws were all slotted and the bit constantly popped out to gouge the wood. Sure is nice having my current tools. ? My dad’s shoulder drill was sort of like this: Speaking of “gouging” I took a couple little gouges out of my fingers when the screw I was starting toppled. To keep from dripping red-stuff all over I went for a couple bandaids. I can NEVER seem to find anything other than kitty/dog bandaids or some other cartoon (an effect of having grandkids around... they look for reasons dig out a cute bandaid for an “ow-eee” when visiting. ?) A true sign of a boat-builder at work... with grandkids. ? So, the aft sections of the bottom planing are now installed and I will cut out the two bow area bottom planking pieces from a single pre-scarfed sheet of 9 mm plywood (using a paper template I made.) The install will be tomorrow. I will need to trim all of the pieces as needed.


-
Thrillsbe, I added a 1” (5/4”) blocking piece to each side of the frame where the butt joint meets. I’ll glass the outside of the joint before glassing the hull.

-
After doing a bunch of little things I installed the two aft side panels and cut out the forward two panels. Tomorrow, I will make the butt joint of the two side halves fit a bit closer (Maybe shaving about an 1/8th inch or so is all that’s needed.) And, I will make the bow joint fit together in an overlap joint. That will take some time to get it the way I want. I’m glad that panels I cut for one side are fitting identically to the other; the hull is symmetrical. ?


-
I’m a Happy Guy Today I have the transom cap installed and have planed both chine logs and sheer clamps to receive side & bottom planking. ? The temps were around zero all day (-20 at night) but I could easily keep my garage at 50 or 60 while I worked by occasionally turning on my propane heater. The 1/4 inch ply strips that I attached to the chine were easily shaved to a nice wedge such that the side planking will seat to a flat surface as needed. So, having ALL the framing/fairing is finally complete, I decided to fit the first 8 foot piece of side planking. I used paper to make a template (a new process for me.) I scissored out the template, placed it on a partial sheet of 1/4 ply to trace an outline, and cut it about a half inch or so outside the line. Cutting 1/4 inch ply with a saber saw (and not really needing to be careful) went very quickly. My router should be able to trim the excess quite easily after the panel is installed. See that little square notch in the ply? I needed to cut that to clear the driver’s seat support in my van... another little thing that I wasn’t sure how it would work out. I was hoping that I could make the side planking meet for a butt joint right on frame 4 (I’ll also add some blocking to the joint area after I flip the boat.) Since I had to cut 3 inches off the plywood sheets to fit it into my van, I wasn’t sure if things would work precisely. Plus, having reduced the boat to 15 feet (from the plan’s 16 feet) I am able to make two ply pieces fit all the way from transom to bow without having to add a third piece. I also checked the piece for fit on the other side. Yup, it fits. Making the second piece will be a snap. Things look like they are coming together quite nicely... as I had hoped. ? So, I finish the day a very happy guy as I enter this next phase of the build. I might be able to install all of the side planking tomorrow and perhaps trim the excess ply in preparation for the bottom planking. ??


-
Writing this as the Super Bowl begins: Kinda short on boat-building motivation today. (Does below-zero temps contribute to that?) I’m planing/fairing the longitudinal members for the side and bottom planking. I might enjoy fairing less than sanding. ? Have I mentioned yet how much I appreciate my new Craftsman power planer??? ? I knew I’d have a little problem to manage with the chine logs in the bow area forward of the last frame. I just could not twist them sufficiently when attaching them to the stem to make a flat surface for the planking at that point. This picture is of the stem (bottom), chine (middle) and sheer (top.) The chine needed to be twisted more on the right side of the photo. So, what to do? When I made the chine/stem joints, I decided I would add a short “wedge” layer to the chines to make up for the insufficient twist. So, today, I glued on a strip of 1/4 inch plywood to that forward section of the chines. (It’s satisfying to use the 3 inch strips that I needed to cut off the full length plywood panels in order to fit them into my van... when I picked up my wood from B&B Yachts.) I will even up the edges when the glue sets and use my planer to shape the wedge... sort of like making a scarf, I suppose. I think 1/4 inch will be enough. I also glued in a third layer to the inside of the sheer clamp forward of frame 5 since most of the sheer clamp will be shaved off with the more extreme fairing needed in the bow area. I pulled the tarp over the newly glued bow area and placed a small space heater to help things cure. Tomorrow, I can complete the fairing and start fitting/installing the side planking. ?. It will be a major shift in the build process. (OK, it was cool that the “Gronk” just made the first Brady-pass-touchdown of the game.)


-
On Super Bowl Sunday, my daughter (a long time musical theater director/teacher) sent out this little humorous video: https://youtu.be/nMNHH4clmP0 It was nearly 20 degrees below zero last night... but my new propane heater still lets me work in my garage... well, maybe I won’t epoxy for a while, but there’s plenty of other stuff I can do. I’m planing and touching up all of the longitudinal members to align things for the side planking... and soon after (hopefully) the bottom planking... maybe this week?