PadrePoint
-
Posts
809 -
Joined
-
Last visited
-
Days Won
64
Content Type
Profiles
Forums
Events
Gallery
Everything posted by PadrePoint
-
Lots of details and ideas. And, nicely done. (It’s in Youtube, in the “B&B Yacht Designs” channel.)
-
Did you inquire with B&B about what a cnc cut kit might be (with shipping)? Who knows, it might balance up well… if a kit is available. Emails are answered and a phone call might be better. https://bandbyachtdesigns.com/flyfisher
-
Had to look up buntline hitch. ? https://www.animatedknots.com/buntline-hitch-knot
-
Yep… still 20 minutes left to watch. Fun to see Avocet referenced. Richard had some great innovations to the rigging and did a beautiful job building the boat. I have great appreciation for having the chance to own it. Now, for more successful sailing. ?
-
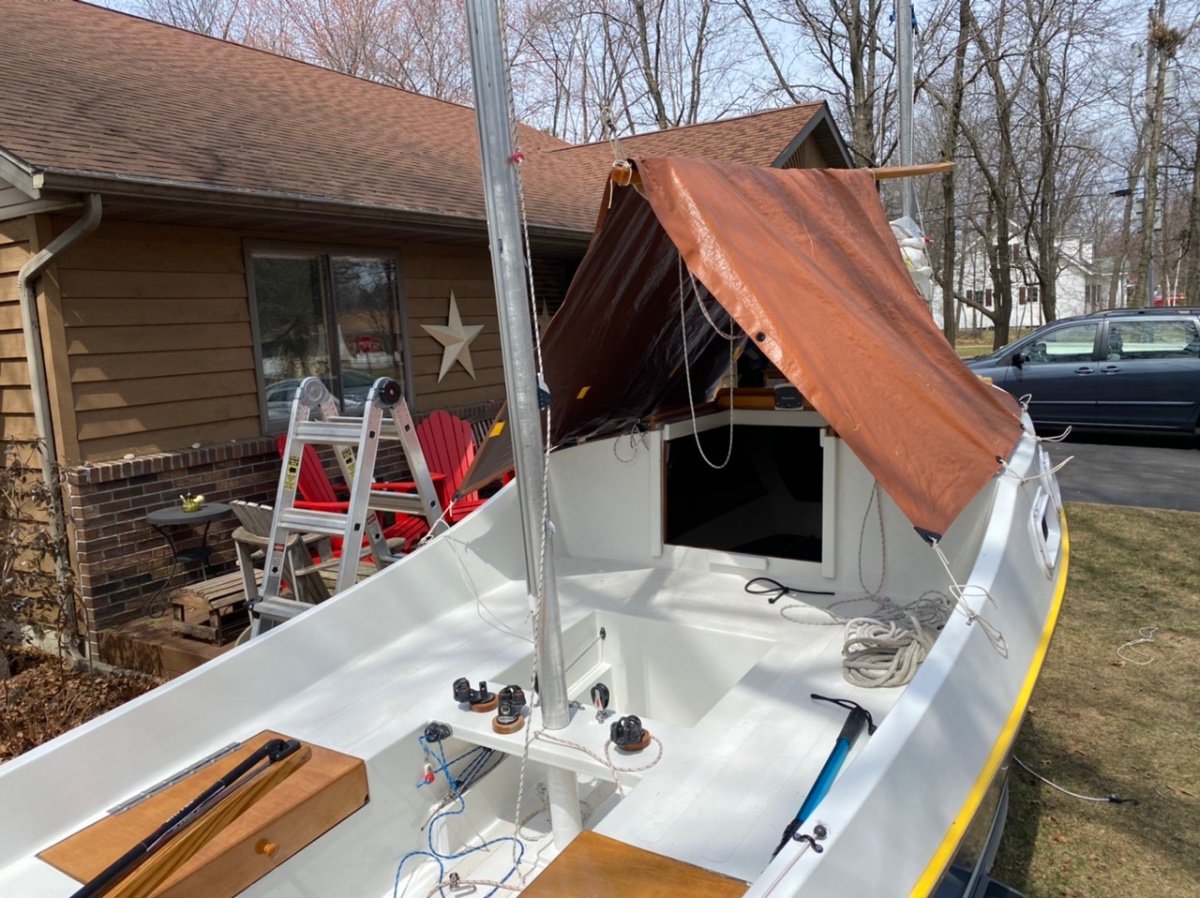
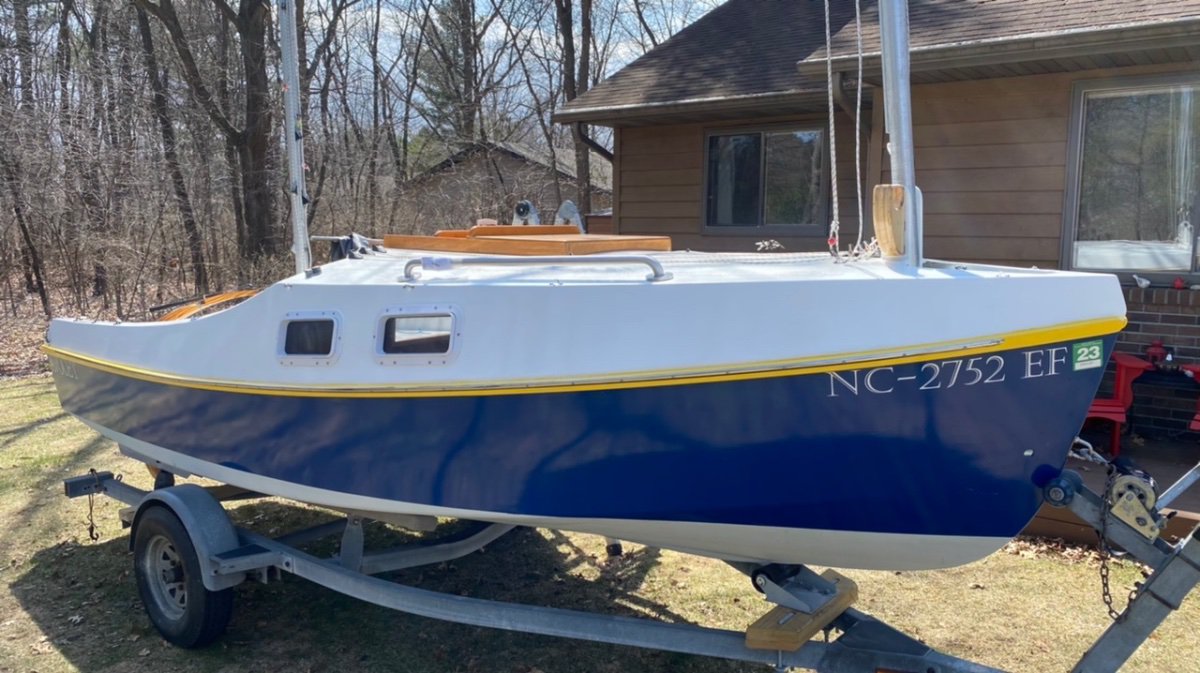
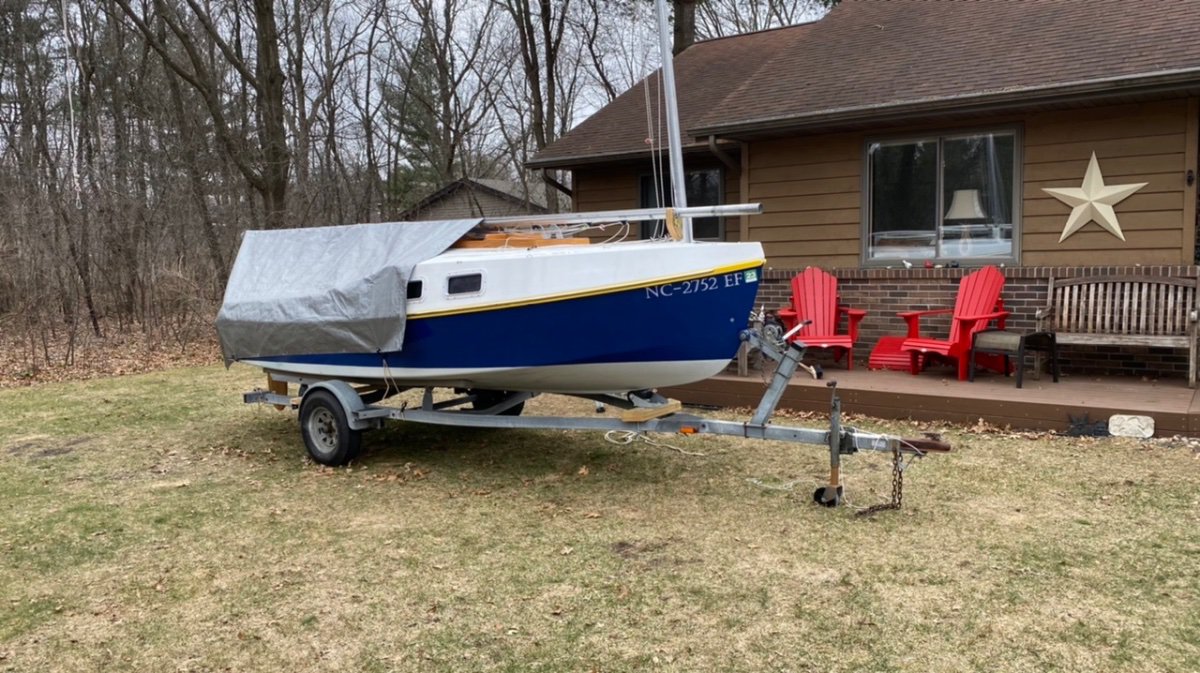
Some Catching Up in the middle of April, I got Avocet out of winter storage and moved it north to my house. I also picked up Norma T with a second trip downstate. (Photos are the same spot at a rest area.) With a lot of time being away in April, May and June (camping with family — once in snow — and vacationing with my wife) along with working to finish building my ski-boat, I didn’t get Avocet out onto the water to sail more than a couple times. I felt like I needed to become more familiar with Avocet and develop techniques and skills in readying the boat to sail, raising the masts, dealing with the 20+ lines that are part of the boat’s setup and rigging. I want to be able to go solo on everything: setup, launching, sailing and loading back onto the trailer. I asked my wife, Joan, to come with me on my first non-sailing attempt at launching it off the trailer into the water. She mostly observed and held the lines. Oops, I didn’t close the Anderson bailer in the ballast tank. Sigh. A mistake that will help me remember that detail in the future. I’d rather not learn EVERYTHING through blundering. ? Since Avocet will be in my sailing club’s boatyard until fall I wanted to figure out how to effectively cover the boat. A rule of the boatyard is that masts must always be up (part of the agreement with the dam/utility company… so the boatyard wouldn’t become a “storage” lot… as I understand.) How ‘bout if I had the main mast standing and had the mizzen mast horizontal on cradled to support the tarp cover? Can I get by with that arrangement? I built a removable cradle for the side of the main mast’s tabernacle and then turned a 3’ wood upright that fits into the mizzen step and added to it a double cradle to hold both masts for transporting. It’s similar to what I did for the Norma T. With the main mast upright I now have a solid ridge for tarp covers. Here, both masts are in place in the cradles and tarps are secured — the boat was ready for our month-long vacation — but this is the idea I have for a cover while in the boatyard. I “sailed” in my yard a number of times this spring to become more familiar with everything. Again, lots of lines to coordinate and remember how to get in place. One technique I figured out: I found I can use the main snotter attached to a rope going to the front of the trailer to hold the main mast securely upright while I go below to place the nut onto the mast bolt. The bolt is removable and goes from the anchor well through the bottom of the mast into the cabin to receive a nut. I prefer to have the mast bolt permanently fixed into the bulkhead in a way that it fits right in to place when the mast is raised. The nut for the bolt is then placed from the anchor well. This would avoid going into the cabin, leaving the mast sort of “on its own” while I place the nut. Not sure whether I will change it. The point is that even in this arrangement I can quickly do this “2 person” job by myself. Crawling around on the cabin roof felt insecure even while on the trailer, let alone on water and waves. I installed some stainless grab bars onto the cabin. It feels much better moving forward on my knees while using these secure handholds. I had found a brown tarp in the boat. The builder, Richard, had begun fiddling with making a tarp-tent for the boat. I noticed eye straps on the hull and matched lines on the tarp to them. There is also a line on the mizzen mast that connects to a short line at the aft end of the main sprit. Maybe this is what he had come up with. Since the tarp covers the companionway and some of the cockpit, it might be a useful thing to have available while camping aboard. At the end of May, with the lake water not so frigidly cold, I finally challenged myself to take a couple solo sails for a few hours. Winds were calm and everything went well. I bought a Honda 5hp outboard this year and really like having it for Avocet. Meanwhile, I also helped The Weezer this spring (she is a now 10th grade girl across the street) finish building and rigging her Spindrift 10, built from a kit. I just heard from her that she now has a trailer and she had taken it out once while I was on vacation this month. I’m looking forward to seeing what her boat is like on the water. She grew up a lot during the time of this whole build project, she’s even driving now. The Weezer essentially did all the work as I showed her how to carry out the building tasks. It’s a great kid-project and it’s something she can always be proud of accomplishing during high school. That’s all for now. Next, I’ll post a “report” about my third sailing of Avocet, this time with my wife aboard to try out the boat for the first time and to experience her first race with my sailing club (a VERY friendly group.) No, it didn’t go so well but had a “comedy of errors” quality. ?


-
Andy, more to ponder… You might consider going to (or riding with me) to the October 21-23 Messabout in North Carolina to see boats first hand, see the B&B business, and chat with the B&B people. A good number of builders will be there with their boats. Just an idea. Ted Oh, and I’ll order some skis soon from Shaggy’s. ⛷


-
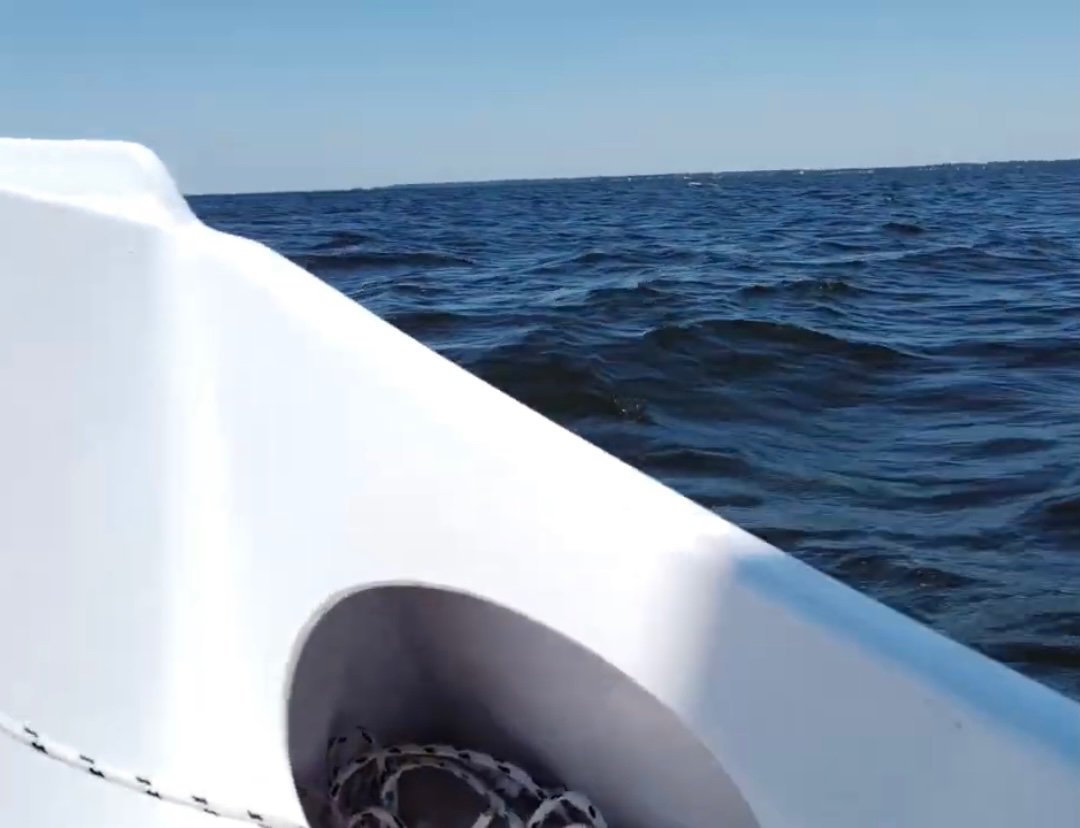
Nice video. And nice catch of the drone. I haven’t tried flying mine yet (bought one last year on a whim) but will begin once I’m home from this vacation. Seems a bit nervy to fly from and back to a moving boat… but if I can develop some skill with the controls… maybe. At least it’s proven here to be a possibility. ? From what I can see the boat looks well built with some great extra features. I caught this glimpse of a cutout in the coaming… very handy looking for tucking things away. And it looks like it is blocked off from the rest of the coaming to preserve flotation. (The best snapshot I could get.)


-
Andy, I can’t think of a witty, humorous, sly comment for ya on this. I really like this Core Sound version for a number of reasons… which you cite. A kit has been made and successfully built into a great sounding open cockpit sailboat in a 20’ version… and perhaps soon a 17’. It takes some time and effort (maybe even contributed by family members??) to assemble a kit but it could be worth it for the end result. Just sayin’. (And yeah, the “Lake Charlevoix cruise to pick up skis” idea in August before the Traverse Bay Messabout just might happen… Shaggy’s annual ski sale is receiving orders for the next couple weeks. ?)
-
Andy, I know this is a B&B forum. On the other hand, I really like the idea of what seem to be quality skis produced by a small self-starting talented company with competitive prices for their great products… like what’s offered by B&B Yacht Designs.? I met and spoke with the “dad” guy at January’s demo day. He set me up with a pair of Ahmeek 95 skis (I think) which are so totally different from my own: Head World Cup Rebels (slalom), 165 cm with 11 meter sidecut… kind of a sport car or go kart type ski. I really like them, but in powder I sink… and stink. The Shaggys skis I tried felt really stable and a little slower to turn, but a nice-feeling effect… sort of like my ballasted Core Sound 17 compared to my CS15… (thought I should get that in for the sake of the forum ?.) And, it’s a great idea that you offer on sailing Lake Charlevoix to pick up the skis… quite a temptation, for the experience and the story. ? I might just try and arrange that as part of my August Michigan Messabout. So, Don, interested in doing Lake Charlevoix before Traverse Bay?? I hope to sail a bunch of various and interesting lakes this year (like Lake Charlevoix) even though I’m not sailing at ALL this month (family and vacation time.) I’ve sailed chartered boats a few times on Lake Tahoe some years ago (swirly winds) but really didn’t like the costs. I also took ASA 101 and 103 courses here on Lake Tahoe.) When we’re here at the Tahoe Ridge we usually hike. This is a shot from today’s venture, atop Round Mound… a “mini-mountain” on the southeast shore. ?

-
Andy, It looks like you are a skier… with Shaggy’s skis!! (I’m a life-long skier.) I tried a pair at a demo day last season and might just buy a pair when I come over for the DCA Messabout. So… do you like them?
-
Hey… this first attempt might just work. ?
-
Yes, because of a substantial increase in members from the US and Canada, the DCA created a new region for North America… I guess a “continental” sized region. It’s recognized that the North American region would develop more localized areas since the likelihood of my taking my boat from Wisconsin for a Texas sailing event is not real high. A Facebook group has been created to help organize events and communicate called Dinghy Cruising the Americas with the same acronym DCA. Check it out here.
-

Spindrift 10 Build (by a 9th Grade Girl)
PadrePoint replied to PadrePoint's topic in B & B Yachts Forum
Heading out for a month’s vacation. Today was my last chance to help The Weezer get her boat ready for a first sail. (She just completed 10th grade.) Still a few things for her to do: assemble a trailer kit, place the sail battens, install daggerboard bungee, practice and make some “tweaks”. (A reefing cringle wasn’t included in the leech of the sail; something to figure out when I’m back. Plus, she’s missing a part for the gooseneck that connects to the sail tack… it’s tied for now.) I look forward to heading to the lake with Norma T when she takes THE RITALOU out. ?
-
October 21-23?????
-
I see why you find the new SR20 design an attractive model of Core Sound. Ya know, there might be folks from whom one could borrow part of your flotilla for this kind of family adventure. ?
-
I posted on the Dinghy Cruising Association Facebook page and they picked it up for their recent journal. Perhaps it will generate a bit of new interest in B&B offerings. Dang, just realized “B&B Yacht Designs” isn’t referred to… the second paragraph and more was not included… Oh well.

-
It must have worked for you, Steve. It’s a win. I had used a heat gun a bit on one of my floats, got distracted for a moment, and kind of made a dimple (The foam semi-melted some at that spot… aieee…) The wonder of epoxy and a few layers of glass material fixed it. ? There are plenty of variations on getting a job done. I often find myself pondering how to do something and come up with all kinds of plans or approaches. Yes, I sometimes use my “pondering” as a means to put it off the task for a while. ? But then, ultimately, I simply have to choose to begin (sometimes with significant trepidation.) In the “doing” is when I discover how I will actually tackle the job. The “pondering-ideas” might or might not end up being how I actually carry out the task. Something that I’ve enjoyed with my recent two boat building projects has been the “pondering time” even if the actual “doing” was different from many of the derived ideas. And, it’s especially fun when the project ends up well. I found that building the two mast floats provided that kind of enjoyment. No, I don’t plan on another boat-build; I can come up with plenty of other projects. And, I am married to someone who can think of all kinds of things that “I might make.” Waiting right now are new wooden kitchen countertops and possibly a couple of grandchild desks. ?
-
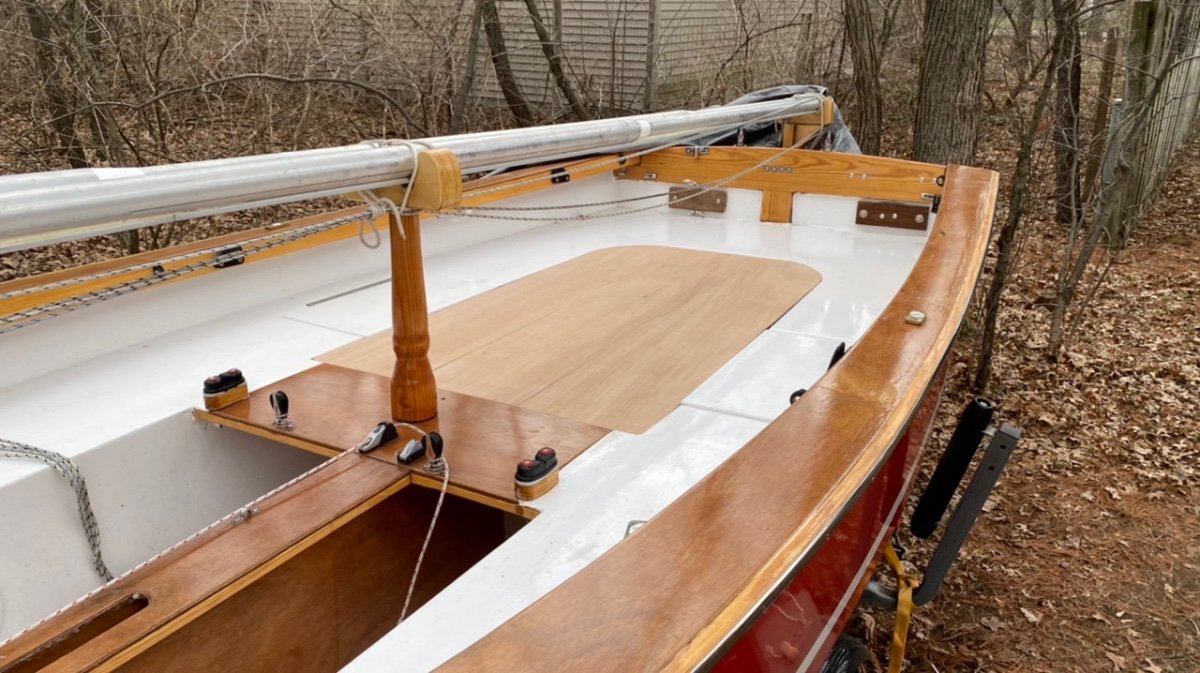
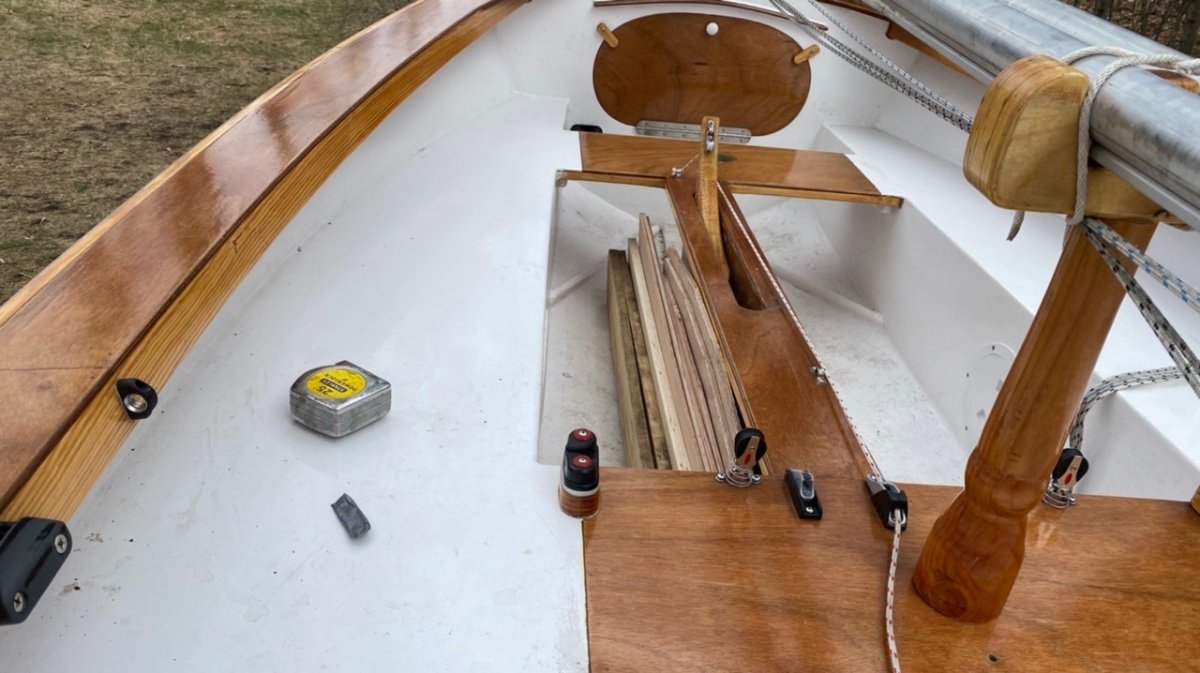
I Got to Work on ALL Three Boats Today! ? It felt like winter again today… 30’s… snowflakes… ?. But, I cut and fit my my last plywood piece for my ski-boat build: the starboard front deck: (Ski-boat build blog:) I spent some time with Avocet, finishing the two mast cradles. Where I’m parking this boat this summer the mast needs to be up and “sail-ready.” With two cradles, I can have the main mast up (for proper appearance) and the mizzen mast horizontal in the cradles over which I can place a rain-guard tarp: (I’ll likely get a longer tarp for more protection.) For fun, I then tried raising the front of the horizontal mast using the main halyard. Didn’t take a photo… but the mizzen was angled up from the stern to bow. I wanted to see if a tent-tarp could be thrown over the angled mizzen mast for camping. Nah… didn’t like it. Then I remembered that the guy from whom I bought the boat last year was already playing around with designing a tent-tarp and he had tossed into the cabin his experimental inexpensive trial tarp. I got it out and tried to figure how what he had designed so far. He had installed some strap eyes along the top. HEY!! Nice!! Using halyards, the tarp could be hoisted something like this: I could likely fit a longer tarp… providing more cover… maybe foot or two all the way to (or past) the mizzen mast. Plus, perhaps the aft end of the main sprit could be hoisted with the mizzen halyard (maybe with the mainsail tied up to the sprit?) to provide a ridge over which a tarp could hang down to be tied to the strap eyes. I could move the strap eyes on the top of the coaming tank to the top of the yellow rubrail, preventing a little sitting surprise to someone trying to hike out on the coaming tank for balance. ? On to the Norma T to finish my sleeping platform. I started this project last year and intend to place a small tent onto the platform and side seats… plenty of room. (A photo of this is at the top of this page.) So, from my last piece of plywood that I bought for my ski-boat, I cut a single piece to fit on top of the honeycomb support I made last year to make a large platform: I then cut it longitudinally into three long pieces. After a couple coats of epoxy, I will use a “tape-hinge” to allow me to fold the platform. I think I’ll start with duct tape and see if it’s enough. With the large platform folded in three and the honeycomb pieces disassembled it all nicely fits in the skinny section of the front cockpit, between the centerboard trunk and the seat. I’m really pleased with how everything turned out today. If the weather is good tomorrow (it’ll be sunny, hopefully warmer) I’ll start getting coats of epoxy onto the ski-boat deck underside and the sleeping platform pieces. I just got a weather report indicating record lows for tomorrow morning. Luckily, I bought a large enough propane heater for my ski-boat build. ? Warm summer IS coming. And, I’m looking forward to trying out my two new boats, exploring lots of lakes and river systems, and trying some overnights and camp-cruising.


-
Core Sound 20 Mark 3 Build - Chesapeake, VA
PadrePoint replied to AmosSwogger's topic in B & B Yachts Forum
Amos, keep posting stuff about your sailing adventures. ? -
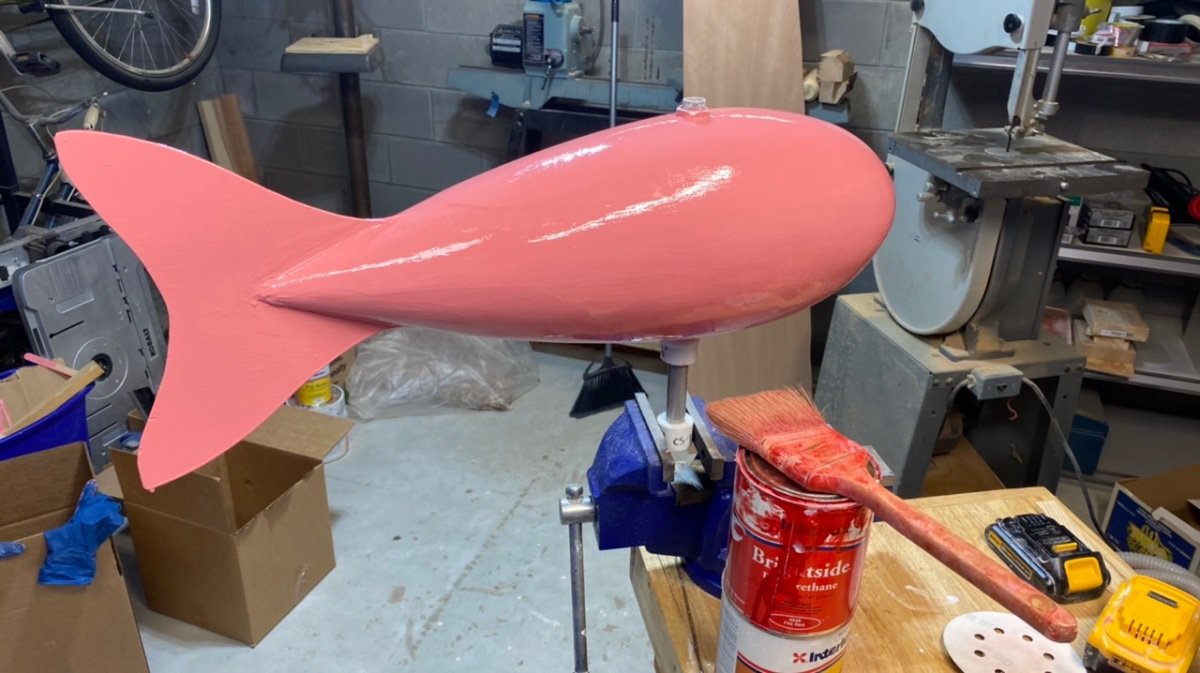
Here is my build-blog for my mast floats: For the fiberglass job, I cut the cloth to the full circumference to wrap around the fish shape. I then made some guesses on both ends and cut out some wedges or darts so that, hopefully, the glass would cover fully and perhaps with some overlapping… but trying to avoid too much bunching up of the material. The rounded cone shape made me nervous. I guess I finally decided to jump into the glassing project and just did the task the best I could. I did some cutting and trimming of the glass cloth as I applied the epoxy (I used old scissors.) I thought it went more easily than I expected. ? I did the whole float rather than just part at a time. I did NOT attach he fins when I glassed the floats but kept the opening slit in back clear of epoxy for the fin’s later installation. (I made my own fishy fins… for fun.) When cured, the glass wasn’t too hard to sand up. I gave fillets to the fins when I glued them in. I did apply some thickened epoxy to a few places to even things and make a couple small repairs or fill some spots. Then, coats of primer helped make the surface smoother in preparation for the paint. I made the faces from cut vinyl… I think I will paint the red one’s mouth since 2D onto 3D created wrinkles. (The red one is named Bruce for my brother, to be mounted onto the Norma T, my CS15; I’m still unsure about the yellow one… but maybe Wrasse-cal (Rascal) for a small Yellow Sea fish that might be food for an Avocet… the name of my CS17 Mk3)


-
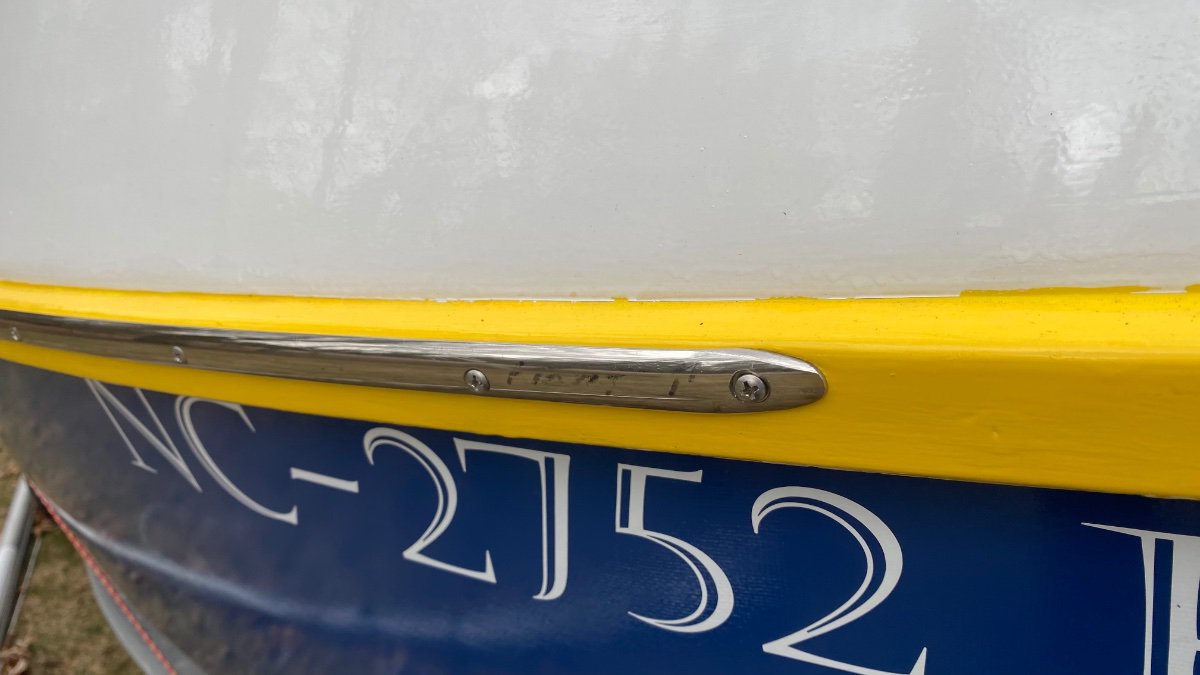
Here are a couple shots of an end that was flattened (I didn’t do it)… perhaps by making a sharp bend… and ground down to a shape as a rail end. The last is what is on Avocet. Note… nice pre drilled holes and countersunk… B&B stainless rub rails. Don, I think it could work for your keel by making the sharp bend first (which will “flatten” the hollowback at that point) right where needed to fit the sharp corner. Then finish the ends as needed. Your boat is 16’ so a butt joint would be needed, maybe near the back. .. or let it just end somewhere along the keel. In no time at all Alan did a perfect weld for me between two short pieces to make a sixteen foot piece, which is what I wanted.


-
Ah… of course. Because I’m working on my ski boat gunwales that’s what I looked at. The stainless hollowback I’ve used from B&B can be bent and flattened for a crease, corner or cut off for an end. I’ll show a photo when I’m home.
-
I had snapped these from a video. It appears to be both an umbrella and a canopy. I plan to try this out soon in my CS15. I need to epoxy coat the pieces for my sleeping platform for the aft cockpit. (Not shown: the mizzen mast would be placed into the forward step… in the forward thwart; it’s a position that I can use to fly only the mizzen sail without the main.) And, since this photo appeared in the Dinghy Cruising Association Journal recently, I think I’m COMPELLED to try this out: This is a thread I had started posing a similar question. Lots of ideas on the thread. This is a thread I started while pondering how to make a sleeping platform in my CS15: I’ll post a couple photos of what I came up with… just a bit more work to do.


-
Sharp corner?
-
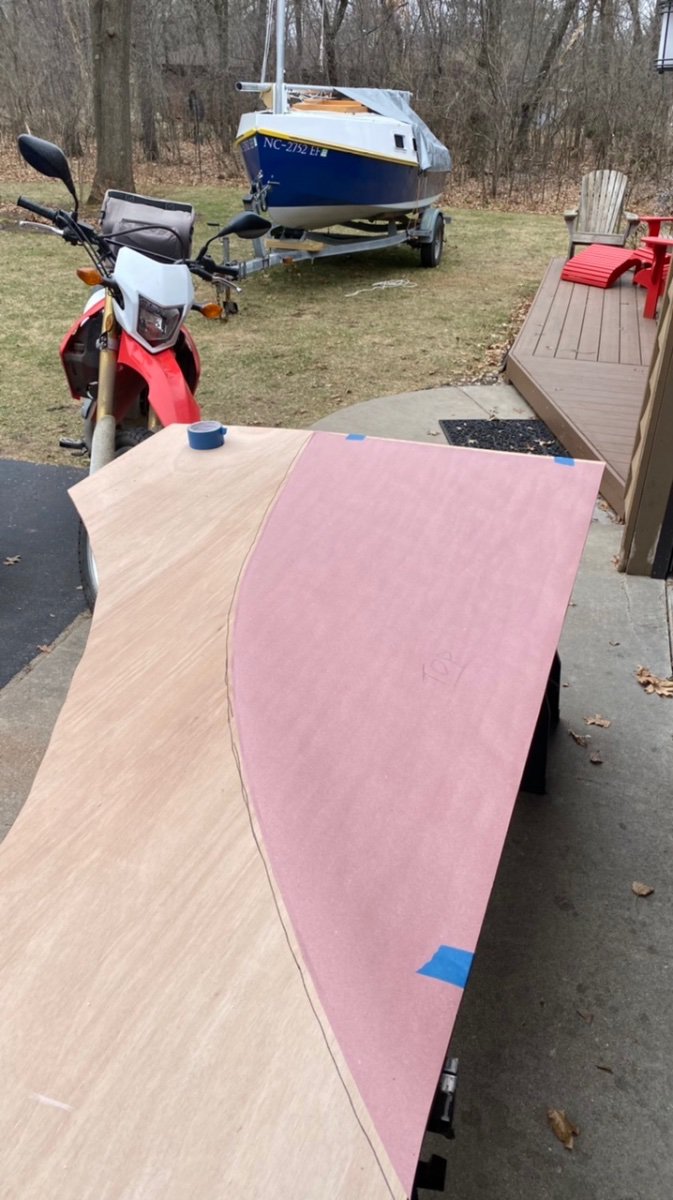
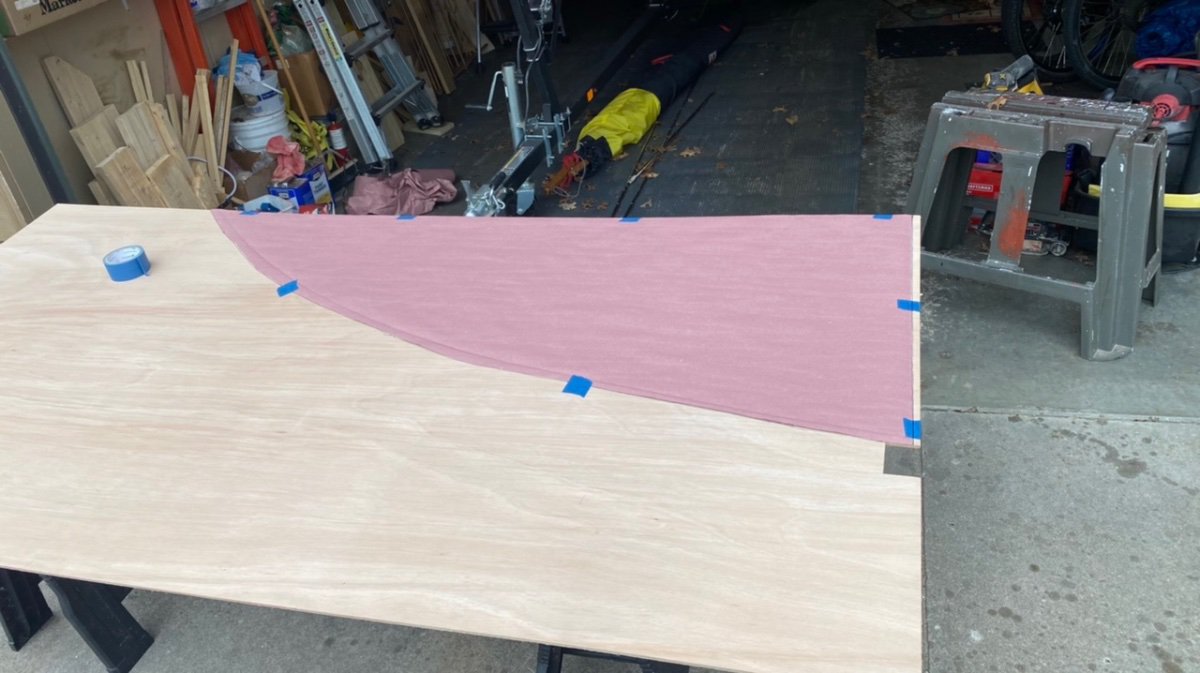
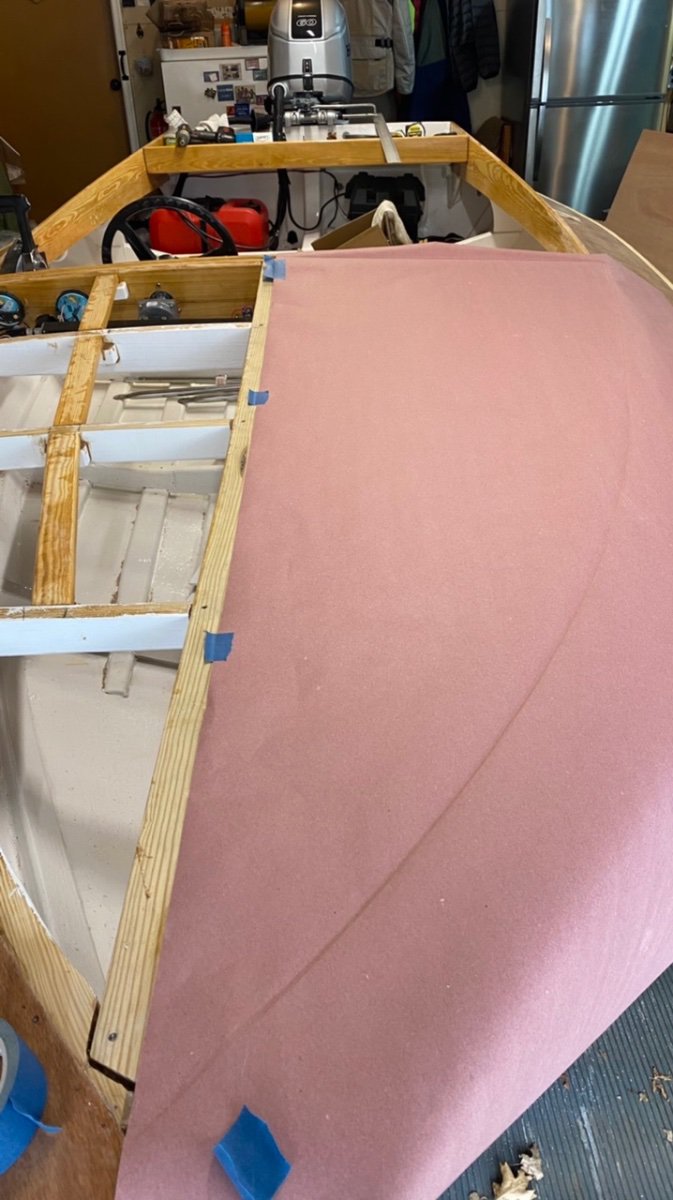
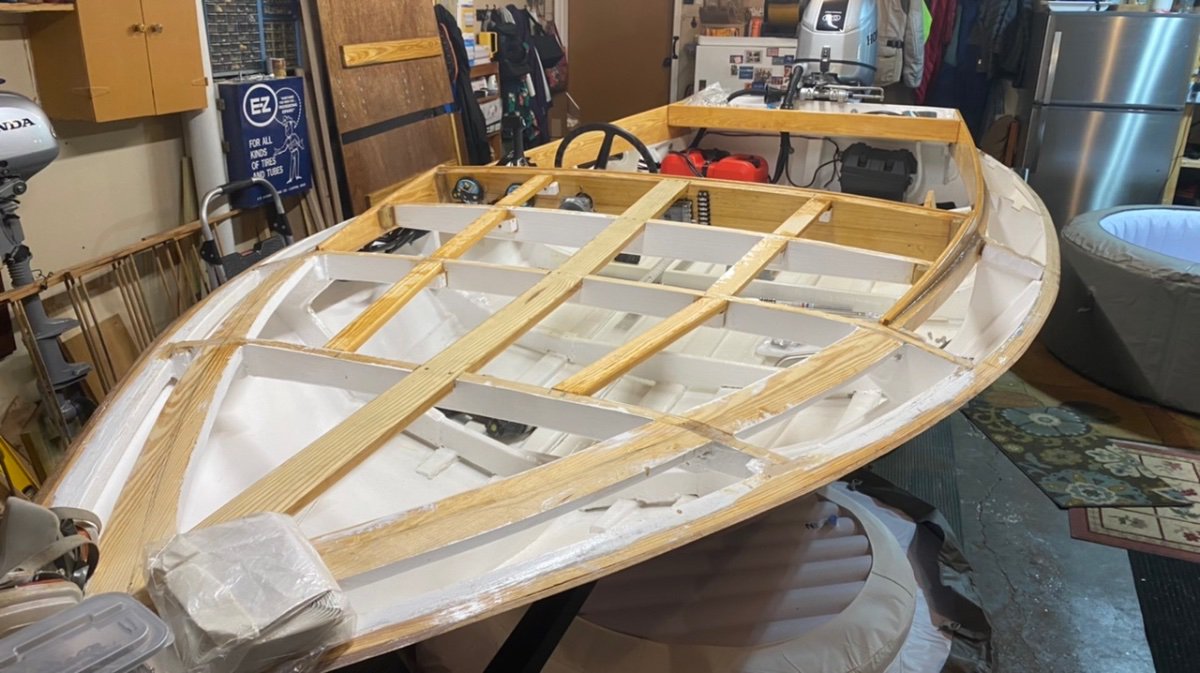
Getting There on the Decks A lot of family stuff to occupy my time in the past month, and more to come. After having the two grand-girls for ten days while their parents were in Hawaii (conference) I finally got back to working in the top decks. I needed first to get all of the support battens fitted and installed. I had already finished the undersides of the side decks. Then, I glued in the side decks. It’s looking better all the time. ? In mid-April I needed to head downstate to pick up my two sailboats, with a couple of 300 mile trips. Then a long weekend of camping with my son & family. It was in the 20’s at night, “ warming into the 30’s during the day. An electric space heater went a long way to keep things comfortable in the pop up camper. (They had their own camper.) Back home again. I dug out the LAST piece of my red sailboat kit (from B&B), the second gunwale piece that I did not use. Instead, for the Norma T‘s gunwale, I ripped one of the 16’ kit pieces to make two 3/4” x 3/4” gunwales (the width of the stainless rub rails.) When I decided to make Joe, I decided to match the color scheme of Norma T as much as possible. Since I had the 16’ piece left from the CS15 kit I decided to use it to make matching gunwales for Joe to finish off the sheer of the hull… along with the stainless rub rails I bought from B&B. After ripping the leftover 16’ piece into two 3/4” square pieces, and molding one side to better accept the stainless, I installed the gunwales. (I’ll cut them off square at the bow point… like I did for Norma T; I find that I like the flattened point when pushing the boat and trailer around.) Since I shortened Joe to 15’ from the plan’s 16’ (to match the 15’ Norma T) all of the 16” pieces of southern yellow pine I purchased from B&B were long enough to avoid any scarfs. Just enough at the transom. ? Today, I cut one of the LAST TWO pieces of the boat project: the bow deck. I dug out the last full sheet of plywood (again, I bought all of the plywood and solid wood — except the frame material — from B&B… I’m really glad I did. AND, I got juuuust the right quantity of everything. I’ll be a little short on the epoxy, so I ordered some more from B&B. I used construction paper to mark my initial cut. Note the little notch cut into several of the plywood pieces to make them fit into my van… I managed to avoid each one sufficiently. I gave the piece an extra inch on the curve for closer trimming. The curve part of this piece needs to fit inside the side deck for a good fitting butt joint. I’ve been concerned how successful I’ll be. Carbon paper makes a faint mark that I darkened with a pencil for 2/3 of the curve. I needed to measure the other 1/3. I still gave the curve a bit of excess. LOTS of sanding was able to make the piece fit rather neatly. Now… time to go camping with my oldest daughter and husband for the weekend… and then back to cut the FINAL piece, the other half of the bow deck.