HighDesert
-
Posts
98 -
Joined
-
Last visited
-
Days Won
9
Content Type
Profiles
Forums
Events
Gallery
Everything posted by HighDesert
-
PAR, thank you. I understand and I'm on it. Ken, mental health services? Up until a few weeks ago, all I needed was an hour or so in the gym, or maybe a little Pickleball with some other old people. Now I sand.
-
I just looked at your rowing wherry...It's incredibly beautiful. Love following your OC256, too.
-
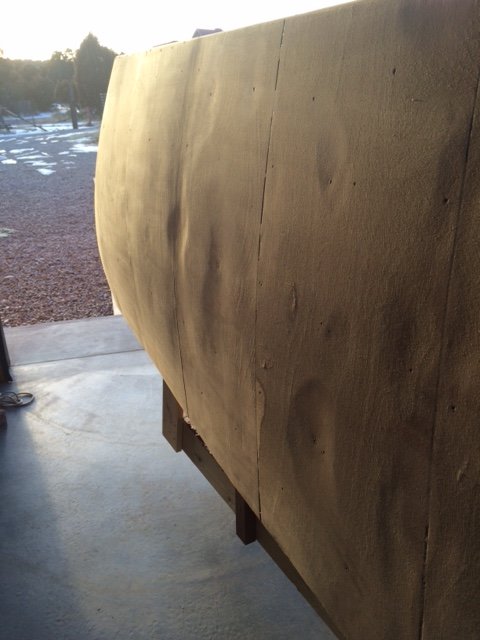
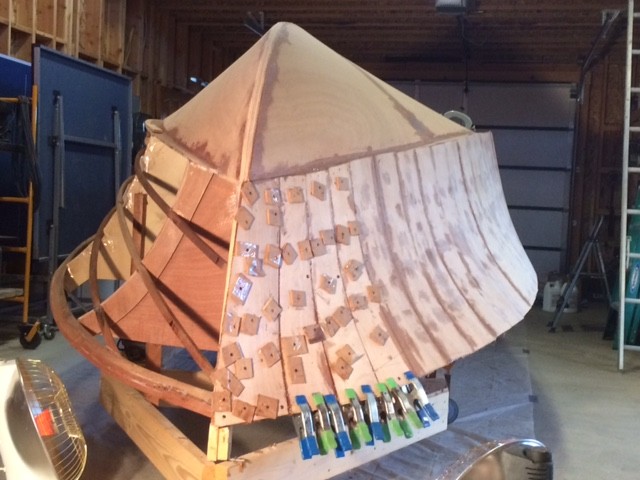
You rate it for sure, but I think sending it to you might be considered bootlegging in Utah. Strict laws here, otherwise I'd be making gin. You just might need to make the trip...for the beer and the boat ride. A better route than the one I mentioned before would be to head west until your smell weed. That's Colorado; keep going. I'll talk you in (down?) from there. More seriously, on your blogspot, you discuss leveling and smoothing as the two parts of fairing. You also talk about using a spray can/sanding technique to help with leveling. I'm guessing that 95% of the leveling should occur before any epoxy/fiberglassing and the spray can/sanding trick comes afterward. Correct, or do you do the spray can trick during the earlier leveling on raw wood? I probably should be too embarrassed to let anyone see the photo below, but I guess I have no pride at all any more. After installing all the hull panels, I identified all of what I considered to be the "hard" spots and went after them with my random orbital sander to "save time". Holy Hell, what a job I created for myself. My wife asked if we were going to name this boat Mr. Potato. The second picture doesn't really tell the story, but after days with the longboard, it's much better now. I love this hobby.

-
That settles it; no Peel Ply for this guy. Well cool. When "we finish up your boat", can we get free beers and the occasional ride too . . . PAR, this may be a good deal for you. I've been brewing beer for a lot longer than I've been building boats. I'm easy to find. "Just head west, until you get to the Rocky Mountains, then turn right...Pilgrim." Not exactly accurate, but I've been wanting to say that for years.
-
You guys are awesome, thank you. I know just how I am going to proceed. Drink, curse, screw-up, drink, curse, learn, adjust, drink, smile...next problem. Having this forum is like having friends help you build your boat. Maybe even better, my friends don't have a clue how to build a boat.
-
Keen, thanks for the tips and photos. I've followed your progress; your boat is beautiful and your incredible metal work makes it very special. I thought I might not need to post with questions again, until selecting paint products and techniques, but not so lucky. I've read that some people feel strongly about pre-coating the hull with resin before laying the glass and some don't think it's necessary. Regarding the pre-coat "dry" method, is it necessary to cure, sand and clean the pre-coat resin before laying the fabric, or is it feasible to think one could catch it in the window between tacky and fully cured? I also read about Peel Ply somewhere on the forum. Some people (a few...maybe it's a very new product) say it's revolutionary and will never do another project without it. Others say it's expensive and not worth the bother. I'm thinking the whole boat needs to be thoroughly sanded before painting anyway...and possibly between subsequent coats of epoxy;. Does it really save that much time? For one reason, or another, I've lived my life doing most everything the difficult, slow and frequently not-so-smart way, but I'm open to a sanding short-cut, if there really is one. Carter
-
Ken, First you inspire us, then you scare the heck out of us and now you're inspiring us again. So glad you're doing better. Where would we be without those women watching after us? Take care and take it easy, but don't quit. Carter
-
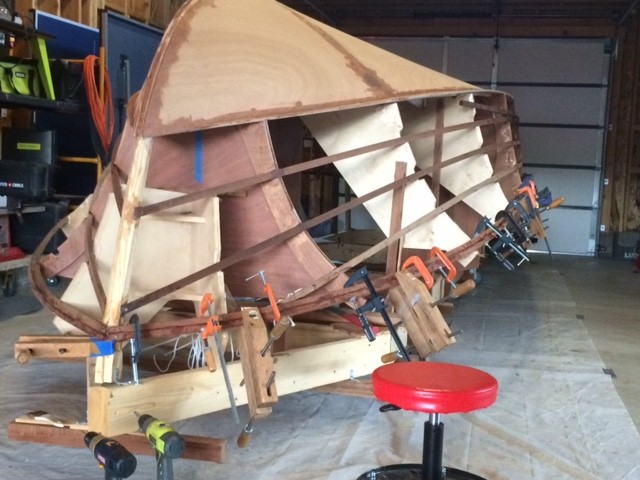
I knew I could count on you guys for great comments and suggestions. Much that I hadn't considered. Thank you. I'll continue punishing that longboard as I contemplate exactly how I want to proceed with the stem. There'll for sure be paint and painting questions later.
-
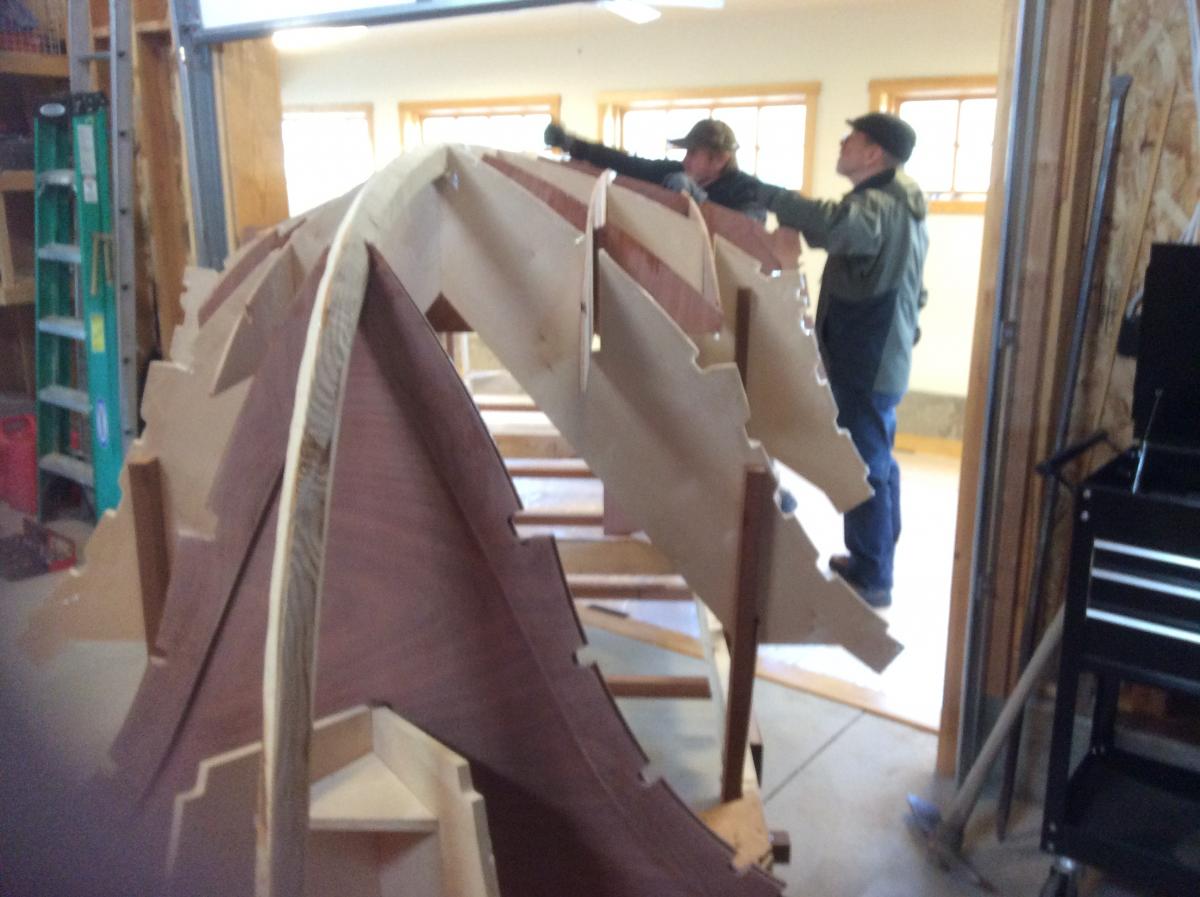
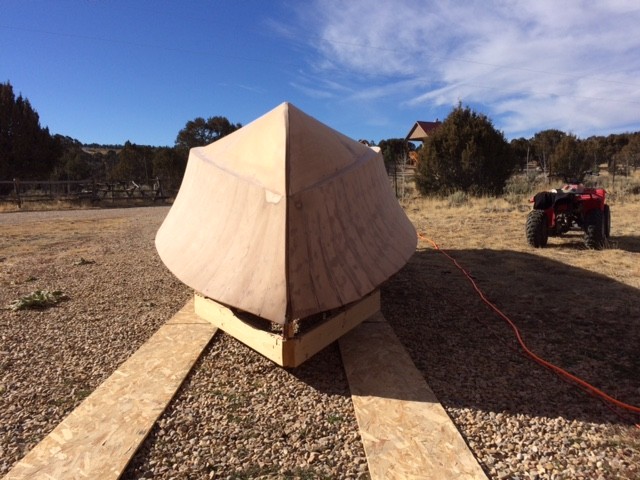
The side planking is now complete on my OB20 and I've started pre-fiberglass fairing. I've never used a longboard before, but I had a pretty good mental image of how to use it. One thing my mental image did not include was how much work is was to use it. Good grief, that thing works every muscle from your toes up! I was using standard 17" rigid and flexible items, until Alan Stewart recommended making a longer one. Good advise, it really works. In the right light the hull looks perfect; in the wrong light not so much...yet. There was a lot of bend and twist in those forward planks, but it's come a long way. One thing I regret doing was filling screw holes and plank seams with the hardened epoxy squeezed out from the plank laminating. I think it has made my fairing more difficult. Next time, I would use a softer fairing compound, or wait to fill those spots, until the fairing is nearly complete. I read as many of your posts as I can, but I still feel like I'm faking it most of the time. A question regarding the stem profile. I may have made it too blunt. Alan says it should be okay with a half round metal strip on it. Any other comments on this issue would be appreciated. I don't mind doing the extra work to build it back up, if that's the correct thing to do. Thanks, Carter

-
GAP333, Thanks for asking some of the questions I've been pondering and thanks for posting it on my thread. I might have missed it otherwise. I'm just completing the side planking on my boat and will be fairing and glassing this winter. I guess these projects all look pretty much the same, but I'm posting a current photo. Are there photos of your build? How about your build JP? I've poked around on the forum a little, but I haven't seen pictures of any OB20 builds, besides Chicks, which are fantastic, and another early one by the Bacons in Montana, which are also very good and include lots of early construction shots. Thanks again to Paul, Don and JP. Carter
.JPG.abb933d13e5a4ae40ce085d4243ee03a.JPG)
-
Good advise, thanks. I used most of it. I have completed the planking on one side of the boat using screws with plywood pads and screws only for fasteners and I'm pretty happy with it. Slower than the plastic staples, but I liked watching the screws snug the planks up to each other and to the stringers, plus squeeze a little glue out. It left screw holes, but they were easy to deal with. Besides JP's notched scraper to trowel the thickened epoxy around, I liked his idea of cutting the planks a little more narrow than specified, which helped. I also tapered the last few planks at the bow just a bit to accommodate the complex bending up there. So far, the most difficult task has been crawling up, under and inside the hull to clean the squeeze-out from the planks and stringers. This is a very large and challenging project for me and I appreciate your comments and tips. PAR (I figured out your name is Paul), I just discovered (and read) the Tips and Tricks link on the signature block of your postings. Thank you. It's very generous for a professional boat builder to spend the time to assemble a do-it-yourself manual for the rest of us. Carter

-
That is a funny one. But, at least a Phillips-head rock can be used as a hammer...I hope my dad didn't hear that. Lots of interesting and helpful discussion on screw selection, thanks. Any quick comments on the other two questions? Broken screws safe to leave in encapsulated in epoxy, or is it imperative to chisel them out? Also, what about pretreating the planks with clear epoxy before laminating with thickened stuff? Carter
-
Sweet! A great opportunity for both of you...master designer and master builder. The photos are terrific. Most of the problems associated with boat building in the desert are eventually solvable, but I don't think I'll ever see the designer sailing up to my porch. Good for you. Carter
-
Thanks for the great tips and interesting discussion on fasteners. I'll go with screws with (and without) plywood pads at the bow sections and composite nails or staples aft. I'll try nails first, since I have a brad nailer that accepts the size of nail I want to use. I'll also be switching to deck screws. I've always thought the cheap black drywall screws were one of man's greatest contributions, but after this discussion, I'm wondering why I mindlessly put up with their shortcomings for so long. Speaking of those cheap black drywall screws, I've told myself that if one or two of them were to break off in my boat, they would become entombed in epoxy and never be exposed to moisture or oxygen and won't corrode, stain, etc.? Correct? Also, I've been assuming that to laminate the planking (or to join any two pieces of wood) I need to apply unthickened epoxy first to prevent the joint from being too dry. Necessary, or not? JP, I like your notched scraper idea to screed the epoxy onto the planking.
-
A few side planks are on. I screwed them and didn't think it was such a hassle, until my wife pointed out that with 8-10 fasteners per plank, 15 or so planks per side and two layers per side, I was looking at 500 more screws to fasten the side planks. Probably no a big deal for wood boat builders doing it the old fashioned way, but it sounds like a lot for this plywood and glue rookie. Is there any reason not to use Raptor or Red Hawk nails, rather than staples? Carter

-
Thanks guys, The side stringer bending went well and is almost complete. I steamed the some of the pieces that had the most acute bends and twists. I also tried the hot, wet towel alternative, just for grins. It worked too and is quicker. Ken, after asking the questions, I revisited your photo link and answered them for myself. My wife got a kick out of your steamer set up. She says watching boat builders is like watching reruns of Macgyver. Your link is great; can't wait to watch how you proceed, now that the boat is flipped over. JP, staples sounds like a great way to go, but don't you have to snug up the planks with screws and battens before stapling anyway? I'm not quite there yet, so I'm just visualizing, but it doesn't seem that I could press a stapler hard enough to forego the screws. Also, I found a plastic oil transfer pump at Harbor Freight for $7.00 and will see how they work on moving epoxy from five gallon containers to one gallon pump jugs. Looking forward to planking. Carter
-
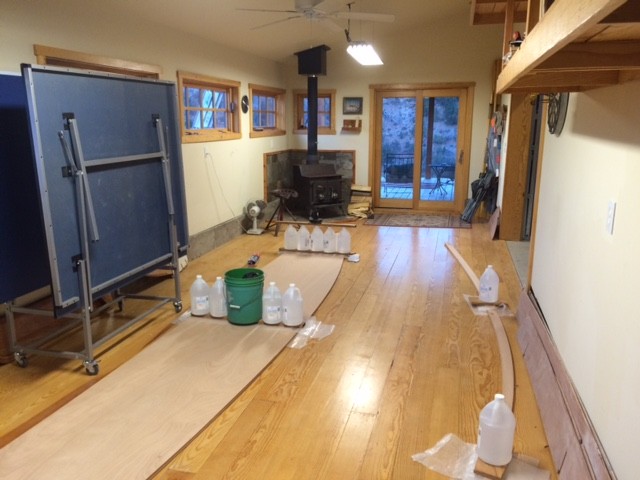
It's been many months (November) since I started work on my OB20. I didn't expect "life" to get in the way quite so boldly, but it did. I'm back at it now, with the bottom and some of the side stringers on...and a couple of items that I could use help with. Ken recommended steaming the forward sections of the shear clamp. I built a steam box and have experimented some. It's interesting how some species will hardly budge and others become wet noodles. I'm guessing that you don't glue hot/wet wood , but mechanically fasten it and hope that it stays put when dry and can be glued afterwards. Ken, you bent and installed one piece of the three piece shear clamp at a time, correct? When I bought the OB kit, it shipped with several 1 and 5 gallon containers of epoxy. Transferring the 1 gallon containers into the pump jugs via funnel wasn't too bad, but I can see me getting pretty sticky attempting the same technique with the big ones. There must be pumps, or something, for that? A couple of months ago, my wife and I were visiting Washington DC on a vacation trip and made the short pilgrimage to North Carolina to visit B&B Yacht Designs. Unfortunately, Graham was away in Texas at a race, but Alan was there and spent two hours showing us the entire operation and answering every question we could think of. He made us feel very special and glad that we made the trip. A highlight of the tour was the opportunity to climb around on OB20 #1. It's a beauty. I regret not meeting Graham, but Alan is a super guy and a great representative of the business.. Hopefully, I'll be able to send a photo of some of the side planks going on soon. Carter

-
Very cool for sure. Perfect shop, great boat, cathedral-like boathouse...plus you live on an island. What's not to like? I hope you have one of those "Life is good" T-shirts. Keep up the good work, Carter
-
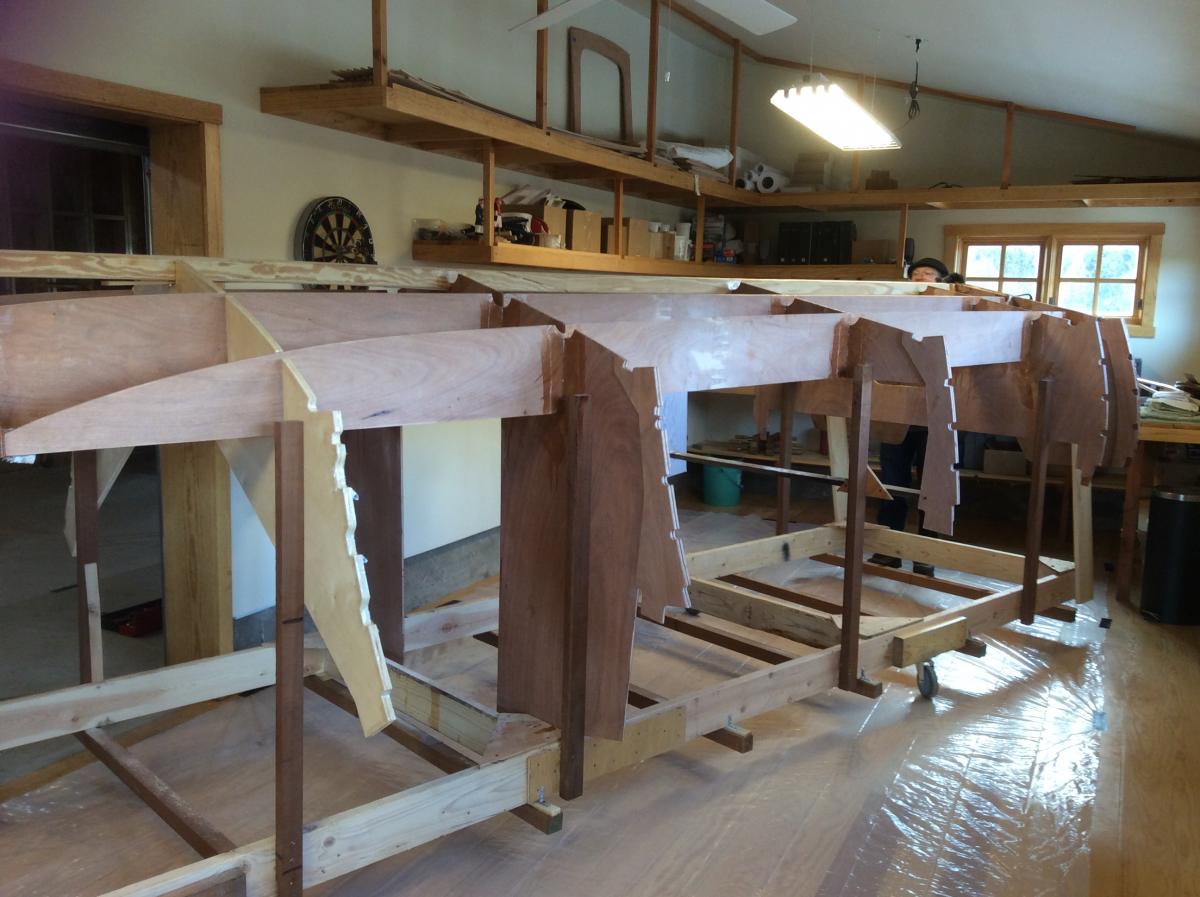
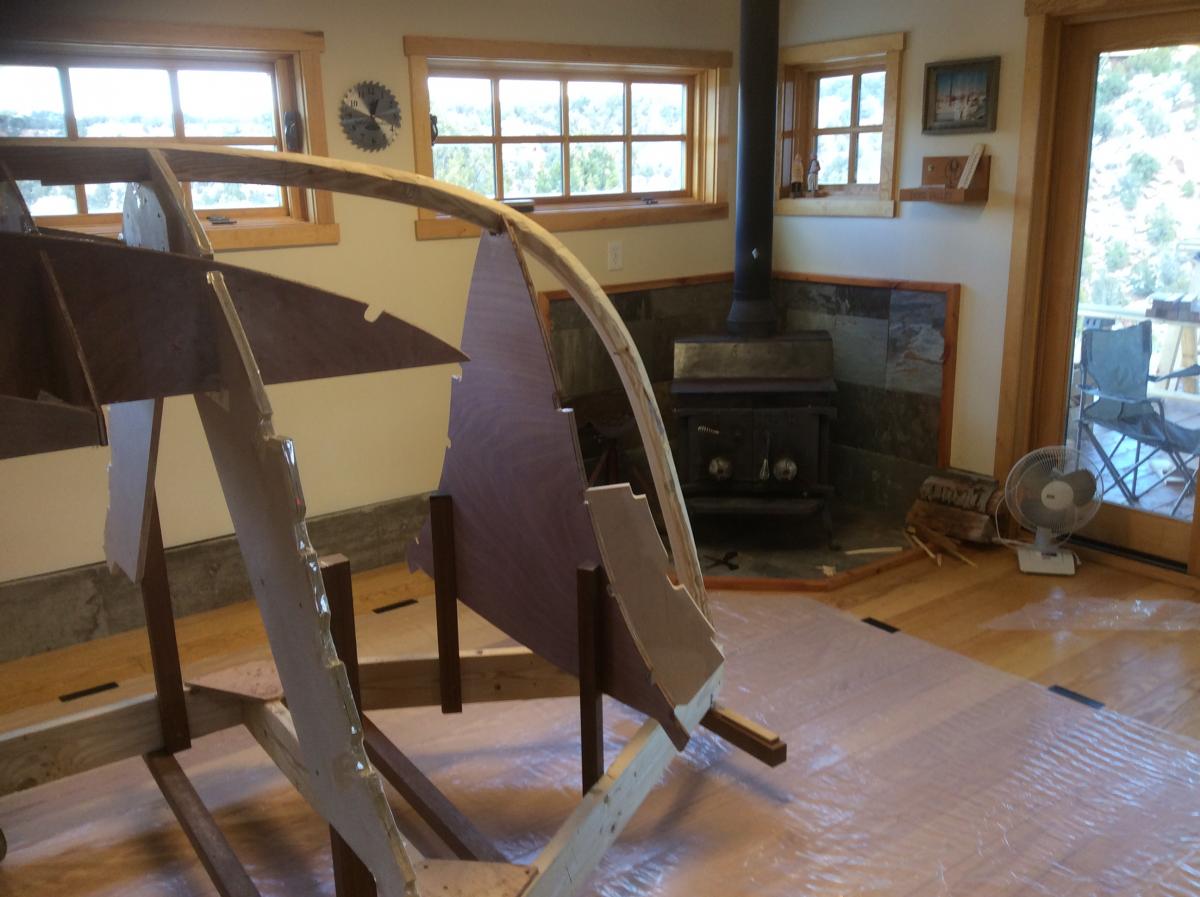
Thanks for the tips and for the nice comments about the work environment. The shop was a pre-retirement gift to myself. We needed a garage, I didn't have a workshop, the stars aligned and there we go. It was one of those rare occasions where we get to do something just right...almost. When I built it, a 10 foot door between the garage and shop seemed adequate. I didn't know there was an OB20 in my future. It was clear from the beginning that the I wouldn't be able to get the boat out of the shop, so work began work in the garage. Now that it's winter and the unheated garage is like a walk-in freezer, I'm becoming more creative. I've decided to move the project into the shop and worry about getting it out later. With no side stringers on, I was able to "cheat" between the bulkheads and frames, so it went in pretty easy. Getting it out will involve removing a pretty sizeable portion of the wall at one or both door jambs, but I can fix that and prefer doing that to working under plastic, or stopping work completely. I move slow enough as it is, without taking the winter off. At least it's not in a basement. Ken, I really enjoy and appreciate the photos of your OB26 build. You are an ace...and so is Chick. I use your pictures, Chick's photo link on the B&B website, as well as those from Striper Rick, 6210 and a few others as my building manual. Carter


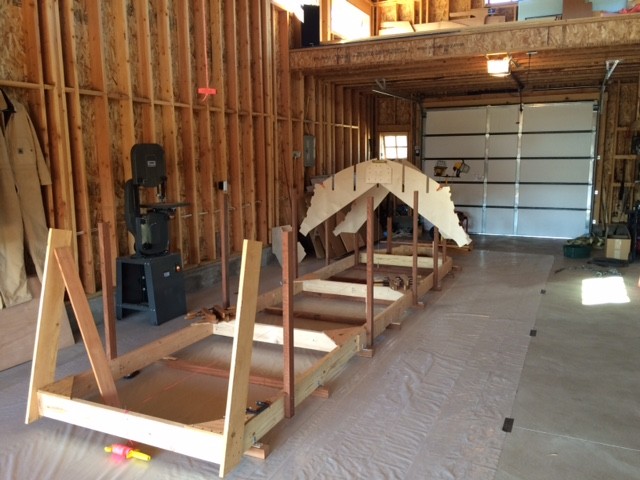
-
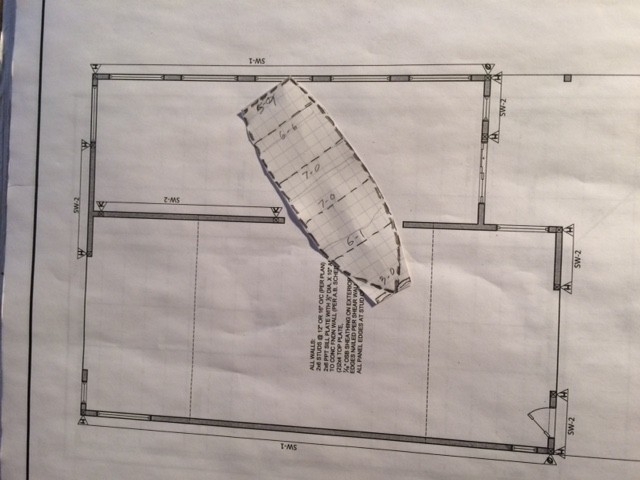
Several months ago I posted a message to this site expressing my interest in the B & B OB20 kit and my concern about being able to complete it. I've built a couple of CLC kit boats and a cedar strip canoe, but I wasn't sure that I actually qualified as a "competent amateur"...plus, it was clear that the OB20 kit would be a step into a different world for me. I was delighted to receive an immediate welcome and some much needed encouragement from several Advanced Builders, as well as, a couple of OB20 builders. Thank you. Within several weeks I had purchased the kit and started on the hull and transom jigs. The transom jig creates a really sweet curve. Getting the hull jig plumb, level and square using standard framing lumber on a concrete floor sloping every which way was a bit challenging, but it's done and I think it's perfect. Currently, the bulkheads, frames and transom are up and I have installed and filleted the bottom stringers. Next will be the bottom panels. Given the thickness of the bottom plywood and the curves at the bow, I'm expecting a real wrestling match...any suggestions? It's also time to select material for the chine battens and side stringers...suggestions there would be appreciated, too. After my first post, someone said, "Post pictures", so I have attached a few. My shop is at 7,000 feet elevation and unheated, so I'm not sure how fast things will progress for the next few months. I'm currently trying to cure the last few fillets under a plastic sheet tent with radiant heaters. We'll see. Carter Childers


-
Thank you, gentlemen. Thanks to all of you for your speedy responses and much needed encouragement. I'm in. To tell you the truth, with such willing and talented support, I'd feel like a sissy not to go forward with this project. I'll be contacting B and B this week to order what I need to get started on my OB20. JP, it's especially fun that you're beginning your build at about the same time. I'll be watching for your posts. Steve, I'm counting on my stubborn streak to make up for lack of talent. PAR, I'm guessing that "organic toolbox" means my noggin...aka tissue computer? Bob, you're right, out here a days drive is nothing. We'll connect sooner, or later. Yes, I'm out West. I live in Cottonwood Heights, Utah. It's near Salt Lake City, but I have a place in the mountains with a big barn, which is where the boatbuilding will occur. Chick, I only have granddaughters, or I'd probably have a grandkid named Carter, too. My son's middle name is Carter and it was my mom's maiden name. I hope your grandson likes it. It took me a long time. Thanks guys, I'll be excited to post again after I get started. Carter
-
I'm considering an OB20 build. I don't think I need to say why I want to build this boat, but I will. Seeing the photos on the B and B website was like the first time I saw Rachel Ward in the TV Mini-Series Thorn Birds. Saying that probably says way too much about me. Google it, if you're under fifty. The problem is, I'm not at all confident about my ability to complete this project. I'm the cautious type. I've built a couple of boats (Jimmy Skif and Annapolis Wherry from Chesapeak Light Craft kits and a Wee Lassie cedar strip canoe), but nothing of the size, or type, of the OB20. Exploring "Messing About in Boats", I've seen some encouragement given to first time builders interested in complex projects, but I have to wonder if they really are first time novice builders and if the advice isn't a little overly optimistic. I'm probably the handiest guy on my block, so I think I could eventually overcome where I am lacking in basic carpentry skills. My real concern is in understanding and following the process. The boats I have built were accompanied by very detailed, specific and instructional construction manuals...which I appreciated and read many times over. Hats off to CLC for making introductory boat building possible for knuckleheads like me. Naively ready to move forward with my OB20, I ordered study plans for the new kit...and was immediately intimidated by them. This clearly isn't going to be the "kit" boat that I was expecting. I guess my question to you veteran builders and Messing About contributors, is would you really recommend this build to a "dedicated amateur" of my description and how willing and available are you to put up with dumb questions from someone possibly over their head in a boat building project? Again, I really want to build this boat, but I don't want to initiate (and sink a lot of money into) a project I can't finish. Carter Childers