.jpg.e4ecbc51c7111c90dc2b6077fb476539.jpg)
Douglas Jacobs
-
Posts
24 -
Joined
-
Last visited
-
Days Won
4
Content Type
Profiles
Forums
Events
Gallery
Everything posted by Douglas Jacobs
-
This Friday, eleven years after purchasing my Curlew plans, I launched my kayak and enjoyed my first paddle on Lake Chickamauga. Weight as pictured is 23 lbs. She tracked straight with no weather-cocking in the strong winds. While initial stability seems low, it improved at cruising speed and secondary stability seems better. I'm working with Seals to get a skirt that fits the coaming and will feel more comfortable testing secondary stability and ease of rolling with a good spray skirt and dry top on. Special thanks to my friend Steve Rouse for his help, shop space, and photographs. In sitting in the kayak on land before launching I broke the right side coaming support as shown in the last photo. Checking other recent launch posts I noticed that this side support piece is missing so am wondering if I should just remove the supports instead of trying to replace them. After cracking the support I realized that I needed to brace on the back deck instead of the coaming when entering and exiting the kayak! Since I want to roll the kayak when I get a backband, seat, skirt, and deck riggings installed, I'm wondering what others have done about making and attaching thigh supports/hooks and side hip padding? The kayak frames are okoume marine plywood left over from another boat-building project and the stringers are Western red cedar scarved together from the clearest boards I could find at a local lumberyard. Fabric is dacron which is covered with 3 layers of Hunter green Rust-oleum paint. Since Steve has already carved a beautiful Greenland paddle, I hope to start work on my own paddle in the near future.
.thumb.jpg.81d5b1ffa2c1ff39141bd0b469801c64.jpg)
.thumb.jpg.3dcdef6993a809a5df0955511e31a900.jpg)

.thumb.jpg.0dbb68bde3945462398c6df3cdecb1dc.jpg)
-
Thanks to Andy, Scott, and Jeff for their suggestions regarding how to sew up Curlew's fantail. The suggestion that no one would notice what we had done after it is painted was very helpful. The attached pictures show that we had to fold the extra cloth over and sew it around the edge of the fantail. Then as we did the roll stitch we had to cut out a V-shaped piece of fabric so that the rolled-over fabric would lay smoothly around the bend from the top to the back of the tail. Our goal was to have a little overlap, but we almost cut too large a V, so this step should be done conservatively. The pictures should be self-explanatory. Having my friend, Steve, as a partner was a lifesaver since his stitching skills are far superior to mine. We double stitched the tail to make sure that the rolled over fabric would stay put. When we completed the sewing we still had several large wrinkles around the coaming which are visible in the picture of me standing with the kayak in the sunlight. The picture of me standing with the kayak in the shade, shows the improvement after extensive work with an iron and a heat gun. We practiced first on a scrap piece of fabric stapled to a frame to make sure we wouldn't melt the fabric with the heat gun. As pictured with foot-pedals but without paint, back-band, seat, deck rigging and brass rub strips, our Curlew weighs 22.3 lbs. I plan to paint it with Rust oleum paint after testing three coats of both Rust oleum and a new fabric oil-based spray paint by Glidden. It has only been on the market for a couple of months and I discovered it when I met a Glidden rep at our local Home Depot. It seems stiffer than the Rust oleum, but I plan to do more testing on left-over scraps of fabric.

.thumb.jpg.2af19806b6e3fd822ecce6970c69b854.jpg)


-
Thanks for the good suggestions.
-
Help! Every way we try to sew the Curlew fantail, we seem to be left with extra fabric. We don't lack for patience, but we seem to have run out of ideas. We have the 6 oz fabric with little stretch. When we sew towards the tail, we can't seem to stretch the fabric enough to keep it tight. We've also tried sewing back from the end to tighten the fabric but then we had a wrinkle at the end of the fantail. Thanks for any guidance as to what we are doing wrong.


-
Jeff, thanks! We will start working on it.
-
Currently my friend Steve and I are stitching the 6 oz. polyester fabric on my Curlew frame. (Since he is a dental surgeon, he sews and I attach hemostats as needed). We've split the fabric on the bow and stapled it to the keel per the Shad videos. Should we use the same process to sew the fabric around the fantail? I've (hopefully) attached a picture. Thanks for any suggestions. Curlew fantail with clamp.heic
-
I've searched the videos, the forum, and internet and haven't found any information about how to stitch the seams at the coaming when starting with the coaming and working out to the ends of the kayak. When I get the nails in place through the holes around the coaming, do I then stitch the seam on the inside and under the coaming before starting the stitching on the outside of the coaming? Should I stitch the seam after stitching the skin to the coaming? Or should I stitch the seam back to the stern and forward to the bow and end by stitching under and inside the coaming, or will the skin be tight enough around the coaming that I don't need to worry about stitching the seam under and inside the coaming?
-
.thumb.jpg.afc9b5d5bc302a4620c0f869a3d75c9b.jpg) I'll certainly post the results if I choose to go that route.
I'll certainly post the results if I choose to go that route. -
One more question re sewing skin on Curlew
Douglas Jacobs replied to Douglas Jacobs's topic in Kudzu Craft Forum
I don't want to gain knowledge that way. Thanks! -
I came across the following website and wondered if anyone had tried this product? https://www.plastidip.co.uk/2018/11/using-hcf-to-coat-a-skin-on-frame-kayak/ The product is sold in the U.S. here: https://www.amazon.com/Gallon-HCF-Multi-Purpose-Acrylic-Coating/dp/B00GUKRWJQ Description here: https://performixcoatings.com/product/hcf-eccs-f-688f-688-s/ also here: https://www.iplastidip.ie/hcf-paint/
-
After going through forum posts and online videos am I correct in understanding that I should sew the coaming first, then sew out from the coaming towards the stern and then the bow? Or should I start at the stern and work forward? Thanks.
-
Double-corded or rolled seam stitching for first-timer?
Douglas Jacobs replied to Douglas Jacobs's topic in Kudzu Craft Forum
Thanks for the input! I'm thinking I'll go with the rolled seam for the first try. I'm neither a medical doctor or a crafter so want to keep it simple. One more question: After going through the forum and videos am I correct in understanding that I should do the coaming first, then sew out from the coaming towards the stern and then the bow? Or should I start at the stern and work forward? Thanks again. -
I'm getting ready to skin my curlew with the 6 oz. dacron fabric and am wondering the advantages and disadvantages of the rolled seam compared with the double-corded stitching technique? Thanks for any feedback on which is easier for a first-timer, which looks better, and answers to questions I don't know enough to ask.
-
Thanks! Finished second coat of tung oil yesterday, glued up the coaming lip today and hope to have the kayak skinned and painted in a few weeks. Have a blank ready to carve a Greenland style paddle and should be paddling and practicing a few rolls by summer.
-
Thanks!
-
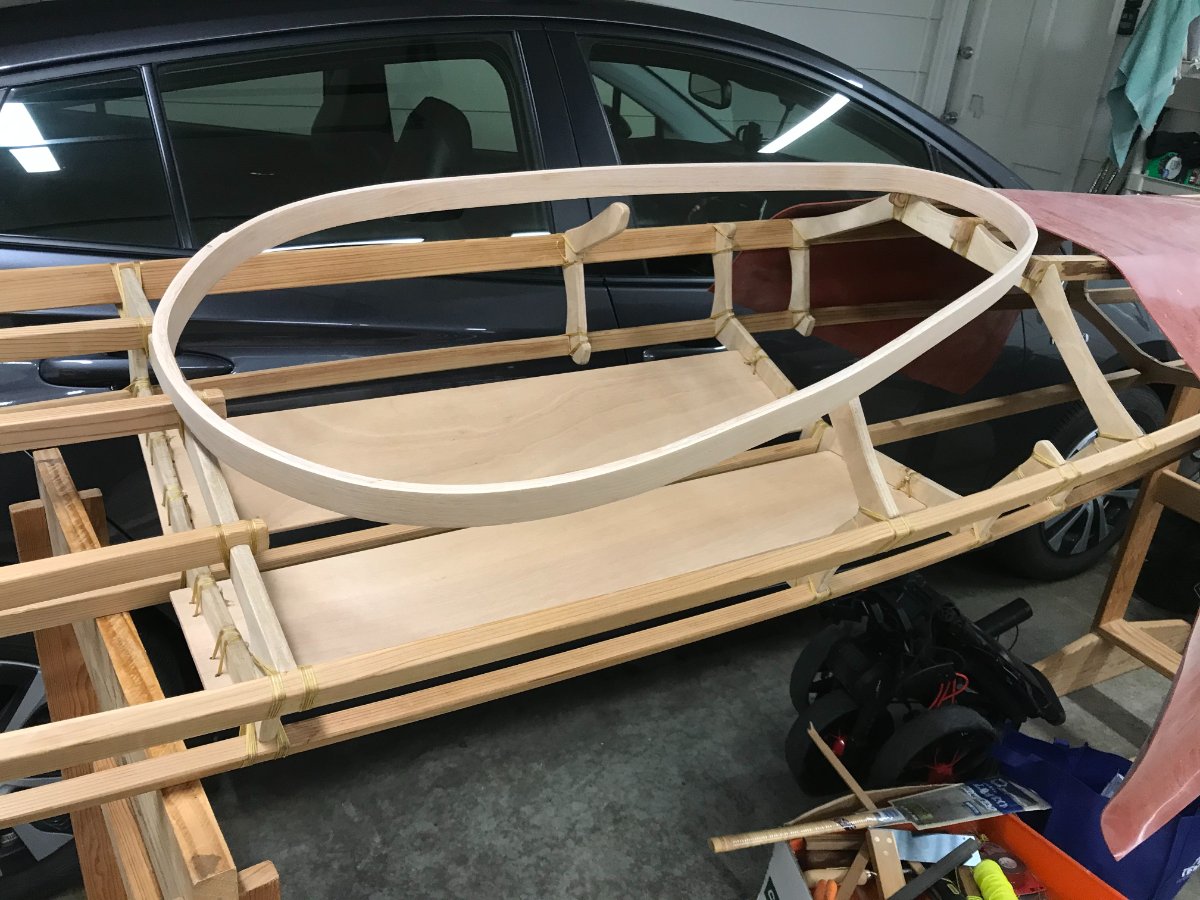
Here is a FROG photo of my Curlew frame taken yesterday and a photo of its partially completed oak coaming. I was able to put the first coat of tung oil on my completed Curlew frame, ten years after purchasing the plans and many years after assembling the frame with zip ties. Thanks to my friend Steve Rouse for his help and his woodworking shop. We built the form for the coaming from the offsets in the book and just have to glue on the lip. We used 1/8th inch green white oak strips which we sanded with 80 grit paper, then wiped with alcohol before gluing with gorilla glue. The wood was incredibly flexible, no need for steam bending, but the glue seems to be holding very well in spite of the wood's 20% moisture content. We considered using G-flex epoxy but the gorilla glue set up in a couple of hours and I was able to plane off and sand off the excess that evening. We should have made the openings in our coaming form closer to the edge of the form to facilitate using spring clamps and we should have spent more time before the glue up planning to make sure our strips overlapped on the sides of the form rather than at the ends.
.thumb.JPG.1df51f004075062669cec9bab1dfeac5.JPG)


-
Questions re choosing a fabric for Curlew
Douglas Jacobs replied to Douglas Jacobs's topic in Kudzu Craft Forum
Thanks for the info -
Questions re choosing a fabric for Curlew
Douglas Jacobs replied to Douglas Jacobs's topic in Kudzu Craft Forum
Can I order it now through the store or should I wait until it is in stock? -
Questions about Curlew Coaming
Douglas Jacobs replied to Douglas Jacobs's topic in Kudzu Craft Forum
Jeff, My apologies. Your emails were going into my junk folder, so I will fix that asap. Thanks for the info in the emails! -
Questions about Curlew Coaming
Douglas Jacobs replied to Douglas Jacobs's topic in Kudzu Craft Forum
Thanks! -
Ten years after purchasing plans for Curlew, friends and I have finally finished lashing the frame together enough to remove it from the strongback. My problem is that I've misplaced or lost the full-sized plans for the coaming. Is it possible to build a laminated coaming from the offsets in the book? If so, are the measurements to the inside of the coaming? And, what height should the wood strips be? Probably I haven't asked the right questions so answers to questions I should have asked would also be appreciated!
-
Just finishing lashing my Curlew frame together and wanting to order fabric. What is the latest on the issues with the 9 oz. fabric relaxing after using Rustoleum paint? It seems there is only 10 ft. of the 6 oz. fabric available on Kudzucraft's store so that doesn't look like an option for now. Also, if anyone has used Spirit Line's 840 polyester or their 840 XTRA TUFF ballistic nylon, what have been the results? Thanks.
-
Curlew bracket and frame locations
Douglas Jacobs replied to Douglas Jacobs's topic in Kudzu Craft Forum
Jeff, sorry for the confusion. As I looked over my plans again I realized that I had used the frame locations in the reference drawing in my assembly manual (partially pictured in my previous post) rather than the frame locations on the actual plans. The frame locations on the plans match exactly the Curlew frame offsets in your book, so I'll use them. Thanks, Doug Jacobs -
I'm new to the forum but bought my Curlew plans in 2010, cut out the frames, scarfed stringers and then did nothing until a few days ago I started putting everything together. My plans have two brackets 112 inches apart holding frames two and seven (at 2' 8" and 12') while, if I'm reading the charts correctly, "Fuselage Frame Boats" places frames two and seven 106 inches apart (at 2' 8" and 11' 6") and has four brackets holding frames one, three, five, and eight. I bungeed in the stringers with frame seven 112 inches from frame two but frames six, seven, and eight seem too close together. So can I use the book frame locations and two brackets, should I make four new brackets to the dimensions in the book, or should I stick with the dimensions in my original plans? HELP! Thanks for helping a befuddled newbie. I'm attaching pictures of plans and book dimensions and my frame two attached to its bracket.


.jpg.48ca2c12083d64caf9ea43f47365e96d.jpg)
.jpg.606ac0611d27e5c8fdb739657712f30b.jpg)

.jpg.f26b82dd339b770e4ffe34427a4be488.jpg)


.jpg.6db6f1540d9c44a4a3fcf73caa0bafde.jpg)


.JPG.775c7bdf7ccf8149fd7bde137dec5689.JPG)