

Oyster
-
Posts
1,053 -
Joined
-
Last visited
-
Days Won
29
Content Type
Profiles
Forums
Events
Gallery
Posts posted by Oyster
-
-
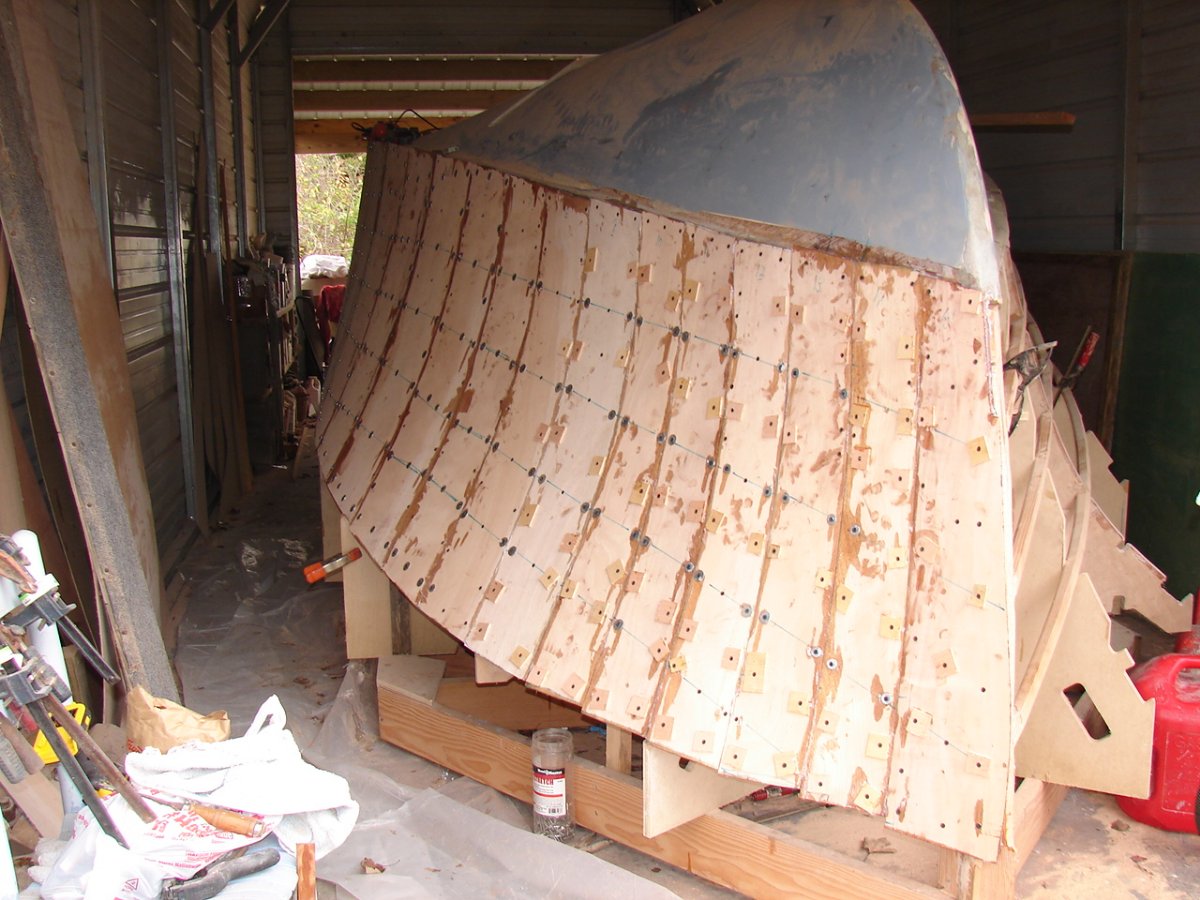
Well we finally got to the stage of flipping.


-
There is a pink color in awlgrip. Of course its a bit harder to paint and a bit more expensive. But there are large sportfishermen painted pink. So its not taboo at all. One of the largest builders did several custom builds for an owner that his entire family was all women. So they called the boats Seven Days.
This is their color chart. I did a kayak in this color.
https://www.p2marine.com/documents/awlgrip/awlgrip-color-card.pdf

-
Well its been a while and I have neglected posting any finish work shots, since the work is fairly boring in color. And pictures from phones are way to large and I don't know how to transfer them to here, which also are huge. But i have reached the point that I think I am within a week of finally getting the final coat of topcoat in it. Life has a way of altering the best laid plans.
Fairing was not as easy as it used to be. Its been a while since I used a gorilla board to sand and fair and had really forgot about how much fun it was and excersize I got when getting up close and personal with the real warmth that wood gives you.

. But the summer was a bit humid and gummy on the surface, which slowed the process too. So anyway, upon finishing a bit more high build primer in areas and sanding, then topcoat, she will see sunshine and the inside will see sunlight too after the flip.
-
 2
2
-
-
8 hours ago, AmosSwogger said:
The Messabout is great for R&Ding.
I plan on installing an electrical system and then duplicating Skeena's ballast tank/bilge pump system. The Anderson bailers I have actually work pretty well, they are simple and efficient, but since I'm putting an electrical system in anyway I may as well duplicate Steve's setup which is significantly faster than the bailers.
The Messabout can also be bad on your wallet when you get in the group of idle handed wood addicts these days, a slightly dusty shop with stacks of full sheet plywood, an active computer screen with boat drawings and one leader with "special suggestions". There is are always room for improvements , no matter what your fully built hulls may be waiting for your next trip.
Good to catch up with some of your guys on this thread and forum again. Someone was promising follow up reports of the week and weekend. [hint, hint] Nick, good to see your re-creation in action.
-
1
-
-
I saw this SR 20 this weekend. I agree with Graham, she ranks right up there with the best open cruiser model in these style boats. The outboard does not look out of place at all.
-
That's quite a view from your break room and lunch seat. Several areas comes to mind as it relates to your list, I created a custom shallow water sailing skiff and I inlaid wheel weights in epoxy in a recessed section of my centerboard. then glassed over the unit with biaxal glass. It worked super. I also added a built in drink cooler with a drain overboard in my helm seat of a cruiser. Of course waterline for the drain and bottom of the cooler comes into play. But you really don't need a deep box as long as you generate a longer than deeper one.
Of course plan for insulation thickness . I used close cell foam, which received epoxy and glass and bonded really well. This is an example, but can be modified to fit any shape and form for an area. Create a crude mold for your box and taper the unit so it comes off easily when you create a solid glass skin for the inside. Formica is great for the outer skin and just wax the surface really well before glassing.
I also used portable bunk board inserts from side seating for sleeping.

-
For you folks unable to attend this evening, the food was grand, the talk was overflowing with stories and we finished up the evening with Ms. Carla's birthday celebration. It was nice to meet folks in person that has provided commentary in print here. A report on Graham, well he appears to be fit and ready for another trip. But he told me not to tell Ms. Carla his plan.

-
1
-
-
17 minutes ago, Chick Ludwig said:
Old Codger won't be coming this year. Various health related issues in his family.
Was wondering how things were with you lately. So sorry to hear the health issues, Hope things gets better. Your skiff is still one of the coolest in the water.
-
Alan, sent you a text and wondered if it got it at the same number as you had in the summer.
-
UShip has flat beds and enclosed trailers and shippers will bid on your boat and trailer too. You can specify how you would like your boat transported.
-
Life and sometimes longevity is about mind over matter. For sure you have the ultimate attitude to manage your current issue. Making the most of what we have at each segment of our life should always be the goal of everyone too. You inspire that each and everyday. It was really nice to see you and catch up a bit over the weekend.
-
2
-
-
17 hours ago, Kennneee said:
A great day of sailing and my crew taking her in to the ramp WITHOUT any unwanted excitement.

That almost looks like George Washington crossing the Delaware.
 Glad to read you and your group are getting the hang of attacking the challenges of docking in a professional way in your beautiful craft.
-
1
-
-
On 3/8/2023 at 9:39 AM, Mike The Desert Rat said:
Ken, I've read all your post. Awesome boat. Thank you for sharing your journey. I'm thinking about building an OB 24 or OB 26. The extra space of the 26 really has my attention. I've never owned or built anything this large. The biggest boat I've owned is an 18' pontoon boat. I can launch, dock, and trailer that boat by myself. I'm wondering two things, 1) How comforatble would you be handling this boat on your own, and 2) What are your thoughts on bow and/or stern thrusters for a boat like yours? Have you ever considered either? Thanks, Mike.
Both the 24 and the 26 involves the same steps, just a few more pieces of wood and will handle the same. We never seem to have enough room inside, the more we use one. But after going back and forth between the two sizes, the difference for me would be a bit more room for a head and shower in the 26 if you create a decent layout inside the cabin with about the same creature comforts for cruising and overnighting.
Now to speak about Ken and esteem builder of the Bluejacket, both are hard to live up to in their standards of excellence, creation and execution of boat building skills. I haven't updated my thread since I have been in the stage of laminating the sides, which is like building two boats in one with the cold molding process. So if you go this route be prepared to have plenty of patience as you see the boat take shape,,,,,,,,slowly. That's my recommendation to anyone that's never bit off a project with shape before.
And I recommend going with a slower harder for your larger glue ups. And be patient and let things dry enough before moving along to your next step if its related to your last step. Wet out properly all mating parts.
-
2
-
-
Nice work,, You are not far from launching, just a few more details.
Its amazing how much work you end up with after the flip. But at least you have a helper to speed things up.
-
I don't read anything that your should worry about. Airplane pilots gets tested all the time in simulators so they can sharpen up their skills and response times when abnormal stuff happens. And you do need some battle scars on the next paint, to get this behind you. Now you can relax and just enjoy your boat without a worry.
-
1
-
-
Well not a lot to show in this stage, but I found the whisky plank. :<} and ready for the edges to be trimmed. I capped the stem ends with solid mahogany and will wrap a couple of tabs around the stem front before doing the chine tabs. Silently in the middle of the night I can hear " Prepare to ram" hehe I plan to rough block the sides before I glass to eliminate a lot of the ever present dimples thats generated by screws and washers in the soft plywood faces . The bow eye plate will lay perfectly flat on the face of the solid wood.

-
2
-
-
55 minutes ago, Kennneee said:
Don- If we weren’t foolish and optimistic we would never build boats. Glad to have those traits or life would be boring!. About to head out on Lula, the result of the above mentioned parts of my personality.
Ken
I don't see boat building as being foolish. Some people blow their money away on drugs, cigarettes and wild wimmin and have nothing to show for the spending but medical bills sometimes. I think we are some of the smartest people on the planet. Boat builders are carpenters that turns straight wood into round objects.
They are electrical engineers, world navigators, and many have a way to keep wimmin happy as they spend their money on the boat building addiction, and some even smile at you in the process. Now that takes a genius to pull some of this boat building off.
On a side note there is real artistry on display by so many of your guys. Maybe staple them to the wall and call it art and put a price tag on them for a half million bucks. Some of us foolish folks try to sell them as floating toys, which brings us a return of about half the materials, you know. :<}}
-
1
-
 1
1
-
-
Thanks fellows. Well work has been proceeding along. Next week we plan on starting to plank the opposing sides. I did manage to purchase a pretty substantial u-bolt bow eye and it came a set of two. I will only be using one. So if anyone else finds a need for one with a long threaded shank, feel free to send a pm and you can have it. This is the link to the specs. The defender ones required a shipping cost of half the price of the bow eye u bolt. And I don't see any problems with this one having it in hand. I will dry fit it and will have the holes in place when I finish the planking and glass work to clean up and install in place.
NovelBee 2 Pack of Stainless Steel Stern Bow Eye Tie Down U Bolt with Hex Nuts and washers,Stock Dia. 5/8",Thread Length 5-7/16",Overall Length 8"
-
12 hours ago, ejds said:
how about McMaster-Carr
https://www.mcmaster.com/eyebolts/material~stainless-steel/thread-size~1-2-13/
Egbert
Thanks for the link. I would like to use the two threaded shank set up, which most have a small plate in which assists in sealing the region in and around the drilled holes. In the past the single shank has had the tendency to spin , which means there is a potential overtime for the water to wick around the shaft and into the underside of the glass region of the stems. All of the Simmons used single shank eye bolts, even though the use of beading compounds was absent. But I just want to hopefully remove this possible problem. Check in sometime and give me an update on your shed facility for your own yacht.
-
2 hours ago, Don Silsbe said:
I just want to share a tip I discovered on an old MAS epoxy video.
One problem is knowing how soon it’s OK to apply an additional coat of epoxy on your work. MAS recommends a test using a cotton ball. Lightly touch the recently epoxied surface with a cotton ball. If it comes away clean, it is not ready yet. If fibers are left behind on the surface, you can give it another coat.
NOTE: Do this test in an obscure corner. Those cotton fibers are going to peek through your final product. Also, this test doesn’t work after four or six hours.Did you mistype this description? Or are you saying that purely wet resin does not pull any cotton fibers away when touching it?
-
Thanks for the interest in watching grass grow and the replies. It was a pleasure to work along side of the new hire. The price was right, a piece of baloney with one piece of white bread per day.
 I have been busy making progress with some additional details between finishing up the second layer. Of course the new shot does not show the detail of the team care of getting the first layer as fair as possible for the second layer, which deals with how much work you will need in the glassing and fairing process before paint. So for anyone considering a cold mold hull, while you want to get the hull planked up, spend time in the set up phase and when you are installing your battens that they are fair the entire running length.
Then as you are gluing up the thinner first layer don't attempt to screw your layers right at the butt seams, which will create deeper areas to fill when you are applying the thickened glue for the second layer before you want to install the second layer. And of course you really do not want to grind down the any humps a way back from the seams if you tighten down too close to the edge.
Figure your second layer that they will land middle way of the first layer, which will further make the outer laminate fairer by the natural tendency in the first layer to not be so flat to the battens. Hope this will help someone watching. Will be grinding all the edges to shape at the sheer and reverse chine flats and clean up all the excess seam resin this week.
At this point in time I will figure out what I think will be the location of the bow eye for the trailer, since we have one for it to fit on before I work on the opposing side and get it ready for planking. I like to do this because its much easier with the access when standing along side of the area. Since the stem back is open I can do what I need to counter bore and recess any coupler for an extension since I have not been able to access 1/2" bow eyes with the threaded shafts long enough to fasten to the back side with its nuts on the original ends. More to follow on my process, unless someone can tell me where I can find approx 5 inch stainless steel eyebolts.
And yes as you can see my moaning chair has filled up a bit too.

Okay now

-
1
-
-
Merry Christmas to everyone. I have been making progress, just haven't gotten to the point of posting some of the boring progress of planking. The big guy came for a bit and sped up the progress with assembly line precision, operating the sharpie for the cuts and the kept the screw gun smoking. Luckily the screw gun had a protective coating of epoxy to cool down the heat transfer to the hands.
 Will provide pictures in the next couple of days when I get things cleaned up on the one side.
-
1
-
-
Okay, without pictures or videos, it did not happen. Must have been a classified gathering in some remote region of Area 51 with no leakers? You guys are slacking off.
-
I have searched for the build photos that used to be on the local community college web page but I cannot find it anymore. That was a fairly decent tutorial for any beginner or for someone deciding if the boat would work for them. Maybe Alan has more information on the old files. I did speak to the fellow thats doing their boatbuilding program now. But he states the files are missing from the inner workings of the college.


OB 26 custom hull build
in B & B Yachts Forum
Posted
Well you can create a wooden frame , known as a wooden wheel and rolled it over with the right combination of room and related equipment. But we wanted to get it up on the trailer with simplicity and less time consuming. Sometimes you cry "uncle" though without crying uncle. We weighed the value coupon against manual labor and the added effort. For our situation the extra effort and materials to get the strongback mobile from the ground in the confined space and on the other side of the yard to the driveway may have been a bit of an overkill. But it was grand beyond wild imagination for the uneven humps and angles. But the setup was absolutely the ticket and two people pushed while one person steered. But the project is a slow and steady piece of work that will hopefully be completed in the next couple of years, if things goes as planned. How do you eat an elephant? one bite at a time.
Now its time for Alan to point us in the right direction of locating the fuel tank and related parts to be incorporated under the deck for the desired interior layout that will be determined once we clean out the non essential parts. .
By the way I highly recommend solid 8" casters in lieu of pneumatic ones on solid surfaces.