Alan Stewart
-
Posts
702 -
Joined
-
Last visited
-
Days Won
115
Content Type
Profiles
Forums
Events
Gallery
Everything posted by Alan Stewart
-
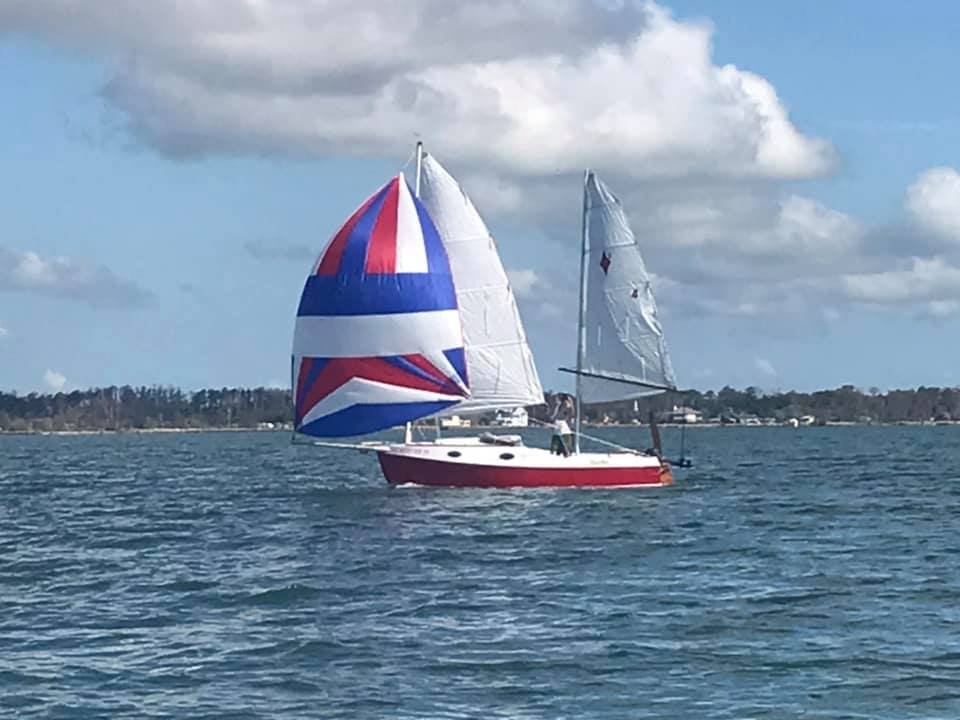
Graham sailed down Core Sound Sunday with the group. In total Graham said there were 7 boats. I think he said he was the last to leave the campground. He had a good spinnaker run down the sound. "A perfect day" he said. He was second into the bight he said. Upwind the last little bit. Here are some pictures for those without facebook.


-
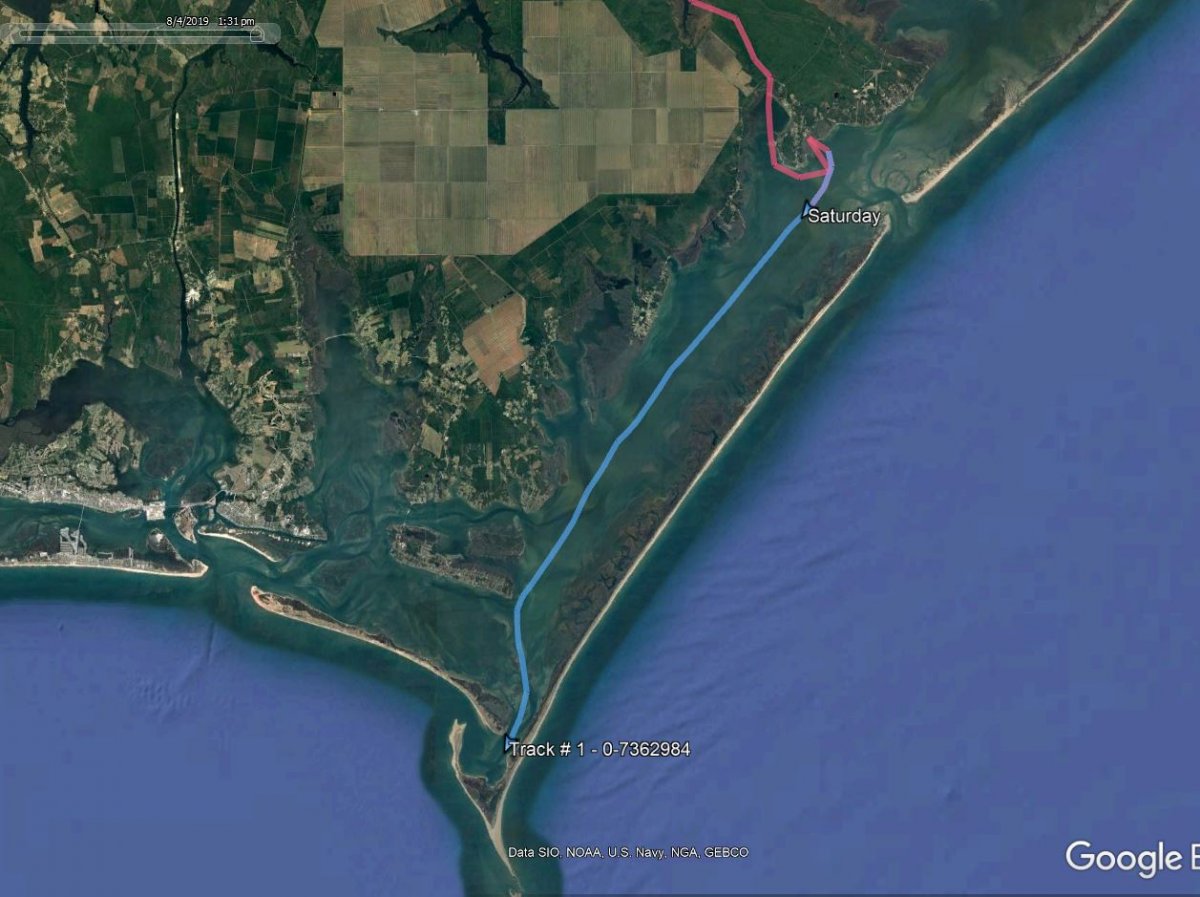
Graham made it to the start of the event yesterday with another 16 nautical miles via Turnagain bag, old canal, Stump Bay, Golden Creek, Nelson Bay and around into the Cedar Creek Campground. Looks like they have just shoved off this morning at about 8am headed for Cape Lookout. They are enjoying a north wind so should have an easy starboard reach down Core Sound. Wind shifting east then south later this evening but they should make it to Lookout in just a few hours. About 18nm away. Here is a picture posted on the OBX 130 FB group by Shawn Payment AKA Lawless, another watertriber!


-
Pictures from Graham.


-
Not sure which route hes gonna take. Hopefully its clear!
-
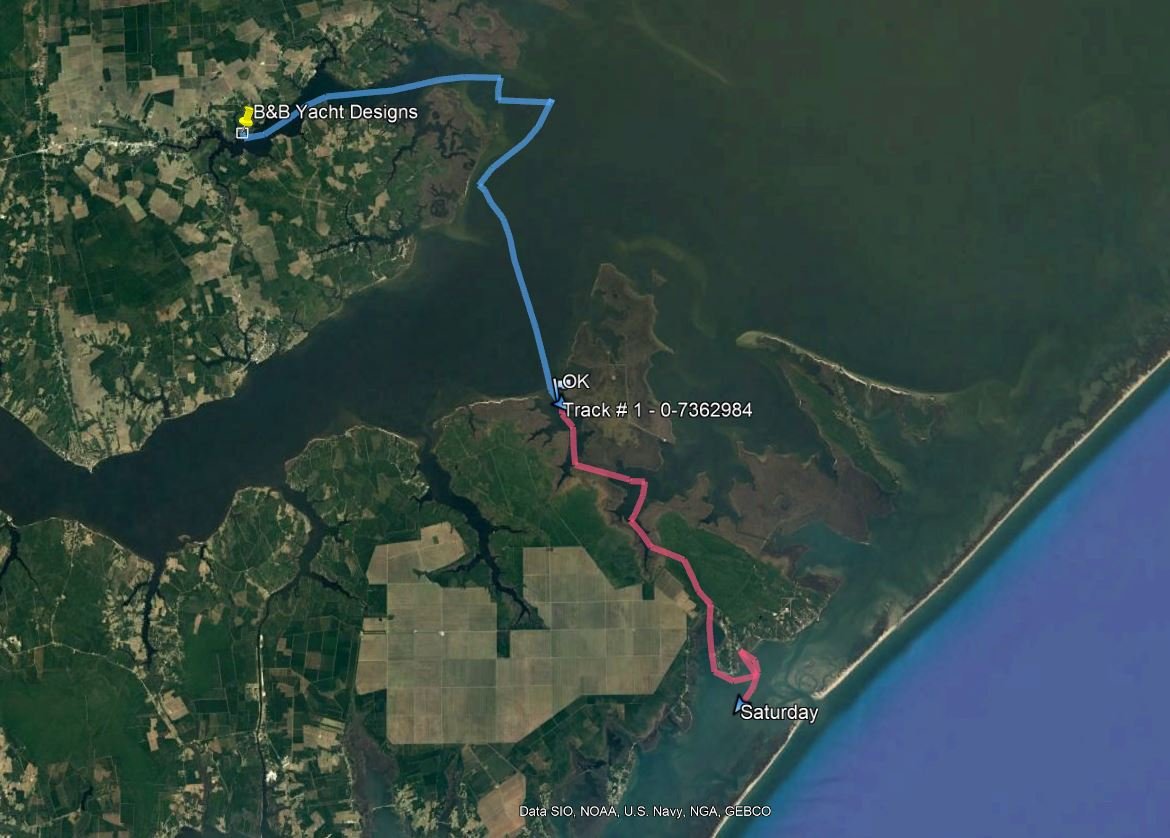
He is actually headed to Cedar "creek" campground for the start of the event as opposed to the old Driftwood location on Cedar "island". A small but important distinction! The group is meeting up there today and leaving as scheduled tomorrow (sunday) for the day 1 leg of the trip which will have them camping at Lookout. Here is the OBX 130 route file from their facebook group OBX130 2019.kmz you can download this and upload it into google earth to see the routes. Here are Graham's spot tracks from yesterday if you want to get the track shown below on your own google earth window. spot_messages.gpx

-
Graham completed 26.8 miles yesterday and anchored in the mouth of Turnagain bay. He departed at 2:40 and stopped around 9pm for an average speed of 4.2mph or 3.6 knots. It looked like he motored out of the Bay River and then shut off the motor upon entering the Neuse. Not sure if he motored across the Neuse or was able to sail but the more sporadic spacing between track points indicates that he was under sail the whole time.

-
Graham has set off from the shop today aboard Carlita his Core Sound 17 Mark 3 bound for the start of the 2019 OBX 130 event which leaves from Cedar Creek Campground on Sunday. You can follow his progress using his spot tracker link. He is currently headed East out of the Bay River into the Neuse with a SE wind building tonight. Looks like he just turned off the motor. He planned to cross the Neuse this evening we will see how he gets on. Here is a video of him leaving the shop today. Uploading now. give it a few minutes. 4:45pm 8/2/2019
-
Jessy 15’ build log - Philadelphia, PA
Alan Stewart replied to Justin C's topic in B & B Yachts Forum
Pictures look good to me. I can't see both sides of the gear chine joint but there should be an equal gap on either side of each gear which is approximately 3/16". These gaps will get filled in when glassing the outside of the chine. The overhang of the bottom at the bow just gets cut off. It's an artifact of the bottom panel being larger than needed around the edges for the gears to slightly overlap the side panel so just cut/round it off when shaping the chines and rounding the stem later. The outboard pad will get radiused on the outside along with the chines to allow for glass reinforcing the bottom-transom joint on the outside. Then that joint will be built back up with thickened epoxy to a sharp corner with ~1/16" radius for a clean breakaway when planing. So basically as long as the transom is flat you are good to go. -
Jessy 15’ build log - Philadelphia, PA
Alan Stewart replied to Justin C's topic in B & B Yachts Forum
Justin, Yeah trim it as needed so the bottom sits flush on the transom at the keel. Looking good. The outboard pad on the outside of the transom should end up flush with the botttom. Any gaps or voids will easily be filled with thickened epoxy. -
Jessy 15’ build log - Philadelphia, PA
Alan Stewart replied to Justin C's topic in B & B Yachts Forum
an 1/8" might be a bit much. You can easily remove the center frame from the boat to make that adjustment in the notches after you wire the bottom on and flip the boat upright. As long as the transom and fwd bulkhead are in the boat will mostly remain in shape. -
Nick, Looks awesome thanks for the pictures! I've not tried the caulk tube so thanks for giving that a go. I've wondered if it were possible to have a tool that would simultaneouslt lay down the exact right amount of thickened epoxy AND shape to a fillet all at once. in my mind that looks like a gun with some sort of wheel, a caulk tube and a shaper thing and then may some sort of edge scraper behind.
-
Jessy 15’ build log - Philadelphia, PA
Alan Stewart replied to Justin C's topic in B & B Yachts Forum
Looking good. The center frame should be just slightly proud of the bottom because the inside face of the bottom contacts the outboard edge of the side panel so if the bottom of the frame was flush there would be a small gap. One thing to watch out for is "fishtail" in both the keel and sides. On the sides this will show up as an inward curvature just when the sides get to the transom usually caused by tightening the screws into the transom too tight or the angle of the transom stiffener being off a bit. On the keel check to make sure the center keel edgea of the 2 bottom halves come fully together all the way to the stern. If you have a gap at the stern that will result in an s curve or fishtail in the keel line. Its easier to close a gap there with the boat right side up so that gravity is working with you. Then lfting at the transom and tightening the sternmost wires should do it. -
Thru the hull plastic fittings
Alan Stewart replied to Mark Rendelman hull 24's topic in B & B Yachts Forum
Mark, This is how I usually join the mast tubes. -
I think that will work well. Look for tight straight grain.
-
B&B's first annual "Capsize Camp" July, 20-22
Alan Stewart replied to Alan Stewart's topic in B & B Yachts Forum
We had a very successful albeit HOT capsize camp on Saturday Here is the proof I mean footage!!! An enormous thanks to Will and Rob for bringing there really nice CS-17 and offering themselves up to the camera and spectators! They did an amazing job, no boats or humans were damaged and everyone learned a lot. Thanks also to Nick for the extra video footage, Rob for coming out and taking our Spindrift 12 for a much needed spin, Tana (the main camera woman), Dawn and Taylor for being our "rescue swimmers" slash "I'm going to cool off in the water now" spectators and Dejah and Zoey for moral support aboard Southbound the camera boat. We will have info up soon on the mast head float and how you can get one. We will be offering them as easy to put together kits which will pop right onto any existing Core Sound boat's mast. -
-
Jessy 15’ build log - Philadelphia, PA
Alan Stewart replied to Justin C's topic in B & B Yachts Forum
Justin, You are correct on assembling the transom, you will need that assembly and the center frame assembly done before you fold the boat up. Glue the transom stiffeners to the transom and the center frame doublers to the center frame. For lamination like that (the technical term for making a wood sandwich) I like to assemble all the parts dry and use drywall screws to hold everything together then I disassemble it all and apply glue and then re-assemble with the screws. Without some type of alignment pins or screws it's practically impossible to get the parts in the right place with slimy epoxy on them. The screws don't have to be all the way in in fact it's better to leave the heads proud a bit. Then I add clamps, as many as I can fit on there but not so many that I don't make it impossible to clean up most of the epoxy squeeze out. Sometimes, I'll clamp it up then remove the clamps one at a time or at least rotate them so that i can get most of the squeeze out. If needed, i'll back out one of the screws so the wood can pull together more (with clamping pressure) then re-insert it. 2 screws per part is minimum but 3 allows any one to be taken out at the time after it's assembled. After about 6 hours the epoxy is like dried up chewing gum, nothing is going anywhere now but the glue up is still not fully strong. At this point it is safe to take off the clamps IF there was not a lot of stress in the wood. For example you wouldn't want to do that it it was a gunwale you were gluing since it was under tension. It's important to take the screws out at this point because if you wait until the next day they are likely to snap right off if you forget to heat them up. If you do wait until the next day you just need to hit the heads with a torch for a second and they will instantly release and come right out. This is easier to do if you left the heads proud! The final step would be cleaning up any remaining squeeze out and puttying in the screw heads. Sometimes it's easier to drill the screw hole out larger say 1/4" hole and fill it in with epoxy than to try and putty in a 1/8" hole where you can't get much epoxy in the hole before it seals itself off and you get the air plunger effect. Some cheap plastic syringes are great for filling small holes like this but a putty knife pulled slowly over the hole does the job. -
Jessy 15’ build log - Philadelphia, PA
Alan Stewart replied to Justin C's topic in B & B Yachts Forum
Yeah that is a good idea and probably what i would do for a remote steering station. Weve also thought of putting a little side station like on a whaler which could go just ahead of the bench. -
Jessy 15’ build log - Philadelphia, PA
Alan Stewart replied to Justin C's topic in B & B Yachts Forum
Justin, Looking good. Glad to see you post some pictures and that you were able to get started on the boat finally. I like your casters on the support frames i'm sure you will enjoy being able to slide the boat around the garage. For cleaning up that epoxy squeeze out, a "mini-grinder" with a heavy grit sandpaper disk like 36 grit is an essential tool at our shop. It will make quick work of the majority of those cured epoxy blobs just be real careful not to gouge the panel and do the final 1/16" with a block of sandpaper or a flat machine sander like a 1/2" sheet sander or random orbit. Looking forward to seeing her folded up!
-
B&B's first annual "Capsize Camp" July, 20-22
Alan Stewart replied to Alan Stewart's topic in B & B Yachts Forum
The second annual Capsize camp is right around the corner. Scheduled for the 20-20 (weekend after next). If you can't make it to the shop don't worry! we'll have another one with more advanced warning. The schedule will be the same as last year which was basically sail around and capsize your boat as you like! We hope to demo version 2 of the mast head float as well. -Alan -
This boat was built from plans and was on display at the Beaufort Boat show this year. The boat looked very nice and although Craig made a few changes to the boat it looked like it would be a great running boat. I took some pictures.... https://photos.app.goo.gl/QTTXLc9pNDey8qV49 I just saw it posted on Craigslist and there are more pictures there.... https://eastnc.craigslist.org/boa/d/avon-23ft-cold-molded-custom-carolina/6917609861.html
-
Building a Two Paw 8 for Trailer Camping
Alan Stewart replied to Don Silsbe's topic in B & B Yachts Forum
I never have. Sounds like a lot of work but i havent used brightsides just 2 part poly devoe and awlgrip. -
Centerboard line pivot? CS20.3
Alan Stewart replied to NowWeTryItMyWay's topic in B & B Yachts Forum
I think that is a typo in the drawing, at one point we were playing with putting a block on the cb itself but decided against. There should just be the one block which is labeled. -
I am jealous. what a sweet boat.
-
I also like the chair, need to get one of those in my shop. And the boat looks great too!