meester
-
Posts
205 -
Joined
-
Last visited
-
Days Won
12
Content Type
Profiles
Forums
Events
Gallery
Everything posted by meester
-
About the lug setup, a loose loop of line will definitely work to keep the yard close to the mast as Don suggests. Other traditional solutions include adding parrell beads, or using a wooden or iron hoop. I use the "Storer loop" with a hook lashed to the yard. It's very quick to rig and derig. The halyard comes back from the throat end of the yard, passes around the mast opposite the yard (not really a wrap) and catches the hook on the aft side of the mast, then up to the top of the mast. When I derig, I leave the halyard tied to the end of the yard. I only remove the halyard from the hook, loosen the downhaul, and bundle the boom, sail and yard. Next the mast comes down and -- done. As Don said, try stuff and see what works for you. Keep up the good work! Bob
-
I can't tell whether your block-hook-wingnut rig has this problem, but it's essential that the tiller "lock" doesn't actually lock the tiller. It should just add friction - so you can move the tiller if you need to. I use just a cord with a wrap or two around the tiller. It's not perfect, but it works well enough for me to leave the tiller alone for a minute or two. The next level would be to add some bungee to maintain tension. Running the halyard back to where you can release it is a great idea. It's important to add blocks and cleats to keep it tidy, though. Bad things can happen if your halyard gets tangled with the main sheet or your feet or something.
-
The Amanda's lug rig has a shorter mast - roughly the length of the boat, I think. That could make a difference if you have storage constraints. For the kind of sailing I like to do, the ability to raise and lower the sail allows me to take a break from sailing without enduring a flogging sail or going ashore. In the Spindrift's favor, you can't beat the zip sleeve for simplicity. That's about all I can think of in terms of technical differences. There are minor differences in performance that won't matter unless you are racing. Aesthetically, I think lug sails are just way cooler, but that's me. Choosing the design is a fun part of the build process. Ultimately, I think the purpose of the boat is to give you grins. If your eye just keeps coming back to one or the other design, you might want to pay attention to that. There's no wrong choice. (Except maybe a PWC - that'd be wrong.) Enjoy! Bob
-
 I suggest keeping it simple. Wear rubber boots in cool weather and use a bailer when necessary. A little water slopping around in the boat is not a big problem. Also, the more gadgets I bring, in my CS15, the more stuff there is to trip over with my enormous flipper feet. Bob
 -
@Mark Rendelman If I remember right, broadcasting on marine band frequencies is OK from the water, but not from land. (Except for the exceptions) Could that be the "illegal" issue? Bob
-
Did we miss the question about the dagger board? It goes in with the dull, rounded edge in front and the sharp edge trailing - like an airplane wing. About downhaul tensioning, it should be just tight enough to smooth out the crease that runs from the forward end of the yard to the aft end of your boom (throat to clew). On the same post as your dagger board question, the second photo shows creases of this type. See also https://www.storerboatplans.com/tuning/lug-rig-setup/what-is-that-crease-in-my-lugsail-how-to-diagnose-and-fix/. with my balance lug, when I get that crease to pop out, I can feel the sail really catch the air. BTW, if you take raise the sail almost all the way up the you'll be able to see where you're going under the boom. Leave a few inches at the top to allow the yard to swing easier. Enjoy! Bob
-
Hi Guys, Just wondering if you oriented the glass cloth "on the bias" with the threads running diagonally across the fish-shape's spine or "straight" with threads going parallel to the spine and other threads going down and around like ribs? My experience is that laying the glass on the bias will conform to complex shapes well, but that the cloth gets a little harder to handle because it's so stretchy along the diagonal. Bob
-
This is one of those "well, I did this other thing" posts. I decided on 1/4" HDPE plastic for a keel strip, because its cheap and I knew I would cringe over grinding away a metal strip on ramp pavement or whatever. I used G-flex epoxy and flame-treated the plastic to help the epoxy stick. I figured the plastic would be a little slipperier for launching and retrieving off the trailer, but I don't know whether that's actually the case. Three seasons- so far so good. Bob
-
@Don Silsbe I'm not an expert in electrochemistry but I play one on TV. I got curious about how galvanization works. I learned somewhere that the corrosion protection in galvanized steel comes from having the zinc coating corrode away before the steel gets attacked. It's the same principle as a bolt-on sacrificial zinc anode, but in coating form. But I also I read on some galvanization vendors' websites that the zinc oxide forms a tight barrier that slows corrosion, which might explain why parts are galvanized after they've been cut and formed. And while I was googling around, I also learned that aluminum sacrificial anodes are available, so maybe aluminum isn't so bad. For practical purposes, it probably doesn't matter. How many times a year is your trailer going to get dipped in salt water anyways? Just hose it off when you get home. Bob
-
I thought it might be the tightened nuts causing the crack, but whatever the cause, those plates will help distribute the load. The crack doesn't look like it runs very far back, so it might not be a big deal at all. Another approach to stabilize the crack might be to run a bolt or threaded rod athwartships(?) through the base board and two cheeks. Consider galvanized steel for the material in order to avoid corrosion at the junction of dissimilar metals. My shins already hurt thinking about those sharp metal corners sticking out just over the edge of the trailer frame. I'm a klutz and I have the scars to prove it!
-
Spindrift 10 Build (by a 9th Grade Girl)
meester replied to PadrePoint's topic in B & B Yachts Forum
Wonderful. Delightful. Inspiring. This thread is giving me grins. Keep up the good work! -
@Don Silsbe

-
Hi Don, Seeing you put the hooks on the tent rather than on the boat triggered a thought: How about holes drilled about 1/2" deep in the underside of the gunwale, and wire bungee hooks or similar on the tent. On the plus side, there would be no visible hardware. On the minus side, the hooks would have to be kept in tension to keep them from falling out. Bungees or ribs in the roof would work. $0.02 Bob
-
Sometimes you just need a little batch of epoxy, and the pumps would squirt too much. I use a little pocket scale ($10 to $15) with a chart like this: https://s3.amazonaws.com/duckbbs/supplies/epoxy/epoxy_weight_ratio.pdf to measure out the resin & hardener.
-
They're sold as kayak lashing hooks. Something like this: https://www.amazon.com/RLECS-Lashing-J-Shaped-Boating-Accessory/dp/B082TTWCF6/ref=sr_1_3?dchild=1&keywords=kayak+nylon+hooks&qid=1632697601&sr=8-3
-
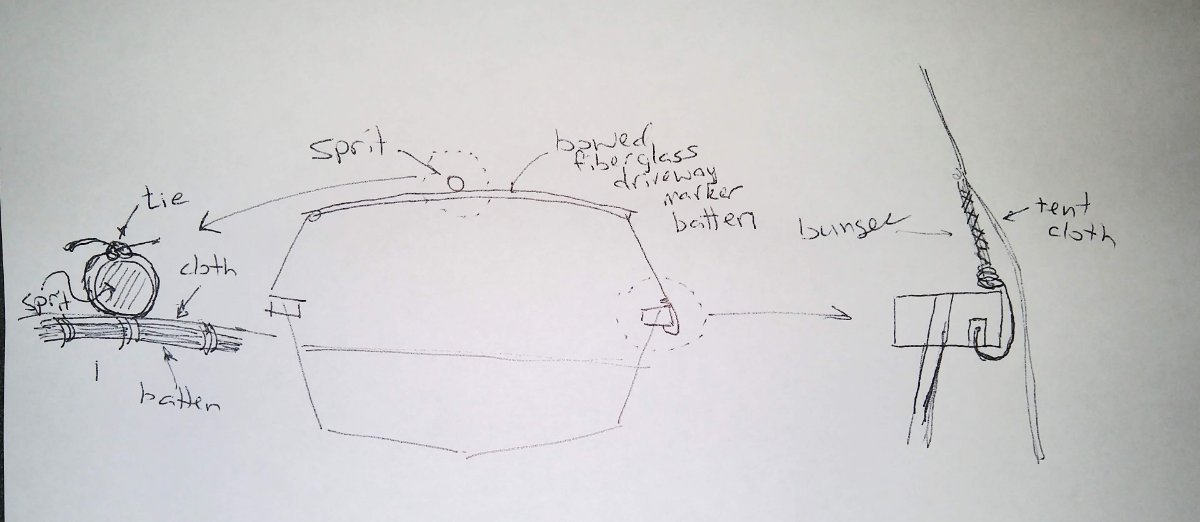
Hi Padre, I have an unconventional rig on my CS15, so my solutions won't apply across the board. When I stop to camp, the lug flops down into lazy jacks. The tent hangs from the bottom of the boom and is stretched fore & aft between the main and the mizzen. Ties on the tent roof go up and around the boom & sail to hold the tent up and bundle the sail. Fiberglass rods (driveway markers) spread the roof and flex down to hold the tent sides in tension. The mosquito netting is a box-shaped net that I picked up from Wal-Mart and just tied in at the corners.


-
I decided to sew my tent from fire-retardant material. Unlike land-camping, there's no fire exit on a boat. I installed nylon hooks under my gunwale to hold the edges down. My hull is dark blue and the hooks are black so they aren't too ugly IMO. Pro tip: Install any zippers with the handles on the INSIDE. Bob
-
Thinning epoxy/cleaning hands&tools
meester replied to Mark Rendelman hull 24's topic in B & B Yachts Forum
I tried vegetable oil recently, and it worked really well. I knew about using vegetable oil to help get adhesive and sticky stuff off of glass, but i found that it works pretty well with epoxy/skin. I dab on a little oil, scrub, and then use soap & water to get rid of the oil. I think the oil coats little glue globs when you scrub and doesn't allow them to re-stick. Waterless cleaner would be my #1 choice since that's what Gougeon Bros recommend, but in a pinch, there's always some oil in the kitchen. -
I wonder if the schooner sail plan is just the result of someone putting up the sails in the wrong positions. I built my CS15 to have a lug yawl sail plan. The configuration works well for dinghy cruising with a clear cockpit and convenient tent poles. I'm not sure what kind of information you're looking for, but I'd be happy to answer any questions. Bob

-
Chick is right about keeping your weight near the center thwart, at least when sailing solo. Too far back, and the transom gets down in the water creating turbulence and drag. For my CS15, I made my first tiller too short and had to reach back to get the trim right. To compensate, I made my 2nd tiller too long. Too long is when it's awkward to shift across the cockpit when tacking and jibing. Also, if you make the tiller long, its easy to make it shorter. Not so, the other way 'round, I found. My tiller pivots up like the ones above. Sometimes it's nice to just push it up and out of the way. Drill, epoxy fill, drill and a 1/4 -20 SS bolt. Bob
-
Hi Steve, For what it's worth, this is my next build - the West Mersea Duck Punt. It's not an ultralight, but it can be cartopped and it is dead simple. There's no dagger/center/lee board or keel, and you steer with a paddle or short oar. You heel it over on it's hard chine to go upwind. https://smallboatsmonthly.com/article/milgate-duck-punt/ Also check out the YouTube channel of "lurch1e" for sailing videos. There are plans in a couple of places online - the original design by John Milgate and a an incomplete stitch and glue development by "Flo-mo." Let me know if you'd like more info. Best Regards, Bob
-
Request for Advice, Coastal Camp Cruising
meester replied to Don Silsbe's topic in B & B Yachts Forum
@Thrillsbe"Toilet in a bag" by Cleanwaste. Available at Amazon, Walmart, and maybe other places. -
Request for Advice, Coastal Camp Cruising
meester replied to Don Silsbe's topic in B & B Yachts Forum
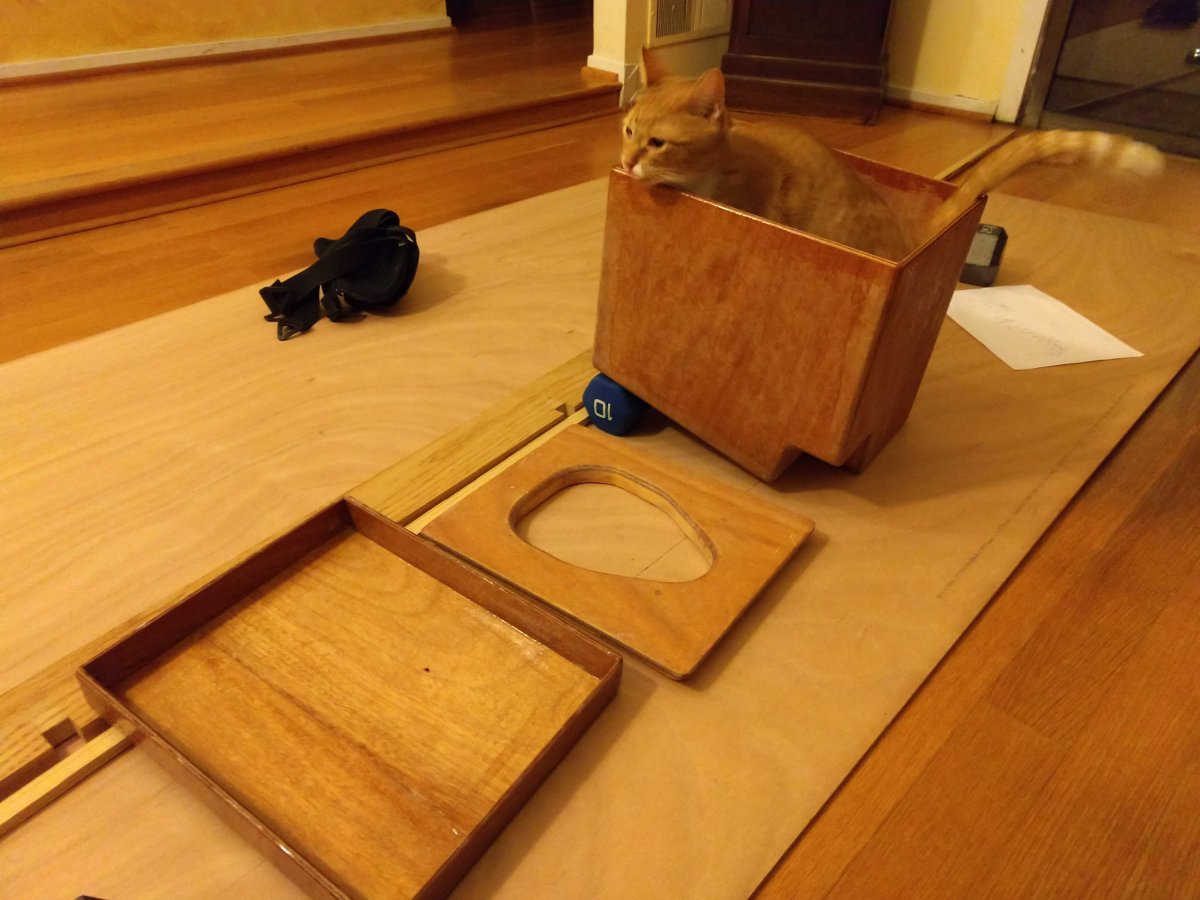
Hi Don, I'm enthusiastic about this topic. Dinghy cruising was really the adventure I had in mind when I built my CS 15. About shelter, I used fire resistant polytarp for my boom tent. I worried that if my tent caught fire, there'd be nowhere to escape to. I also bought a cheap mosquito netting shelter from Wal-Mart that I attached to the inside of the tent. I can roll up the tent walls and let the breeze flow through. I second the recommendation of http://logofspartina.blogspot.com Steve Early is a great photographer. Also Roger Barnes youtube videos. Roger has a book out, The Dinghy Cruising Companion, which you might enjoy. Nobody mentioned cooking and sanitation, so I'll add my bit on those topics. I like my 1-burner butane stove for cooking. Compared to many backpacking/camping stoves, it has a very low center of gravity. The downside is that the butane canisters don't produce enough gas when it's cold. BTW, for starch with a dinner meal, I like couscous instead of pasta or rice. Dead simple to cook and clean up. I always end up dropping a few "cousies" in the bilge, though. Sanitation: I pack the solids out, just to do my little bit for the Chesapeake where I sail. Here's a photo of my wag bag Taj-ma-John, which is made to fit under the center thwart. The inside-out bottom corner is an "oops" fix that allows me to work my bailer. Inside the box, I store a supply of wag bags, hand sanitizer extra TP and wipes. Ollie the cat stays home. As a bonus, my wife loves having it along when the two of us land-camp in our big family tent. I built an additional base to hold it upright on level ground.
-
Congratulations on your retirement and on your new project. Keep up posted!
-
I put a lug rig on my CS15, and the mast is 16' birdsmouth out of Doug Fir. DF is relatively inexpensive and its reddish color looks quite nice. I used too much math to calculate and measure the taper. Now I'd go with a simple bent batten to get a nice fair curve on one piece and then use that piece as a reference to match the others to. It looks like your mast tube is already installed, so that answers the diameter question. In addition to the boom attachment, a lot of forces get exerted at the deck-level end of the mast tube. Reinforce with a solid core there too. The glue up gets sloppy as Dave suggested. It can be a mess, but if you have a stay-at-home partner, an extra pair of hands can be an enormous help. The semicircle forms are a must. I used four on my bench, but I didn't get them aligned exactly right, so my mast has a slight bend. No problem. I just aimed that bend at the stern and called it a subtle rake. <wink> Good luck! Bob