

garrett6575
-
Posts
25 -
Joined
-
Last visited
Content Type
Profiles
Forums
Events
Gallery
Posts posted by garrett6575
-
-
Hello,
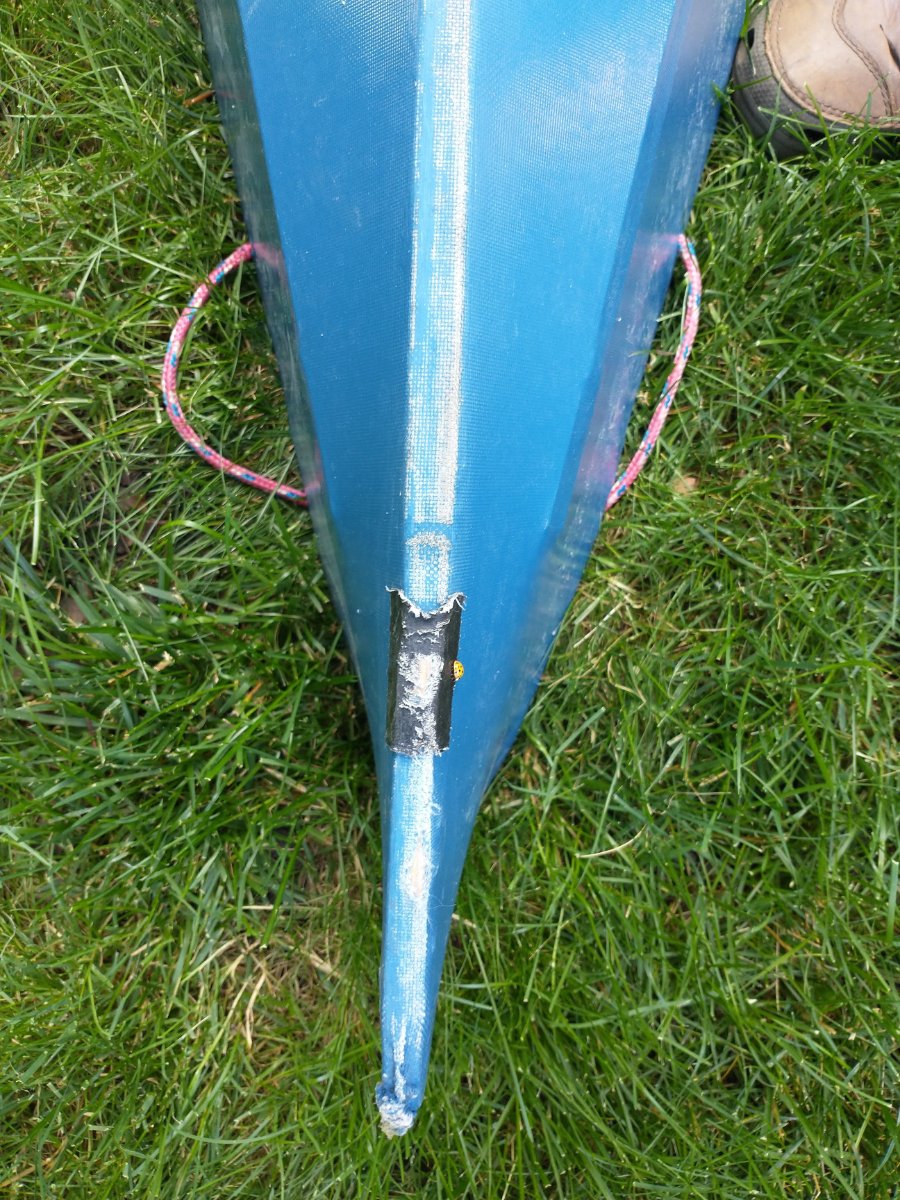
I built a Mess About 6 or 7 years ago. When I built it, I don't know of the rub strips were being sold, but I didn't use them. While the boat has held up great, years of use have worn through the skin as shown. You can see duct tape has held for a while, but now I need to address. My question is whether this is a re-skin situation or if I could patch somehow. My thought was to cover both ends with a rub strip and use silicone or some adhesive under it that would stop the leaking. Anyone have any experiencing fixing something like this?


-
I wanted the fabric held in place as tight as possible as I was sewing.so it was easier to pull tight while keeping everything in place. I bought a bunch of the large metal binder clips, pulled everything into place and clipped it every 3-5 inches. Then I could just pull tight the section I was working on and remove them one at a time as I moved down. After sewing a couple of feet, I did re-adjust the once that were left to tighten things back up. I found this made the process pretty easy.
-
At the Maker Faire here, they had a display of SOF kayaks. The builder there, suggested a trick for pulling nylon tight for sewing. They clamped the skin in place and then did a wide cross lacing (like shoe laces) back and forth about 3 inches on either side of the deck beam. Then you draw that as tight as you can and tie it off. With that tied off the skin is held tight and you apparently have to pull very little when stitching to get everything tight. I know this would never work with the loose weave 8oz poly, but I wonder if the 11 oz or recycled poly have a tight enough weave to try this?
-
I found it was easiest to mount a stick on the strong back at the end and use it as the 0.0 point. I measured all of frames & brackets off of that, going from the front of that to each bracket and frame. With that in place it is easy to test out the bow assembly on the first frame as the bow should touch the 0.0 post. On the other end, the stern end should be at 15'. If there was a difference between the frame and bracket measurement on any others, I went by the frame distance.
I have no answer regarding removing more weight by drilling more holes; however, I wouldn't think the extremely small weight savings would be worth the risk as the boat is extremely light as it is.
I did not glue my stringers to the stern or bow assemblies, I only lashed them. I did glue in a few corner blocks on the bottom of the stern assembly as I was concerned the bottom could have some flex in it,
I only bolted the two suggested frames to the brackets and leveled off of them. I will tell you that I was using the boat yesterday and was didn't like the fact that I could seen the two screw holes in the frame where it was bolted. I wouldn't trust just clamping them, but I would suggest filling the holes.
-
The balls would fill the space better, the noodles would be easier to retrieve if they get out

-
Finally, my mess about is ready to hit the water. Trim and rigging still needs added, but I want to get it in before I need to put it away for the winter. Has anyone used swim noodles for float bags? I was thinking of using zip ties to create bundles to fit between the frames on both ends, cut to length as needed. I like the idea because I have a bunch of them handy, they are puncture resistant, will take up a lot of volume if the boat were to submerge and they should have more than enough flotation. Plus they could be pulled out and used as a swim toy wen the boat is on shore.
My biggest concern would be securing them so that they don't come shooting out if the boat was flooded.
-
I looked through the manual and found a good close up of 'bad' pull holes. I suddenly feel much better as mine don't look like that. I have some holes about the size of the needle head.
-
Thanks for the response. I was thinking of redoing the corner, but was concerned about more snags if I restaple.
On the pull holes, I guess my big question is how big is too big. It seems most of mine are on part with what I see in your video, but it is hard to tell. Is there some good closeups of a 'good' pull hole and a 'bad' one which is too big?
-
I have stapled in the skin on the cockpit of the mess about. I could only find flat end staples for my staple gun (in stainless). The staples have caused some pulls in the fabric as shown in the pictures. Do I need to worry about these, other than than appearance will they be an issue? Will they get better or worse when I shrink? I thought of pulling some staples and trying to smooth them out, but don't want to make matters worse. Also, you will see in the pictures the puckers around the corner. Is there a way to smooth this better or will the shrinking smooth it enough?
I still getting the hang of the sewing, but I think next time I may try nylon as I am struggling with the loose weave on the original poly. Getting it tight enough with no pull holes is a real art.


-
I have to double check, but I thought I cut stringers at the suggested length in the build notes and it seems they are too short. I guess I'll get more use out of my jig for scarf joints

-
Switching to the other end of the boat, I have questions on the bow. First, should there be a cutout for the deck beam or does it end flush with the frame? There wasn't a cutout on the plan. Actually, I am not sure there was a cutout for the keel ether, but I added one.
Second question, should the bottom stringers lash to the bow and if so where? It looks like they would end in the cutout. As you can see in the picture, mine are short if this is needed, so if they need to lash to it, I need to fix that. I assumed the ended at the frame.
Do you have a picture of a mess about frame for comparison?

-
I am interested in the Stonefly as well, I'll be interested to see how the build goes. I am curious do the floor boards attach to the bottom side of the frames, in the cutout section I see in your frames, rather than being lashed to the top of the frames?
-
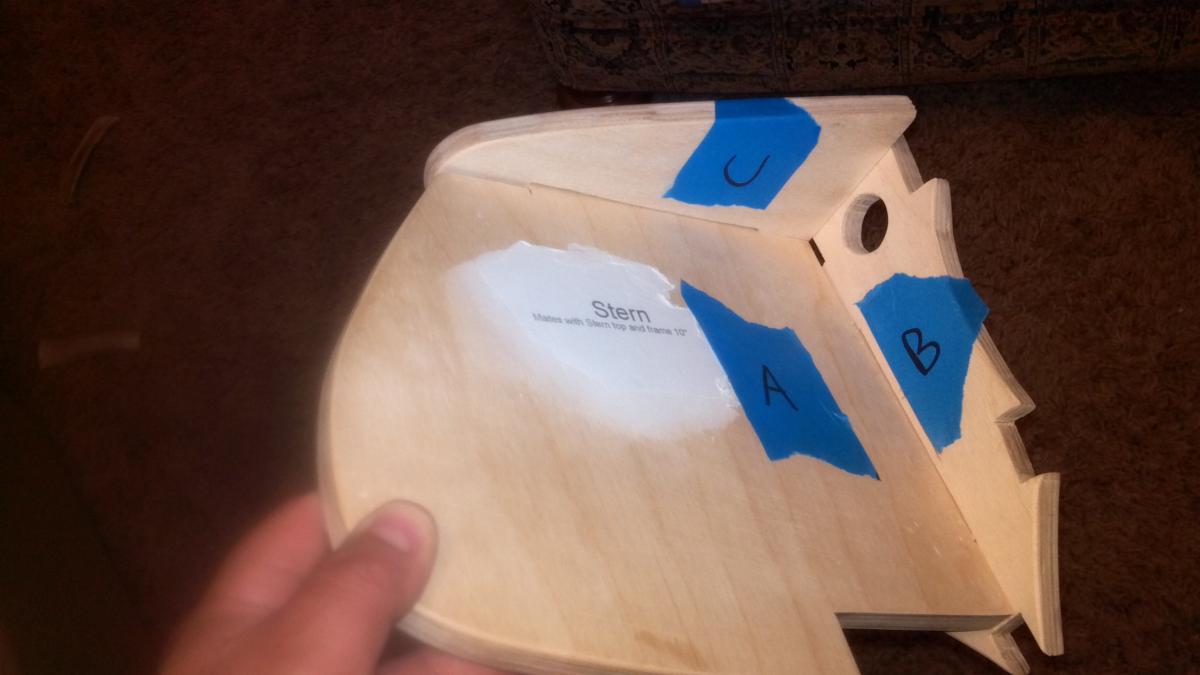
On the stern assembly are all 3 pieces supposed to be square? In my picture, A is square to B and A is square to C; however, the angle between B and C is less than 90 degrees. Is this supposed to slope down or did I screw up my cut. I assume the key is that the stern is square to the frame so the boat tracks straight, but I am curious if I should adjust this or not.

-
I thought I would follow up to post where I found my plywood in case anyone else in my area comes looking. Fingerle lumber in Ann Arbor can get baltic birch (they stock the European Birch), marine plywood (bs 1088) and has excellent clear cedar at various lengths (oddly, the 9 ft 1x4s were only 7 cents more than the 8 ft ones). I also found that Woodcraft stores carry BB. They carry it in very odd sizes from 30x48 down to 12x12. While this seemed odd, it actually worked well for the frames and worked out significantly cheaper and is only a few miles from me. Woodcraft also carries system 3 epoxy,
Hope this helps if anyone else is looking.
-
I did mean scarf joint angle.
Jeff no disrespect to the book, I find it very thorough - as you can see, I can't even post without needing to correct it

The one thing I like about epoxy over wood glue is that it seems to fill the gaps betters so if the mating surface of the joints aren't perfect it should give a better bond.
-
I was surprised that I couldn't find a recommended ratio for the stringer angle in the book or assembly instructions. I used a 1:10 ratio, I am curious if that is what others are using.
In terms of the jig, after reading a few horror stories on table saw accidents when trying to cut the stringer angle, I put together this jig for a circular saw to cut them. I am curious on peoples thought as to how this compares to a table saw jig for both ease of use and safety. I find it very easy to use, the jig is clamped down and I have a few scraps screwed in for alignment and hold down so I just put on one spring clamp and cut away. The cut probably isn't as smooth as a table saw, but I am using cedar and a few seconds of sanding smooths it up easily.
Finally, I used epoxy because I had some. Do people recommend epoxy or is waterproof wood glue(titebond 3) good enough? My stringers are done, but I am already thinking ahead about building a stonefly, so I plan on doing this again ;>


-
Bcone, thanks for the image. Jeff was nice enough to email me the notes so I am all set.
-
Jeff,
I seem to have lost the notes that came with the blueprints. I assume they were accidentally tossed out with the scraps from the frame cutouts. Any chance you could email the instructions that were on there? I know that you had the recommended stringer lengths on there. garrett6575@gmail.com. I'll keep looking, but the seem to be gone.
-
I have the strongback ready, brackets ready and frames cut out. I have a question on the placement of the first bracket. On the bracket drawing is shows 1' 0". However, the first frame shows 10" and the Notes show the 10" frame mounted to the strongback which I assume means it should be mounted to the first bracket as the rest of the frames which are to be mounted to the strongback align with a bracket. Can you let me know if the first bracket is at 10" or 1'?
Also, just as a sanity check, I assume the frames mentioned for the strongback mount directly onto the bracket and that I should place the bracket so the measurement will be in the center of the frame? For example I have a frame at 13' 3" so the edge of the bracket should be at 13' 2 3/4" so the center of the frame is at the correct location?
-
The placed mentioned in Charlotte,Mi sounds like they have what I need and at reasonable prices, but they are 100 miles away. I know a couple of you have driven that that far, but I hate to do that for one sheet. I found a local place that can get Joubert Okoume but it is $260/sheet. I could get the cheaper stuff and build 3 sets of frames for that price. The European birch sounds like the best bet if I can't find a source for BB, but I'll spend the weekend looking.
Thanks for all of the help, who knew looking for plywood would be so much fun.
-
Thanks for the information, that is very helpful. I live in the Detroit area. In my initial search, I have only found the marine grade l had listed. Based on this discussion and some research, I have specifically asked several places if they have the BSS 1088 and am waiting to hear back. Based on your info, I was able to find a source that has European Birch (I missed it originally as I looked specifically for Baltic). The description is below and that sounds comparable to the baltic. It isn't cheap though $112.
I thought you would find this humorous. One lumber store said they had marine plywood. I asked for information on the grade and number of plys and was told 'I Do not know the precise details. I can tell you that I have supplied others to build canoes and kayaks and none have been reported sunk.' Guess what store I'm not buying from.
European Birch:
- Excellent for cabinet doors, drawer sides, furniture, trailer floors, and marine use.
- Free of core voids.
- Exterior glue.
- Clear face, a few wood patches allowed on back
- 1/2” 4x8 9-ply
-
I recently received the plans for a mess about, my first boat, and I am struggling with plywood options. I haven't been able to find BB or BS 1088 around here. My two options are shown below. Based on these two options, do you have any recommendations? The lower cost is obviously attractive, but my primary concern is which would have the better quality. Comments on this thread have me wondering about the quality of the Douglas Fir plywood, especially seeing the C grade interior ply with up to 1/8" gaps. I have no idea what the G1S on the MDO indicates so I was hoping someone with experience with both could comment.
G1S MDO Plywood - $42/sheetMarine Grade Plywood - $80 - $100/sheetAB marine grade Douglas Fir.Made with exterior glue.A grade face veneer.B grade back veneer.Inner plies are C-grade veneer with core voids limited to 1/8" in width.Can be used indoors, outdoors, and in marine applications. -
I guess I was thinking of it more like a decked canoe where the deck would be skinned separately with both skins overlapped and hidden under a rub rail. It looks like this is how a lot of the Gentry Chuckanuts are done from the pictures I have looked at. Although with that approach I don't know if you need the heat bond or could just staple and cover with the rail? http://www.gentrycustomboats.com/C12%20page.html
It seemed like the same approach could be done on the mess about.
-
I am interested in building my first boat and I am looking at the plans for the mess about. I like the idea of a skin on frame style but I don't necessarily like the look of the seam (I know it is tradition and part of the SOF style, but I still don't like it) and I would rather avoid sewing for my first boat. Has anyone use the heat bond tape for this boat? I see it it done on Geodesic Airolite Boats so I assume it could be used on any boat, but I would like to hear from someone who has tried it.


Ripping on stem & stern
in Kudzu Craft Forum
Posted
Will do, didn't know if anyone had a better option. I am surprised at how little it leaks as it is. A little pumping after an hour of paddling and I'm fine Just concerned that one day it opens just enough to swamp me")