

Barry Pyeatt
-
Posts
2,084 -
Joined
-
Last visited
-
Days Won
1
Content Type
Profiles
Forums
Events
Gallery
Posts posted by Barry Pyeatt
-
-
Ditto, think it has been hacked and the attempt is to spread to everyones computers that are linked to the BYYB
-
you may want to read and study the following article. Then consider what wood you might want to use.
http://mothboat.tripod.com/CMBA/Building/foils.htm
Just for thought consider this. Current harvests of Douglas Fir or Hem/Fir comes from plantation grown stock for the most part. You will find considrable difference between this currently harvested "fir" and old growth fir that is what most of the older articles are referring to. The old growth Fir was a slow growing, tree with very tight annular growth rings. Especially on the north sides of the trees. Some times you could find as many as 60 annular rings to the inch on some of the old groth Fir. Not any more. Now you will find that most of the harvested Fir or Hem/Fir will have between 4 and 10 growth rings per inch. They are raised to achieve maximum growth So they can make studs and peeler logs from them. The rest goes into OSB and particle board production. If you have access to some good clear straight verticle grain fir you will potentially have a good solid piece of wood to work with. Or some older recycled Fir that is from old growth timber. Then consider the article and the fabrication of either the centerboard or rudder. Any plain sawn lumber will warp, twist and cup. The article is showing how to eliminate that tendency. Using Quarter sawn or verticle grain material will make it much more stable to fabricate and a vastly superior finished rudder or centerboard.
-
 1
1
-
-
Great to hear from you Mark. Been wondering just how all three boats have been holding up. Kits grow older and more experience and interests. Often at the expense of earlier interests. Boats can be a huge part of their life and continue on thru their lives if we can just keep them involved. Sounts like it is time for a larger boat?
-
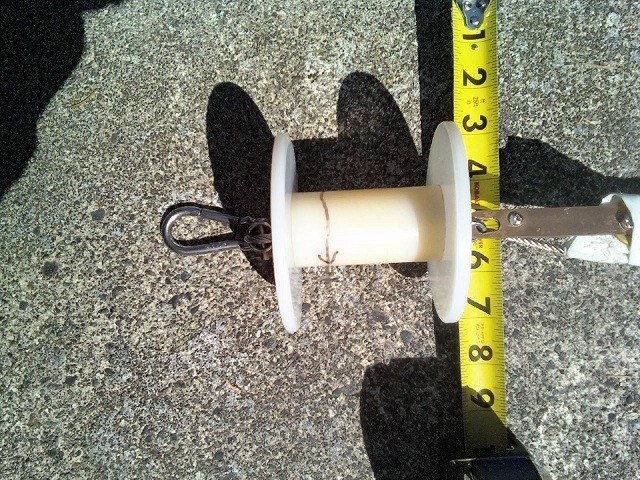
These are photos of Capt. Jakes furling spool(s). He had one on his Lapper and one on his foresail. A modified standard jib rigged to fly inside the Lapper on a clubfoot. Together they were more trouble to use than it was worth to try to sail with both of them. Seperately, the Lapper is perfect for the majority of the wind conditions we see on Puget Sound and when it gets to the point that you need to reef down the main, the modified jib on the clubfoot offers a nice balance. The furling system(s) both work beautifully.


-
http://www.thechandleryonline.com//product.asp?dept%5Fid=1735&pf%5Fid=151%5FHR2080
These swivels work just fine. For both top and bottom swivels.
The Ronstan furling package is an excellent system as is the Harken small boat furling system. Schaefer makes one as well as does RWO.
All of these systems use a luff wire sewn into the sail. The luff wire is terminated top and bottom with an eye that is sewn into the sail. The sailmaker that modified the lapper shown here used a simple flat strap that bolted to the eye and connected to the top eye of the spool. This gave an absolute twisting to the sail and spool with no play between the two. If you use a top swivel such as the one Duckworks sells, the spool has a wire that sticks out and attaches to the forestay that keeps the swivel stationary at the top. This keeps the halyard from twisting with the luffwire. In practice, we've had no issues with the swivels shown in the link.
I'll take some more detailed photos of the fittings and how they go together when I go over to the island later this week.
-
This is one of the spools. It is UHMW poly sheet and solid UHMW poly rod. The center is drilled out so that an eye bolt with a threaded shaft can be run thru it. The flanges of the spool is compressed between the Eye on one end and a swivel is attached at the bottom. The swivel then clips onto an eye in the bowsprit where it can turn. The sail has a flat plate attached to the bottom of the luffwire and that is attached to the eye bolt on the top side of the spool. It is simple and works smoothly. The screw on the drum with an arrow pointing to it is to attach the furling line to the spool.


-
Mark, I'll get over to the island on Wed. and take some closeup photos of the furling spools for you that were homemade.
There was a fair amount of discussion on combining staysails with the standard jib on the Weekender a few years ago. At the time there were a lot of discussions on the Cool" factor vs the "practical performance" factors. The discussion led to Doing something similar to A Friendship type of setup but from a layout point of view the amount of space to make it work was not enough to make it practical nor was the actual increase in sail area considered enough to make it desirable. However...the over riding "Cool" took presidence. IT took Capt. Jake a long time to work out the geometry for the staysails clubfoot to allow it to furl and unfurl and to still allow it to function as a self tending staysail. On an outing with light winds we gave it the test. We got both of them set, tacked with them both (a real pain) and had some nice shape to both but when we furled the staysail, the boat with the lapper simply out performed the combination by a huge margin. So...the staysail has become the heavier weather jib, self tending and the main reefed down. Nicely balanced combination and easily managed.
Now this combination was using a lapper plus the staysail. The staysail was basically hidden inside the curve of the lapper. Getting the lapper to swing about the luff of the staysail to tack was quite an ordeal.
It was functional although difficult to manage cleanly. About 18 inches of seperation between the two.
-
For smaller stowable pads. Try the Kneeling pads for gardening. They are just firm enough that they give you good support but are fine for sitting on hard seats. They come in several sizes b ut you may have to look around for larger ones.
Closed cell foam for upholstery work is available in a wide variety of sizes. Also verying densities. Those used for cushions are about medium density as they are fairly thick. An "Upholstery Foam" distributor will have the various types you are looking for. Check The larger Fabric shops as well as the Upholstery shops who will be able to direct you or may have it onhand. Some of the "home improvement" stores may still have summer furniture pads instock. Some of them are fairly thin but firm.
-
RE: Furling systems for Weekender Jibs.
I've been sailing for basicly 5 years now with a Weekender with a homemade furling spool for the jib. No issues! It is for a Lapper, but could also be used for the standard jib and is on the Weekender Fire Escape. It will not work with a clubfoot on a Weekender. The geometry just doesn't work out to use a standard jib with the clubfoot and have it furl up when you need to quit. If you were to go forward unfurl the jib and clip it onto the clubfoot and unclip the clubfoot before quitting you could use the furler and have it self tending. But you would need a seperate furling line to the jib to unfurl it and then unclip that line and clip onto the clubfoot. Kind of self defeating.
We use two jibsheets with the lapper which makes furling and unfurling a no brainer. Same with a standard jib, if set up that way. No clubfoot.
The luff of the jib is modified by the addition of a luffwire, 1/8" 1X7 counterlaid stainless wire. Quite stiff. Any other gromments on the luff need to be removed and the luffwire sewn in. This will involve shortening the luff to eliminate the portion with any holes punched into it. The luff wire terminates at the head with a sewn in grommet and at the foot with another sewn in grommet. These allow you to attach the jib halyard and the foot to the furling spool which is mounted about 3" behind the forestay. A furling line is run from the furling spool back to the cockpit area thru small bullseyes and terminates at a cleat. To set the jib you would release the furling spool line but keep it taut and pull on the jib sheet to either side of the mast to set the jib. Then cleat off the furling spool line. When yo want to quit you pull on the furling line from the spool to allow you to furl (wrap) the jib around the luffwire. The two jib sheets are attached as normal. It is a tension act with both furling line and jib sheets keeping the jib taut between them. Once the jib has been furled you cleat off the jib sheets, and the furling spool line and the jib stays wrapped around the luff wire sewn into the leading edge (luff) of the jib. If you wanted to have the jib be self tending, you would need to go forward and attach the clubfoot to the jib and disconnect the jib sheets. When finished sailing you would need to reverse this in order to furl the jib.
The Harken small boat furling system is ideal for the Weekender. Schaefer makes one as do a few other firms but all are relatively expensive. All work on the same principle but they are not deisgned to reef the jib. That is another matter entirely.
The home made furling spools we use are formed from UHMW solid rod and sheeting. The rod becomes the cylinder hub for the spool and the sheeting is cut out into flanges for that hub These are all thru bolted together and a Schaefer swivel is mounted to the bottom of the hub to allow it to turn easily and another Schaefer swivel is attached to the jib halyard and the jib to allow the luff wire to turn freely as well. We have two of these on "Fire Escape" one for the lapper and one for a highly modified storm jib which has had the geometry worked out so it will furl with the smaller clubfoot attached. This storm jib is mounted behind the mount for the Lapper allowing us to use both or either. with both being able to be furled.
I'm doing the same thing but with Harken Small boat furling systems for a Lapper and a Standard jib on Spiritwind.


-
Glad to hear you had a good outing. Couple things to note regarding your gaff. If you have rounded over the inside edges of the gaff jaw, say with a 1/2" Round over bit in your router it will move easier and cause less wear. I've gone to craft stores and picked up pieces of leather that can line the inside edge of the gaff jaws. I've wet it to allow it to be formed around the pieces and wrapped it tight to the gaff jaws while it drys. Then glued it inplace with a Product called Pliobond which is an industrial strength contact cement. Then tacked the edges to hold them to the flats on the outside of the gaff jaws with copper flathead tacks. Then oiled the bejeebers out of the leather with a product called Lexol which is available at any feed and tack store or western wear store or most Ace Hardware stores. This will soften and protect the leather and can be reapplied a couple times a year. You can also wrap a thin sheet of copper around the area on the mast that the gaff rides against and bond it to the mast with the same Pliobond Industrial contact cement. Place the seam of the sheet of copper on the opposite side of the mast from the area the gaff jaws rub against and tack it down with the same flat head copper tacks. You can put a wrap of tape around the bottom and top edges of the copper sheet to keep it snug and flat against the mast itself. Spray on several coats of Polyurethane and the copper will stay bright and protected.
Do you have a Line running up between the mast hoops on the opposite side of the main sail? If not, go back to the plans and see how they run this up to the gaff and down to each ring to hold them level when raising the main. It also keep them level when under sail. If not the jaws will often hang up and cause issues in raising and lowering the main and on occasion can cause issues in the main sail taking a good shape under some points of sail or when tacking.
Sounds like you have the initial basics going OK for you. Check where each sheet runs when under sail under all points of sail. If anything is rubbing on them or they are running around any other parts of the rigging and getting hung up on them, then move those parts so the sheets are free to move and clear of any obstructions. Always seems like they get hung up at the point where you need for them to be moving freely and keeps you from doing what you need to do. Keep your halyards tidy and coiled out of the way while under sail. Keep the excess length on your sheets tidy and neatly coiled so that you don't have knots forming to prevent you from trying to have them run free. Keep all other items and materials stowed so that they are not going to cause anything to happen that you could have prevented. Never cleat off your main sheet. That is one sure way to have things happen suddenly that you can't handle.
The basic learning curve is generally quite easily managed. Each outing will help to set things in your mind and the things that don't work will be things to focus on and try to understand better. It will all come with practice and your confidence will build. Time to pick a point to sail to and then turn and sail back again several times. You will learn a lot about how you can adjust jib sheet, main sheet and peak halyard tension to allow you to sail comfortably in any direction. Yes, you will heel over unless the boat is heading directly down wind. The boat will feel much more solid when it is heeled over and the tighter you make the jib sheet and main sheet and ajust the peak so that the sail doesn't have a diagonal crease runing diagonally on the main, the faster you will tend to go when heading into or across the wind. You can loosen up the jib sheet and main sheet if you feel that you are heeling over too far and not controlling it well and you will straighten up and keep on going at a lesser speed but still in control. You can always ease up on the main sheet and turn into the wind and you will have control again.
So go have fun and try adjusting tension on the sheets and peak under different points of sail and you will feel the difference in how the boat responds. It is usually very nimble.
-
Hurrah! Was wondering if you had actually had a launch. Glad you are having a good time with your Project. Nothing like having it in the water and getting it wet.
-
You do not want to support the boom with the topping lift while sailing. You only want to have the topping lift taut when you drop the sail to keep the boom from dropping to the deck.
Using the peak halyard will become second nature and you will feel a dramatic difference when under sail by adjusting the tension on the peak. If you have diagonal wrinkles in the main, you need to adjust the peak tension so that the main sail takes a smooth shape with no wrinkles across the diagonals. Going down wind you will find that you will loosen the peak somewhat so that the main fills and has more power. Going cross wind or up wind you will find that tightening the peak will flatten the sail giving you more power going on those points of sail. If you keep the topping lift taut, the main will have a ridge running across it from the aft end of the boom to the top where the topping lift is creating a crease in the shape of the sail and the main sail will not function as well as it could nor will adjusting the peak halyard have much effect. Under sail the topping lift should be slack so it doesn't interfere with the sail shape.
If your boom hangs too low when undersail, you may well have the mast at the wrong angle just as others have done. That is easily corrected. With the mast set at the correct angle the boom should hang with ample head clearance unless the main sail is not the dimensions as designed.
-
Great Mark!
That is the way it should be done. You will notice when you are under sail that the tension on the shrouds will change as you sail. The more pressure there is on one side or the other the tighter the stay will be on that side as well. Often the stays on the opposite side will be a little slack. Learning to adjust them for more or less equalized tensionwhen there is no difference in pressure is part of learning how to adjust your rigging for it to perform well. Having a bit of forward rake to the mast was essential to this design to keep the Weekendr from having too heavy a helm. (Weather helm). While under sail if you to release the helm The boat should turn into the wind on its own until the boat points directly into the wind with both jib and main fluttering with equal pressure on both sides of the sails. This is turning into the weather. If the pressure on the jib were greater than on the main the boat would turn away from the wind and this is called lee helm. This can be very dangerous under some conditions if the helm has been released and it happens on its own. These boats are designed so that they have some weather helm for safety reasons. As you gain experience and you have a better feeling for how things feel under varying conditions you can tweak (tune) things to give you better control and to increase performance a bit.
Initially learning how to tack consisitenly and how to adjust the peak halyard for best mainsail shape and power and then how to detune it to loose power will be a major goal. You may want to add telltails to your sails as you get further along and get used to how it handles. These will allow you to see how the air flows over the leading edge and across both sides of the sails. You will find out how changing tension on your halyards or sheets can allter the sail shapes enough to give them better shape and performance.
It is going to be a lot of fun. Just take your time, don't push things too far initially until you get used top how it handles for you. Learn the safety tips, follow them. Learn hot to sail the boat in a 360 degree circle around a fixed point and how to get to a fixed point from all points of sail. The learning curve can be fast or as slow as you take it. Just don't be afraid to ask questions. :grin:
-
Wedges (Tapered Shims) are commonly used to take the slack out of the mast box and keep things in place. What you lost was the thickness of the kerf caused by cutting the mast base. If you wish, others have added a small shim to the bottom leading edge of the masts base that is the thickness of the kerf to keep things as they were as well as at the top of the mast box to keep the same dimension at the deck level. Yes, the forestay will be shorter than before. The aft shrouds will need to be slightly longer than before. The top of the mast has moved forward quite a bit. Adjust the length of the forestay so it is fairly tight when you set the mast. Adjustment for tension should then be done with the turnbuckles on the shrouds just as before. I know this might be an unknown for you since I got the impression that you hadn't raised the mast for sailing as yet
Then a boot is placed around the mast that will keep water from running down the mast and into the mast box. This generally requires a wooden curb around the mast at the deck level. This would be done regardless of what you might have needed to do to get the mast at the correct angle. This is not addressed in the instructions from the plans.
-
And that is how you make a bent mast base. Far easier than trying to adjust the bulkhead or mast box angle. Should move that mast top quite a bit forward and give you good headroom under your boom while sailing. Not to mention that you will have a better balanced helm. :cool:
-
I would! Take a 3 degree wedge off the back side of the mast base from base to deck level and re-attach it to the front side of the base. You will be amazed at how far it will move the trailing end of the boom up. It will help with tacking, and help in keeping the helm from feeling so heavy when under sail.
-
Mark,
This topic has come up several times in the last few years.
http://www.messing-about.com/forums/index.php?topic=4351.msg36439#msg36439
Click on the link above and it will bring up a topic. Nerdy Sailing Stuff that has a drawing I posted back in 2006. Double click on the drawing and it will enlarge for you.
-
Sorry , I didn't intend to hijack this thread either. Mark, I'm posting a reply to your launch thread.
-
Mark,
You may want to double check the angle of the base of the mast to the bottom of the boat at the forward surface of the mast box. If it isn't as set on the plans, (93 degrees) then it would be best to change that angle thru some sleight of hand with shaping the mast base before you go out. Too much of an angle and the boom sits low the boat has too much weather helm and you will have trouble with handling and not understand why. Can be very frustrating to a person trying out a new boat. :? Tacking will be extremely difficult if not impossible and you will have handling issues from the get go. Not to mention that you will really need to duck to keep your head from getting hit by the boom.
If that angle is more than 93 degrees then take not of how many degrees it is more than 93.
The easiest solution is to take a wedge cut off of the aft side of the tabernacle equal to that measurement and then attach that wedge to the front side of the tabernacle. From the side it would now look like the mast has an elbow in it that will adjust the mast to sit more upright when raised to a 93 degree angle. This will raise the boom so that it sits where it should, give you top of head clearance and give you less weather helm so that the boat is easier to control and sail.
I've seen and applied this fix to two Weekenders in the past. One had front of mast box angle set at 112 degrees. The boat had been purchased by a friend thafrom a builder that couldn't get it to sail at all. Bad enough that the original builder had recut the main sial to raise the boom enough that it offered some clearance above the cockpit but still not enough to offer clearance. Couldn't get it to sail because it turned right into the wind and he couldn't get it to sail in any direction. once he cut a wedge off the base of the mast (19 degrees) cut from the aft side with base tapering to nothing at the deck level and attached it to the front of the base he had a boat thata sailed pretty well. Then he needed a new main sail. cut to the correct dimensions.
Other one had an angle of 107 degrees. Same story.
In both cases the front bulkhead and mast box had been set at the wrong angle during the early stages of building. So...rather than tearing things out this simple fix works and your mast (above deck) will be at the right angle.
If this isn't clear, I can make up a little drawing for you if it will help.
-
Looks a lot like Meranti to me too.
If you are going to try to bend those strips around the compound curves of the boat, they need to be a lot thinner and then laminated. Ideally it would take a multiple part form with the twist built into it. Thinner strips and if steamed (or boiled) sandwiched around the form and clamped solidly in place. Once they dry completely, you can then lay them up in the form with epoxy between the laminations. Say three 1/4" thick strips laminated. Once set up in the form with epoxy to glue them together after being preformed. you could expect to take them out of the form and they will stay almost exactly the shape of the form with little or no spring back. Finishing them out with a nice mahogany gel stain and then varnish and they will not look funky. They would be beautifully done. But, is it worth if for this project to do that?
If you back up the plywood sides of the boat so they are held to the shape you want when finished, you could then drill oversized holes on the inside of the bend in the form and using clamps just glue up the strips with epoxy and they will stay the way. Working with full thickness you will break them with this type of wood and they will splinter and crack. Working with thinner strips to make up a full laminated strip that is full thickness they will bend far easier and take the twist as well as the bend. But have lots of clamps available. Once the bow curve is done, the rest of the way back is easy to manage.
Done lots of this in the past and it just takes the patience and the willingness to do it in thinner strips or set up a form and a steam box to do it right. I would still expect that you might have breakage around the bow curve and twist. Frustrating to say the least. Patience and thinner stock will do the job. If you can cut up a couple more sticks of this into 1/4" thick by full width strips you will have a much more managable project with little chance of not having it come out right. But it takes the prep work to make up the form to be on the inside of the bend. Not that it is particularly difficult to do. A couple layers of 3/4" particle board cut to shapeglued together into a 1 1/2' thick form and faired into the inside of the front curve. Large enough holes drilled for a clamp to hold to on the inside and pull the strips into alignment and a strap or small blocks to hold the outer layer of the strips inplace with the clamps. Let them cure for a couple of days before removing from the form or removing the clamps.
-
Poly Tarp sails, if taped together, may give you a couple seasons worth of use in light to moderate winds. Provided you take care of them and don't let them winter out in the weather. If sewn and made the same way as a Dacron set they will [potentially] last quite a bit longer provided they are well cared for. I've had higher quality poly tarp sails last 5-6 seasons of light use on small boats. But they were sewn and reinforced the same way as a professionally made set of Dacron Sails.
The biggest factor in my mind is that you can put together a set of usable Poly Tarp Sails for a Weekender for under $75 if you tape them together and are not concerned about appearance or longevity. They will get you on the water, get you used to how your boat handles and allow you to have some fun. If they don't last, not a big deal to make another set with some shape made into them and have them perform better than the first set, assuming you make them with some care and follow the instructions.
Dacron sails have several advantages. First is that the material doesn't fray and get misshapen under use for many years. Secondly, Dacron sails are available in lots of differing weights for varying conditions. For the Weekender, PC or Vacationer, They don't need to be very heavy material since these boats perform quite well in light to moderately heavy wind conditions. With reefing points they become more versatile yet. They have all the contours made into them by the sailmaker and will in most cases perform extremely well for many years. They will also allow you to have a consistent performance by which you can tune your rig and take advantage of the learnig curve offered with continued use of your boat.
If you are paying a professional sail loft to make up a set. Dacron will cost more than Poly tarp fabric and last far longer. Labor is about the same.
If you are one that wants to try out various modifictions to a sail for your particular conditions, poly tarp sails allow you to experiment for little cost and see what might be worth investing in a custom set of Dacron after you have found out if you will get the use from them to justify their cost to you.
The sails offered by the Stevensons are excellent sails. You wouldn't be unhappy with them.
-
One common situation that has a really adverse effect w/new to sailing buddies that you should check.
As Konrad alluded. Check out a number of things including how you have the rudder installed. Also check rudder swing to port and starboard from dead center. If you have more than about 30 degrees to either side of center you are in all likelihood causing the rudder to stall when you are turning. To understand what I mean, hold your hand out of your car window while driving with your hand flattened and edge of your hand into the wind. As you turn your wrist, feel what happens w/airflow over your hand. You reach a point where the air no longer flows over your hand but blocks it. That point is at about 30 degrees off of the wind. Same thing happens in the water. To see what I mean, take a flat board along or a paddle. Hold the board or paddle down into the water while moving. As you turn the board or paddle you feel the board or paddle moving well up to a point. When you get much past 30 degrees they will feel like you are blocking the flow of water and you are. It acts just like a brake and you slow down substantially, especially when you try to come about in a tack.
I've advised a number of builders to install blocks to limit the side to side movement of the tiller so that you are limited to about 30-33 degrees. Then the rudder will act more like a foil and help you thru the turns rather than acting like a brake when you throw the helm over all the way to try to tack or turn. The blocks can be on the underside of the rear deck with rubber cushions on the sides like hinge stops for doors. They work well and can be fine tuned with stop nuts on them to keep them stationary. Or if you are using a tiller, the blocks can be on either side of the rudder box on the transom.
Your speed does need to be kept up. Most people try to point too close into the wind while working upwind. The boat heels over more, and you feel like you are really moving well and quickly but if you ease off a bit on the main sheet as Konrad stated and ease off of the wind a bit you will flatten up a bit, your speed will actually increase a bit and then you shouldn't have any problem in light to moderate winds to tack.
Another thing to check is the angle of your mast. If it isn't at the right angle you can have too much weather helm or too little. Too much makes the helm heavy even in moderate winds and want to turn directly into the wind. That is being locked into irons. You have a difficult time getting the boat to turn away from heading directly into the wind. Too little and the boat will not track straight without constant attention. And a shifting wind can cause you to loose control. Letting the helm go and the boat may well turn away from the wind and that can be really dangerous. A little weather helm is good, too much makes a hard to turn and tack boat, too little makes it hard to control or dangerous.
Sitting on the down wind side to induce heeling is fine on a Weekender or Vacationer provided the winds are really light and you have a pretty well balanced helm with a tendency to turn into the wind if you release the helm. If not, and it is not almost flat. better off staying on the upwind side where you have better control and changing sides after you have pased thru the wind and are settling down into a new tack.
Remember, it is hard to point closer to the wind than about 45 degrees off to either side in one of these boats if they are not really well balanced and finely tuned. Any closer than that and you are likely fooling yourself about speed and how well things are handling.
-
Sounds like it is time for a little knowledge on suitable materials for building. Invest a little time on the following website. www.glen_l.com Look at the section on woods for boatbuilding. Well worth the read and the time invested.
You should be able to find a lumber dealer in one of the larger communities with a little yellowpage search. I've found good douglas fir at reasonable prices and even marine plywood at most of them. Unfortunately the big box stores sell for the home improvement and contractor trade. Building stationary boxes on foundations. Not a place to find appropriate woods for boat building.
Problems: Poplar will essentially fall apart when it gets wet and goes thru a freeze/thaw/heat cycle. Unless it is Tulip Poplar. And that is not what is sold at the big box stores. The poplar they sell is good for making book shelves and cabinet parts for indoor use.
Red Oak will soak up water, turn black and rot from the inside out in boat use. White Oak is great.
Maple isn't a great material for boat building either but great for cabinets and furniture.
Mahogany is fine but can splinter and crack easily when you try to bend it.
White Pine boards from the box stores. Not suitable either for boat building. gets mushy.
Gleen what you can from the Glen-L site, the information was great 20 years ago and is still valid today.
Let your fingers do the walking and ask questions about materials that the lumber yards can get for you.
Another site to check out and they will know what you need. www.edensaw.com
-
Joel,
Yes, I am without question going to finish Spiritwind! The only question is when. Life has a way of getting in the way of what we would really like to be doing. That plus weather. If this year is a duplicate of last year, we may have had our good work days until mid summer.
I'm in the process of getting the rigging installed right now. The plan is to have Spiritwind in the water this summer. Sailing! :


Getting an 80' rig under a 60' Bridge
in Main Forum
Posted
It can be a loooooonnnnnnnggggggg way around in much of the intercoastal. Very clever!