Leaderboard


Popular Content
Showing content with the highest reputation on 03/24/2020 in all areas
-
I didn't think "missing centerboard" either and I still don't. And it wouldn't make sense either as the up-haul line AND the pivot bolt would both have to be cut/removed for the board to be missing else we would see the board dangling by a line. In the picture of the boat after it capsized the view of the trunk I see as consistent with the board just being completely retracted. Even if there was a bumper installed at the top of the trunk I wouldn't really expect to see any of the board except maybe a glimpse of the very fwd part which I think i see. It's certainly a wake-up call to anyone who takes their boat out alone.2 points
-
Like everyone else, I've read the accounts and looked over the CG photos with a really awful pit in my stomach. I am really sorry for Jim under any scenario I can dream up to explain what went wrong. The mind begs to understand what happened, and I am completely embarrassed i hadn't noticed that the CB appears to be missing, and not just retracted. Granted, it's hard to imagine how the CB could drop out, but on my boat, at least, even without the bumper, the forward-most leading edge would still be visible from almost any angle with the board completely retracted - it's recessed maybe 3/4" from the bottom. Trouble with his CB might explain how he got so far downwind and off course, and perhaps suggests a way to explain his going overboard. Graham and Alan, I cannot imagine how hard this must be on you both. We love the boats you create - they're sound, seaworthy craft that we're proud to own and sail. Keep up the great work.2 points
-
Mini 6.5s are required to paint their rudders and canting keel bright orange for easy spotting when capsized. Something to consider if you are sailing off shore or in races like the Everglades Challenge.1 point
-
Amos, We do, here is that link.


 1 point
 -
I used the B&B technique and it worked very well. The natural sag of the tape works to your benefit. The B&B plans should have drawings and instructions how to do this. It is a little confusing reading about it, but easy to do once you get started.
 1 point
 -
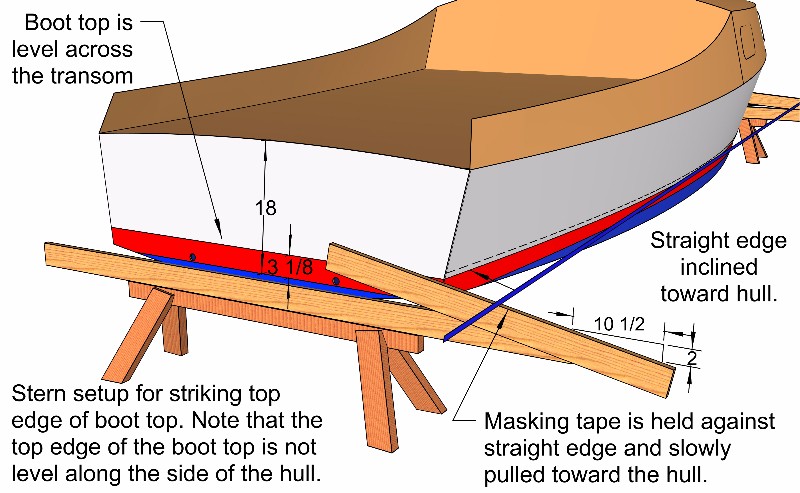
You cannot go wrong if you follow the waterline method that Alan illustrated for putting on the WL and boot top. It is one of the most critical cosmetic components you will add to the boat, get it wrong and the boat will look sad. The most common mistake that I see is that the boot top is measured up the slope of the hull instead of vertical. On boats that have flare forward at the wl or have a counter stern, it causes the boot top to look narrower at the ends giving the boat a frown rather than a big smile that says "look at me". If you do not get the boot top right, leave it off. On high sided boats it will make the boat look longer and sleeker. The proportions of the boot top have to be just right and are different for each type of boat and freeboard height. We give the dimensions on our boats as to where it should be. As Steve said do not put it too low . Small boats are almost never in perfect trim and the water is rarely flat. Small ripples will make the water appear higher on the boat than it is. If you put it exactly on the DWL, part of it will usually be underwater. I prefer the scum line to be on the bottom. I prefer to put the waterline on with the boat upright as there is always some sag or catenary in the string or tape and it could look hogged if it is put on upside down. A tiny bit of rocker in the WL always enhances any boat. I long ago gave up on the string method because you have to do the job twice and best way to put the tape on fair is to pull the tape out a long way as you lay the tape on the hull, why not use the straight edge as a guide? As the illustration shows, put on the stern straight edge on first because you can measure it accurately at both chines to make it truly level to the boat athwartships. Remember to position the straight edge down by the width of the tape. Then position the forward straight edge at the right height forward and make sure that it is in plane with the aft one. It makes sense to do the boot top right after you mark the WL because you have the setup and it will be more accurate than trying to re setup later on. 1" masking tape works great and it is easier to apply if you have help because the tape will slide down especially forward and you do not want that to happen. I put a step ladder or sawhorse etc to anchor the aft end of the tape positioned a foot or two beyond the stern so that I will have enough length as I pull the tape in to the stern. I want the tape pulled out for the whole length of the boat parallel to the boats CL with the lower edge kissing both straight edges and held vertical. I do the bow first and holding the roll out a couple of feet forward of the forward straight edge, start moving the tape inwards with the bottom kissing the straight edge while trying to keep some tension to reduce sag. As soon as tape touches the hull have your helper touch the top edge of the tape and continue touching the as you move inboard. When you go around the chine forward there will be a bridge where the tape will hit the bottom 6" to a foot forward of the chine, this is normal, keep going until you reach the bow. If it looks good you can pat the tape on to the hull pushing the bridge horizontal to keep it fair. While you are concentrating on three things at once it is easy to get the bow wrong by rotating the tape on the vertical axis causing the tape not to be straight. Just pull the tape back out for as far as you need and fix that section. Only after you are happy with the line should you pat the tape down to the hull. Repeat for the stern half and do the other side. If you are going for the boot top follow the directions for setting up the short angled straight edges. Taping the boot top is identical to the Wl with one exception. For the WL you want the top edge of the tape to touch the hull first. On the boot top you want the bottom edge of the tape the touch the hull first. This can be accomplished by holding the tape roll horizontally and rotate it as you move it along the straight edge so that it touches the hull with the bottom edge. This sounds more complicated than it is. While a laser is a valid method and appeals to the gearhead, you still have to put on the tape smoothly and when you factor in where to remount the laser in space to get the right curve to the boot top and get it exactly right again for the other side of the boat is harder or less accurate where as the sloped straightedge method is mathematically correct. Do not forget to really press down the tape edge that meets the paint or the paint will bleed under the tape messing up your beautiful work. I usually run the blade of a putty knife along the paint edge of the tape and run my thumb nail into any tape joins that will make a tiny bridge. Or you can spring for 3M's fine line tape.1 point
-
The masking tape method looks interesting and I might give it a try sometime. I marked the waterline on a friend’s CS 17 using a laser level and it worked out well. The boat was blocked fore and aft so that the level registered to the design waterline marks on the bow and stern as taken from the plans. Then the boat was leveled side to side. The laser line was traced onto the boat. Then the laser level was raised 2.5 inches and the upper line was traced. The “as painted” line was wider at the transom and noticeably wider at the bow due to the slant of of the hull at those points. If you try this method it is important to trace the laser line onto the hull continuously or with a mark every two inches or less. Otherwise connecting the dots will not give a true curve. And I recommend a self leveling laser (Bosch has a good one for a reasonable price). The laser has a pendulum to compensate if it is set on an uneven surface. As for waterlines in general. It is standard practice to mark the waterline and bootstripe higher than the actual waterline so the boat looks like it is floating high in the water. And, since the waterline stripe will naturally appear to rise toward the bow and stern (being farther from the eye) some builders actually paint the line closer to the water at the end points so it appears flat to the water. An example of this is building a strip canoe, in which the strips are bent downward slightly toward the ends so the canoe doesn’t look too “smiley” when viewed on the water. That is my 2 cents. I did not put a waterline stripe on my boat. But every time I take the boat out of the industrial Menominee River I have to wash a waterline stripe off of the boat.1 point
-
That method Graham shows is to get a variable waterline, which might be best for our light boats, whereas the video is to get a straight one. An alternative is to put the waterline a bit higher than normal. I think a waterline that is too low (right at or below the waterline) looks bad. I haven't done anything on Skeena but I'll be watching.......1 point
-
There are numerous ways to draw your waterline. Carefully because it is one of the first things everyone will notice at least for the first year. This is some suggestions from some of the forums best. Though it is hard to go wrong watching Lou. https://messing-about.com/forums/topic/9887-grahams-bootstripe/?tab=comments#comment-904171 point
-
There is some talk on the Everglades challenge 2020 page about boarding ladders. One of the things I learned years ago in a very scary incident was that even a very fit person has trouble re-boarding a boat with high free-board when wet and fatigued. I added a ladder I saw at the messabout that I'm not sure who's boat it was, but I couldn't be happier with it. Here it is: 2020-03-17 17.07.57.mp4 I had a chance to swim a few times and it was easy to hold the top of the transom and deploy the ladder with one hand. As the ladder locks out at a nice angle I could easily use my legs to climb up. In any case, a good ladder is essential. I had a god-awful rope ladder on my Sea Pearl and it would swing under the boat and I usually just hoisted myself up, but I'm not sure in an emergency I could. Stay safe everybody.1 point
-
The Coast Guard has suspended their search for SailorMan, Jim Slauson. Even as the other participants celebrate their completion of the course it is impossible to forget this one that did not make it. Congratulations to the finishers and God Bless Jim Slauson and his family. Safety was one of the features of BandB boats that appealed to me. I think it is one of their strong suites. The capsize camps and development of mast head floats have demonstrated a continued commitment to safety at sea. However no matter how safe your vessel there is going to be a certain amount of risk involved. The skill and decisions of the crew have a huge impact on vessel safety, but the power of the sea can overwhelm even the wisest and most skilled mariner and founder the best boat. I have for the last few years carried a PLB in the center pocket of my PFD. To activate it I would have to remove it from the pocket, deploy the antenna and depress the proper button. There is a power and a test button of similar size located close together. I can accomplish this pretty easily on dry land, when I am well rested, during daylight hours so I can review the instructions on the back. However..... There is beauty and a unique satisfaction in going to sea in a boat you have made. Let us be as safe as we can and look after each other and cherish those wonderful hours on the water.1 point
-
There was some questions about electrical systems. I'm not sure mine is totally complete. I may add a pump for the ballast, and that would indeed add to the needed capacity, but so far so good. https://www.youtube.com/watch?v=PRdDjnZ5T8c1 point
-
Time flies gentlemen. Here is Teddy, the cute kid sailing the Spindrift 11N in the link in my signature, who turns 18 next week, this past August sailing Skeena.1 point
-
You will need two long battens struck horizontally across the bow and transom at the height of the water level. They should be long enough so that line pulled across the top of them and parallel to the boat centre line will touch the extreme width of the hull. Mark the three points: where the string touches the hull and the two points on the battens. With two people - pull masking tape across the sticks and watch it pull a perfect line on your boat. With one person - I stick the tape at the mid point on the hull an pull one way and then go back and pull the other half. Take note that the upper edge of the tape will be the bottom of your bootstripe. Graham likes his bootstripe to have an upward tick. On the 17' the stripe goes 2.75" -1.5"- 2" bow mid stern. The 28' goes 6" -3" -4". The smiley effect helps cover up out of trim flotation. Figure out your stripe ratios. For example let's go with 5"- 3" -4". Meaning that the stripe will be 5" wide at the bow, 3" amidship and 4" at the stern. What you need to do now is to rig up two ramps -one in the bow one in the stern. In the bow fasten the inboard end of the ramp 5" up from the horizontal batten at the centerline. The other end will slope down so that at the mark you made earlier it is 3" above horizontal. Do the other ramp going from 4" to 3". Now pull the tape across, - it should touch the hull 3" above your lower tape at midpoint -stick it to the hull and walk the ends up the ramps. Pay attention and go slow because now you will be pulling a curve so the tape needs to be tweaked up in a gentle arc rather than a straight line. Let your eye be the judge - as always. The actual positioning of the boostripe is an individual choice. Should the waterline go through the middle of the stripe, should it be just above,a bit proud of it in anticipation of heavy crew? So many choices, so many opinions. Good luck with it. PeterP1 point
-
Great illustrations. I remember Graham saying that the boat doesn't even need to be level. Set the aft straight edge so that it is correct at each transom corner---even with the boat not level. Then set the front straight edge parallel with the aft one. You can get back a little way from straight ahead of the bow strait edge and "eyeball" it to parallel the aft one.1 point
-
Graham (or Alan) sent me the following four diagrahams. I'm building a Cs20.3 -- so I assume they apply to the 20 footer and not the Cs17. But I'm not sure. Maybe these will help.


 1 point